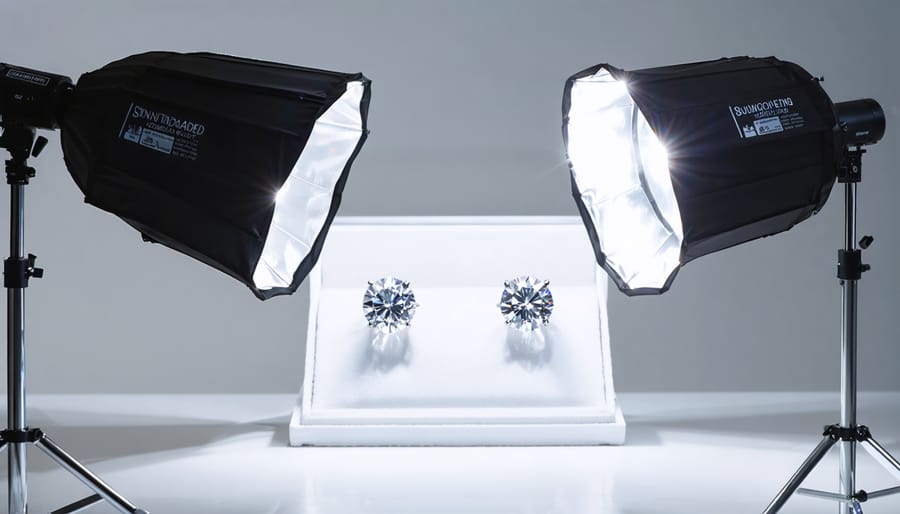
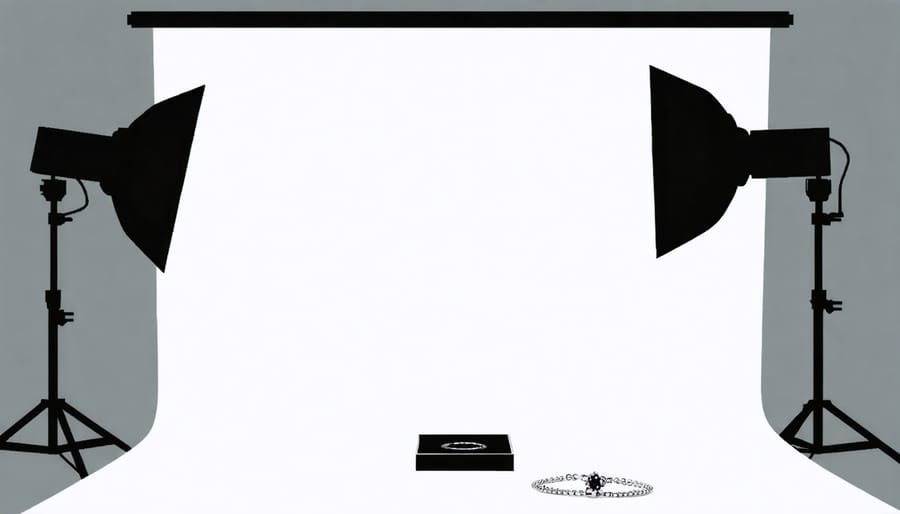
Transform ordinary jewelry shots into stunning commercial images with precise lighting control and professional-grade product photography lighting techniques. Position two softboxes at 45-degree angles to eliminate harsh reflections while maintaining the metal’s natural brilliance. Mount a small LED strip light directly above the jewelry to capture the sparkling facets of gemstones and create compelling highlights that draw viewers’ attention. Deploy a light tent with diffused overhead lighting to achieve even illumination across intricate pieces, eliminating unwanted shadows and maximizing detail retention in both metallic surfaces and precious stones.
Master these foundational setups, and you’ll consistently produce magazine-worthy jewelry photographs that showcase every delicate detail, from the subtle textures of precious metals to the fire within diamonds. Whether shooting rings, necklaces, or elaborate pieces, proper lighting transforms challenging reflective surfaces into opportunities for creating dramatic, professional results that command attention and drive sales.
Essential Lighting Equipment for Jewelry Photography
Main Light Sources
When it comes to essential lighting equipment for jewelry photography, you’ll primarily choose between continuous and strobe lighting systems. Continuous lighting, such as LED panels, provides what-you-see-is-what-you-get illumination, making it easier to adjust your setup in real-time. These lights are particularly beneficial for beginners as they help visualize shadows and reflections instantly.
Strobe lighting, while requiring more experience to master, offers powerful, crisp illumination and faster shooting capabilities. These flash units freeze motion perfectly and provide consistent color temperature, which is crucial when photographing metallic surfaces and gemstones.
LED panels have become increasingly popular due to their versatility and temperature control. Most modern panels offer adjustable color temperature and brightness, allowing you to fine-tune the light quality for different types of jewelry. They’re also energy-efficient and generate minimal heat, which is essential when working with delicate pieces.
Ring lights, while commonly associated with portrait photography, can be excellent tools for jewelry shots, especially for capturing pieces with centered stones or symmetrical designs. Their circular shape creates even illumination and attractive catchlights in reflective surfaces. However, they work best as supplementary lighting rather than your primary light source, as they can sometimes create flat-looking images when used alone.
Light Modifiers
The key to capturing stunning jewelry images lies in understanding and effectively using lighting modifiers. These essential tools help you control and shape light to bring out the best in your jewelry pieces.
Softboxes are your best friends when it comes to creating soft, even lighting that minimizes harsh reflections on metallic surfaces. A small softbox (12-24 inches) positioned at a 45-degree angle to your jewelry creates beautiful, gradient highlights while maintaining detail in the shadows. For larger pieces or sets, consider using multiple softboxes to ensure consistent illumination.
Diffusers play a crucial role in taming direct light sources. A simple translucent diffusion panel placed between your light and the subject helps spread the light evenly, reducing unwanted hotspots on gems and metals. This is particularly important when photographing diamonds and other reflective stones.
Reflectors are indispensable for filling shadows and adding controlled highlights. White reflectors provide subtle fill light, while silver reflectors create crisp, specular highlights that can make gems sparkle. Position them opposite your main light source to bounce light back onto shadowed areas. For precise control, small folded cards or mini reflectors can target specific areas of your jewelry.
Remember to experiment with different combinations of these modifiers. Sometimes, the perfect shot might require a softbox as your main light, a diffusion panel for overhead fill, and a small reflector card to highlight a particular gemstone.
Basic Lighting Setups for Different Jewelry Types
Lighting for Metallic Jewelry
Photographing metallic jewelry presents unique challenges due to the reflective nature of precious metals. Gold, silver, and platinum each require specific lighting techniques to capture their true brilliance while avoiding unwanted reflections and hotspots.
For silver jewelry, diffused lighting is your best friend. Use large softboxes positioned at 45-degree angles to create even illumination while minimizing harsh reflections. A white bounce card placed underneath can help fill in shadows and bring out the metal’s natural luster. Consider using slightly cooler light temperatures (around 5500K) to maintain silver’s crisp, clean appearance.
Gold pieces require a warmer approach. Position your main light source at a 45-degree angle, but experiment with a slightly warmer color temperature (around 3200K) to enhance the metal’s natural warmth. A gold-toned reflector can add subtle richness to the shadows, creating depth while maintaining the authentic color of the piece.
Platinum jewelry demands precise control over contrast. Use multiple small light sources rather than one large softbox to maintain the metal’s distinctive bright white appearance while preserving its subtle grey undertones. Position your main light at a 30-degree angle and add a fill light at the opposite side to prevent excessive shadowing.
For all metallic jewelry, consider these essential tips:
– Use a polarizing filter to manage unwanted reflections
– Keep your lighting setup symmetrical to ensure even illumination
– Experiment with black cards to create controlled reflections that add dimension
– Clean the jewelry thoroughly before shooting to avoid distracting spots
– Consider focus stacking for pieces with significant depth
Remember that subtle adjustments in light positioning can dramatically impact the final image, so take time to fine-tune your setup for each piece.

Gemstone Lighting Techniques
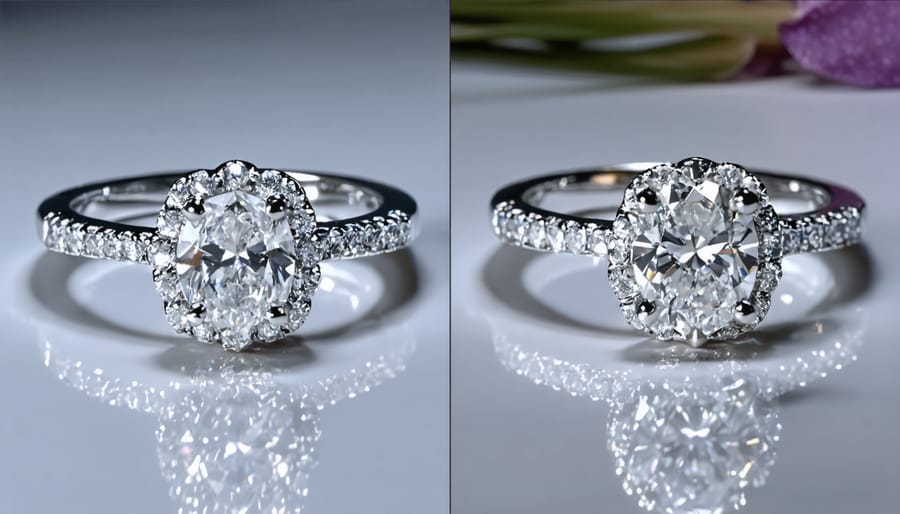
Capturing the fire and brilliance of gemstones requires specific lighting techniques that bring out their unique characteristics. For diamonds, the key is creating controlled specular highlights that showcase the stone’s sparkle and clarity. Position your main light at a 45-degree angle above the stone, then add two smaller accent lights at opposing 45-degree angles to create those coveted bright spots that make diamonds come alive.
For colored gemstones, diffused lighting is your best friend. Use a softbox or lightbox to create even illumination that reveals the stone’s true color while minimizing harsh reflections. Position your main light source directly above or slightly in front of the stone, then use white reflectors on either side to fill in shadows and enhance the gem’s natural color saturation.
To capture the internal fire of stones like opals or alexandrite, experiment with backlighting. Place a small LED light beneath the stone (if the setting allows) to illuminate its internal structure and color play. This technique works particularly well when combined with front lighting at a low intensity.
Remember that different cuts require different approaches. Brilliant cuts need strong directional lighting to showcase their facets, while cabochons benefit from softer, wrapped lighting that highlights their smooth curves. Use black cards strategically to create negative fill, enhancing contrast and defining the stone’s edges.
For challenging stones like black diamonds or dark sapphires, try using multiple small catch lights positioned around the stone. This creates separation between the facets and prevents the stone from appearing as a dark mass in your images.
Lighting for Pearls and Matte Finishes
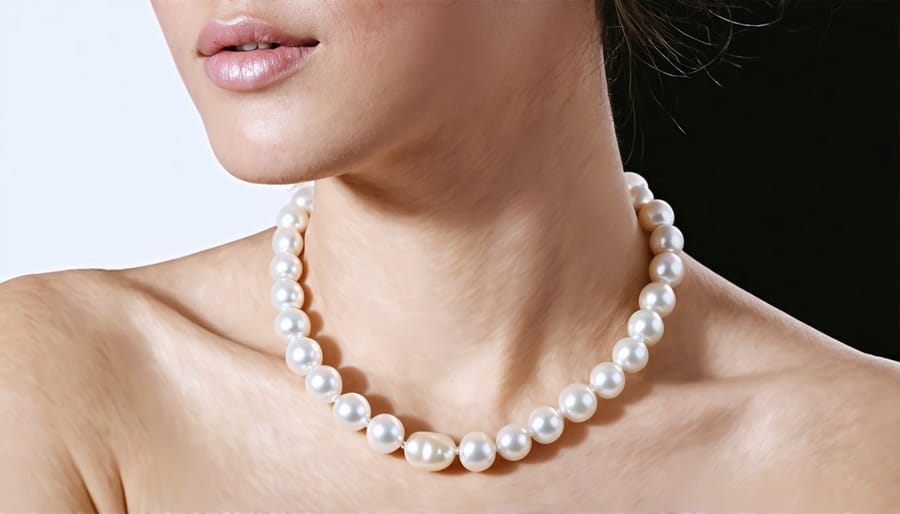
Photographing pearls and matte-finished jewelry presents unique challenges due to their subtle textures and non-reflective properties. Unlike highly polished metals and gemstones, these pieces require a softer, more diffused lighting approach to capture their delicate beauty.
For pearls, the key is to create what photographers call “pearl lighting” – a technique that reveals the gentle luster and organic surface variations. Position your main light source at a 45-degree angle above the piece, using a large softbox or diffusion panel to create wrap-around lighting. This setup helps highlight the pearl’s natural glow while minimizing harsh shadows.
A common mistake is using direct, harsh lighting, which can flatten the appearance of pearls and make them look artificial. Instead, work with reflected light by placing white bounce cards on either side of the setup. This creates a gentle fill light that brings out the pearl’s depth and dimension while maintaining its natural appearance.
For matte-finished jewelry, the goal is to reveal texture without creating distracting reflections. Use broad, soft lighting sources positioned slightly higher than the piece, typically at around 60 degrees. This angle helps define the surface texture while keeping shadows soft and controlled.
Consider using a light tent or multiple diffusion panels to create an even, wraparound light that reveals detail without hotspots. For particularly challenging pieces, try experimenting with black cards positioned strategically to create negative fill, which can enhance the contrast and bring out subtle surface details.
Remember to adjust your camera settings accordingly – matte surfaces often require slightly higher exposure compensation (+0.3 to +0.7 EV) to capture all the nuances of the texture. Keep your ISO low to maintain image quality, and use a tripod to ensure maximum sharpness, as these subtle details are crucial for showcasing the beauty of pearls and matte finishes.
Advanced Lighting Techniques
Focus Stacking with Multiple Lights
Focus stacking is a game-changer for jewelry photography, especially when working with multiple lights. The technique involves capturing several images at different focus points and combining them to create a single, tack-sharp photo where every facet and detail is crystal clear.
Start by setting up your primary and secondary lights as usual, ensuring they’re securely positioned. You’ll want to take multiple shots without moving the lights or the jewelry piece. Using a tripod is absolutely essential here – even the slightest camera movement can ruin the entire sequence.
Begin by focusing on the closest point of the jewelry piece and take your first shot. Then, adjust the focus slightly further back and capture another image. Continue this process until you’ve photographed the entire depth of the piece. Typically, you’ll need anywhere from 5 to 15 images, depending on the jewelry’s complexity and depth.
For rings with gemstones, focus on the front of the stone first, then the setting, and finally the band. With necklaces, start with the pendant’s closest point and work your way back to the chain. The key is to maintain consistent exposure across all shots.
Once you’ve captured your sequence, use focus stacking software like Helicon Focus or Photoshop to merge the images. The software analyzes each photo and combines the sharpest parts into one perfectly focused image. This technique is particularly effective when shooting pieces with significant depth or multiple gemstones, as it ensures every element appears crisp and professional.
Remember to check the final composite carefully for any artifacts or alignment issues, especially around the edges of metal surfaces where light reflection can cause stacking problems.
Creating Drama with Light Painting
Light painting adds a theatrical dimension to jewelry photography, creating mesmerizing effects that make your pieces truly stand out. By using advanced light manipulation techniques, you can paint with light to highlight specific facets or create dramatic streaks of illumination around your jewelry.
Start by setting your camera to manual mode with a long exposure time, typically between 5-30 seconds. Place your jewelry on a dark, non-reflective surface and dim the ambient lighting. Using a small LED penlight or fiber optic tool, carefully trace the contours of your piece while the shutter remains open. The movement of your light source will create striking light trails that emphasize the jewelry’s shape and texture.
For added drama, try incorporating colored gels on your light source or experiment with multiple light tools simultaneously. Crystal pieces particularly benefit from this technique, as you can create rainbow-like effects by painting different angles of the facets. Remember to keep your movements smooth and deliberate – jerky motions will result in uneven light patterns.
The beauty of light painting lies in its unpredictability. Each shot becomes a unique artistic expression, giving your jewelry photos a magical, almost ethereal quality that’s impossible to achieve with static lighting alone. Practice different patterns and movements to develop your signature style.
Managing Reflections and Highlights
Managing reflections and highlights in jewelry photography can be both challenging and rewarding. The key is understanding that not all reflections are unwanted – some add depth and sparkle to your images, while others can be distracting or reveal unwanted elements like your camera or lighting equipment.
To control unwanted reflections, start by using diffusion materials strategically. A light tent or softbox creates even, soft lighting that minimizes harsh reflections, but you can also use white paper or fabric to create custom diffusion panels. Position these materials between your light source and the jewelry to soften the light while maintaining the piece’s natural brilliance.
For metallic surfaces, particularly in rings and watches, consider using black cards or flags to block unwanted reflections. Place these cards at angles where you see distracting reflections, keeping them just outside your frame. This technique, known as negative fill, helps create contrast and definition in your images.
When photographing gemstones, pay special attention to the placement of catch lights. These small, bright reflections can make or break your image. Try positioning your main light source at a 45-degree angle, then fine-tune until you achieve the perfect sparkle. For diamonds and other faceted stones, multiple light sources might be necessary to capture their full brilliance.
Remember that polarizing filters can help manage reflections on certain surfaces, but use them cautiously with jewelry as they might reduce the natural shine that makes the pieces appealing. Instead, experiment with light positioning and diffusion materials to find the sweet spot between controlling unwanted reflections and maintaining the jewelry’s natural luminosity.
Troubleshooting Common Lighting Issues
Even with a perfect professional lighting setup, you’ll occasionally encounter challenges when photographing jewelry. Here are solutions to the most common issues you might face:
Hot spots and harsh reflections often appear on metallic surfaces, particularly with rings and polished pieces. To minimize these, try diffusing your light source further or adjusting its position slightly. Sometimes, moving the light just an inch or two can make a dramatic difference.
Shadow issues are another frequent challenge. If you’re getting unwanted dark areas, incorporate a fill card on the opposite side of your main light. White foam board works wonderfully and is an affordable solution. For stubborn shadows under gemstones, try placing a small reflector beneath the jewelry piece.
Color casting can occur when shooting mixed-metal jewelry or pieces with colored stones. Use neutral-colored reflectors and ensure your white balance is correctly set. If you’re still seeing unwanted color tints, consider using polarizing filters on your lights or lens.
Focusing problems are common with macro jewelry photography. To achieve sharp images, use a tripod, enable your camera’s live view, and zoom in digitally while focusing manually. If your camera has focus stacking capabilities, use it for complex pieces with multiple facets.
For pieces that won’t stay in position, museum gel or putty can be your best friend. It’s invisible in photos and holds jewelry securely without leaving residue. Just remember to clean the jewelry thoroughly afterward.
When shooting pieces with diamonds or crystals, you might notice some stones appear dull. Try experimenting with background colors and lighting angles to bring out their sparkle. Sometimes, adding a small spotlight focused specifically on the stones can create that desired brilliance.
Mastering jewelry photography lighting is a journey that requires patience, practice, and experimentation. As we’ve explored throughout this guide, the right lighting setup can transform ordinary jewelry shots into stunning professional images that capture every detail and sparkle. Remember that while having the proper equipment is important, understanding how to manipulate light and shadows is equally crucial for achieving exceptional results.
Don’t be afraid to mix and match different lighting techniques we’ve discussed, from basic single-light setups to more complex multi-light arrangements. Start with simple configurations and gradually work your way up to more sophisticated setups as your confidence grows. Pay special attention to controlling reflections and minimizing unwanted shadows, as these are often the biggest challenges in jewelry photography.
Keep a log of your lighting configurations and their results – this will help you develop your own signature style while building a reliable repertoire of setups for different types of jewelry. Remember that even professional photographers constantly refine their techniques, so don’t get discouraged if your first attempts aren’t perfect. With consistent practice and application of these lighting principles, you’ll soon be creating captivating jewelry photographs that showcase every facet and detail brilliantly.