Transform real-world objects into stunning 3D digital models with photogrammetry software – a revolutionary technology that’s reshaping industries from architecture to video game design. By capturing multiple photographs from different angles and using sophisticated algorithms, these powerful tools reconstruct detailed three-dimensional representations with remarkable accuracy and texture fidelity.
Today’s photogrammetry software ranges from accessible smartphone apps to professional-grade solutions, making 3D scanning more attainable than ever. Whether you’re a hobbyist looking to preserve family heirlooms, an architect documenting historical buildings, or a creative professional developing assets for virtual environments, modern photogrammetry solutions offer unprecedented capabilities for bringing physical objects into the digital realm.
This comprehensive guide explores the leading photogrammetry software options across all price points, breaks down essential workflows, and provides practical tips for achieving professional-quality results. We’ll examine how these tools compare in terms of accuracy, ease of use, and output quality, helping you choose the right solution for your specific needs. From capturing your first dataset to exporting production-ready 3D models, you’ll learn the technical foundations and best practices that drive successful photogrammetry projects.
Let’s dive into the world of 3D reconstruction and discover how this fascinating technology can enhance your creative or professional workflow.
What is 3D Photogrammetry Software?
How Photogrammetry Works
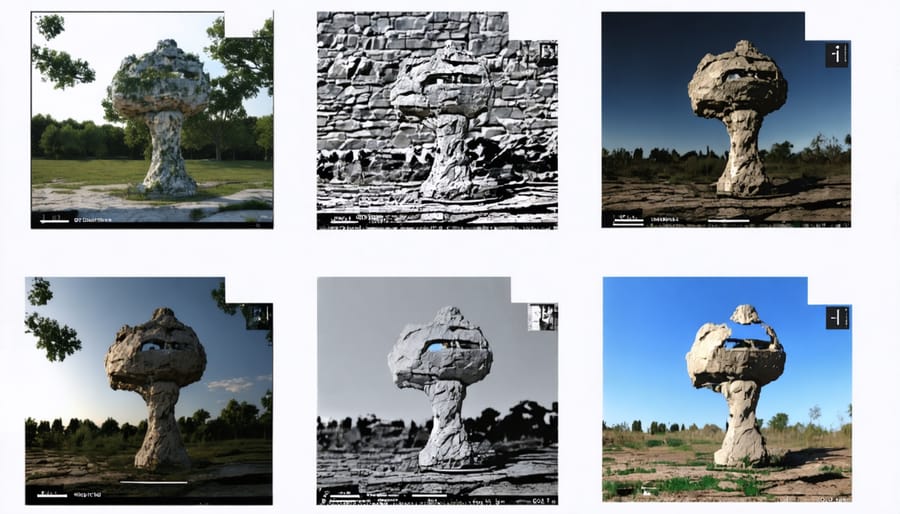
Photogrammetry works by analyzing multiple photographs of an object or scene taken from different angles to create detailed 3D models. The process begins when specialized software identifies common points, called feature points, across multiple images. These points act like puzzle pieces, helping the software understand how the photos relate to each other in three-dimensional space.
Once these reference points are established, the software calculates the camera positions for each photo and creates a sparse point cloud – a basic 3D representation of the subject. This initial framework is then refined into a dense point cloud, adding millions of additional points to create a more detailed structure.
The software then generates a mesh, essentially connecting these points to create a continuous 3D surface. Finally, it applies texture mapping, using the original photographs to add color and surface detail to the model. This process, called UV mapping, ensures the final 3D model looks realistic by wrapping the photographic textures onto the geometric shape.
For best results, photographers typically capture 20-100 overlapping images, ensuring each part of the subject is visible in at least three photographs. Consistent lighting and sharp focus are crucial for accurate reconstruction.
Key Features to Look For
When evaluating 3D photogrammetry software, several key features can make or break your workflow. First, look for robust camera alignment capabilities that can handle large datasets and varying image qualities. The software should automatically detect and match common points across your photos with high accuracy.
Mesh generation and texture mapping quality are crucial – your software should create detailed 3D models while maintaining reasonable processing times. Look for options to adjust mesh density and texture resolution to balance quality with performance.
Export flexibility is essential, with support for common 3D file formats like OBJ, FBX, and GLB. The software should also offer tools for model optimization and cleanup, helping you fix minor issues without switching to separate 3D modeling programs.
Cloud processing capabilities can be a game-changer, especially for complex projects. Some solutions offer hybrid workflows, combining local and cloud processing for better efficiency.
Finally, consider the user interface and learning curve. While powerful features are important, they should be accessible through an intuitive interface with good documentation and tutorial resources. Built-in masking tools and automated ground control point detection can significantly streamline your workflow.
Top Professional Photogrammetry Software
Agisoft Metashape
Agisoft Metashape stands as one of the most versatile and powerful photogrammetry solutions available today. This professional-grade software excels at creating detailed 3D models from photographs, making it a go-to choice for professionals in archaeology, architecture, and digital content creation.
The software’s workflow is remarkably straightforward despite its sophisticated capabilities. Users can import photos, align them automatically, generate dense point clouds, and create textured 3D meshes with impressive accuracy. One of Metashape’s standout features is its ability to process aerial drone photography effectively, making it particularly valuable for mapping and surveying applications.
Performance-wise, Metashape offers excellent GPU acceleration support, significantly reducing processing times on compatible systems. The software handles large datasets efficiently, though processing times can vary depending on your hardware configuration and the complexity of your project.
In real-world scenarios, Metashape proves its worth in various applications. Archaeologists use it to document excavation sites and artifacts, while real estate professionals create virtual property tours. Game developers and VFX artists regularly employ it to create detailed environmental assets and props.
The software offers two editions: Professional and Standard. While the Professional version includes advanced features like network processing and thermal image processing, the Standard edition provides all the essential tools needed for basic to intermediate photogrammetry projects at a more accessible price point.
RealityCapture
RealityCapture stands out as one of the most powerful photogrammetry solutions in the market, known for its lightning-fast processing speeds and impressive detail capture capabilities. This software has gained significant traction among professionals in architecture, game development, and cultural heritage preservation.
The workflow in RealityCapture is remarkably straightforward: import your photos, align them automatically, generate a dense point cloud, and create a textured mesh. What sets it apart is its ability to handle massive datasets efficiently – you can process thousands of high-resolution images without bringing your computer to its knees.
One of RealityCapture’s standout features is its parallel processing capability, allowing users to work on multiple projects simultaneously. The software excels at producing highly detailed models with accurate textures, making it particularly valuable for applications requiring precise measurements and realistic visual representation.
Professional users appreciate RealityCapture’s advanced features like automatic ground control point detection and the ability to combine laser scans with photogrammetry data. The software also offers flexible export options, supporting common 3D formats like OBJ, FBX, and glTF, making it easy to integrate with other 3D workflows.
While the learning curve can be steep for beginners, RealityCapture’s comprehensive documentation and active user community provide excellent support for newcomers. The software operates on a pay-per-input licensing model, making it accessible for both occasional users and full-time professionals.
3DF Zephyr
3DF Zephyr stands out in the photogrammetry software landscape with its intuitive workflow and robust feature set. In real-world testing, it excels at handling complex architectural projects and detailed object reconstruction, making it particularly valuable for heritage preservation and professional documentation work.
The software offers four editions – Free, Lite, Pro, and Aerial – each catering to different user needs and budgets. The Free version, while limited to 50 photos per project, provides an excellent entry point for beginners to experiment with basic reconstructions. The Pro version unlocks advanced features like automatic ground control points and detailed mesh editing tools that prove invaluable in professional scenarios.
One of Zephyr’s strongest features is its ability to handle challenging lighting conditions and reflective surfaces, often problematic in photogrammetry. During testing, it successfully processed glossy objects that other software struggled with, thanks to its advanced algorithms and customizable processing parameters.
The user interface strikes a balance between accessibility and functionality. While newcomers might need some time to familiarize themselves with the workflow, the logical layout and comprehensive tooltips help flatten the learning curve. The batch processing capability is particularly useful for large projects, allowing users to queue multiple reconstructions overnight.
Performance-wise, Zephyr demonstrates efficient GPU utilization, though processing times can vary significantly based on photo quantity and quality. It’s worth noting that the software works best with a dedicated graphics card for optimal performance.
Budget-Friendly Alternatives
Free and Open-Source Options
For photographers and 3D enthusiasts working on a budget, several powerful free and open-source photogrammetry solutions offer professional-grade capabilities without the price tag. Leading the pack is Meshroom, an AliceVision-powered software that has become a go-to choice for beginners and experienced users alike. Its node-based workflow provides exceptional flexibility while maintaining an intuitive interface that helps newcomers understand the photogrammetry process.
Another notable option is COLMAP, which, despite its more technical interface, delivers outstanding results for those willing to climb the learning curve. It’s particularly praised for its robust camera calibration capabilities and dense reconstruction quality.
OpenMVG combined with OpenMVS offers a powerful pipeline for those comfortable with command-line operations. This combination provides granular control over the reconstruction process and often produces results that rival commercial solutions.
For those seeking simplicity, VisualSFM provides a straightforward interface while still delivering reliable results. Though its development has slowed, it remains a viable option for basic photogrammetry projects.
These free tools often benefit from active community support, regular updates, and extensive documentation. While they may lack some convenience features found in paid alternatives, they’re more than capable of producing professional-quality 3D models for various applications, from asset creation to architectural documentation.
Mid-Range Solutions
For photographers and creators seeking professional-grade photogrammetry solutions without breaking the bank, several mid-range options offer an excellent balance of features and affordability. RealityCapture stands out with its lightning-fast processing speeds and user-friendly interface, making it a favorite among architectural visualizers and real estate professionals. Starting at around $40 per month, it provides exceptional value for those working on regular projects.
Agisoft Metashape Professional hits the sweet spot between capability and cost at approximately $179 for a standard license. Its robust feature set includes detailed texture mapping and automated workflows that particularly benefit those in cultural heritage preservation and archaeological documentation.
3DF Zephyr offers a tiered pricing structure, with its Lite version starting at $149. It excels in creating highly detailed 3D models from drone footage and is particularly popular among surveyors and construction professionals. The software’s intuitive workflow and comprehensive tutorial system make it an excellent choice for those transitioning from basic to professional-grade photogrammetry.
Another noteworthy option is Meshroom, which, while free, offers paid add-ons and extensions that enhance its capabilities without reaching the price point of premium solutions. These extensions typically range from $50-200 and can significantly improve mesh quality and texturing capabilities.
These mid-range solutions often provide the best value proposition, offering professional-grade features at a fraction of the cost of enterprise solutions.
Optimizing Your Workflow
Camera Settings and Setup
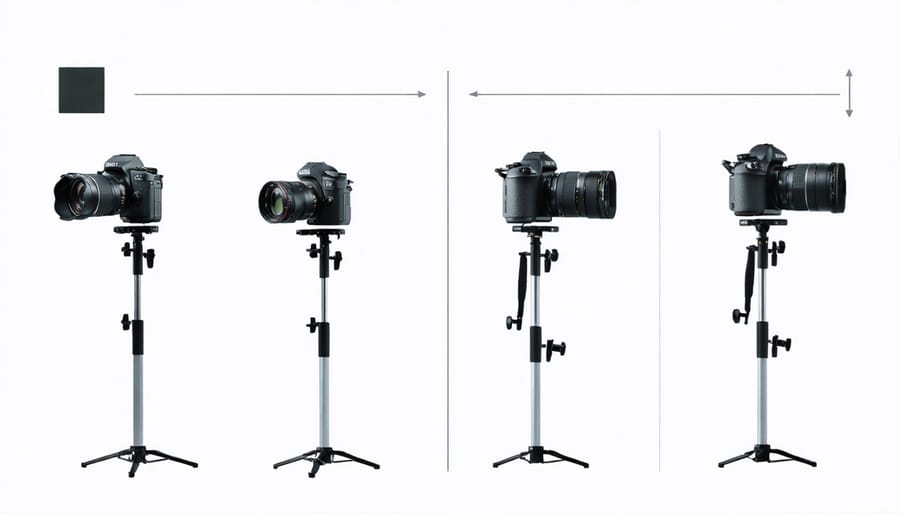
Successful 3D photogrammetry starts with proper camera setup techniques and optimal settings. For best results, use a camera with at least 20 megapixels and a high-quality lens that minimizes distortion. Prime lenses are ideal, but a sharp zoom lens can work well too.
When configuring your manual camera settings, maintain consistency throughout your shoot. Set your ISO as low as possible (typically 100-400) to minimize noise. Choose an aperture between f/8 and f/11 for optimal depth of field and sharpness. Your shutter speed should be fast enough to prevent motion blur – at least 1/125th of a second when shooting handheld.
Always shoot in RAW format to preserve maximum image detail and ensure proper white balance during post-processing. Enable fixed white balance rather than auto to maintain consistency across all photos. Disable image stabilization when using a tripod to prevent unnecessary corrections.
Lighting plays a crucial role in photogrammetry. Aim for even, diffused lighting that minimizes harsh shadows and reflections. Overcast days are perfect for outdoor shoots, while controlled studio lighting works best indoors. Consider using polarizing filters to reduce unwanted reflections on shiny surfaces.
For optimal results, maintain at least 60% overlap between consecutive photos and capture your subject from multiple angles and heights. This comprehensive coverage ensures the software has enough data points to create accurate 3D models. Remember to check your focus and exposure settings regularly throughout the shoot to maintain consistency.
Shooting Techniques
Capturing high-quality images is crucial for successful 3D photogrammetry. Start by ensuring your subject is well-lit with consistent, diffused lighting to minimize harsh shadows. Natural daylight works best, but if shooting indoors, use soft, even lighting from multiple angles.
When photographing your subject, maintain a 60-80% overlap between consecutive shots. Walk around the subject in a circular pattern, taking photos at three different heights: low, middle, and high angles. This creates a comprehensive coverage that helps the software accurately reconstruct the 3D model.
For best results, keep your camera settings consistent throughout the shoot. Use a fixed focal length lens (avoid zoom lenses), set your aperture between f/8 and f/11 for optimal depth of field, and maintain a fast enough shutter speed to prevent motion blur. Enable manual focus after initial focusing to prevent the camera from hunting between shots.
Avoid reflective, transparent, or highly uniform surfaces as they can confuse the photogrammetry software. If necessary, apply a temporary matte coating or place reference markers around these challenging areas. Similarly, moving objects or changing lighting conditions can compromise the reconstruction process.
For larger objects or environments, break down the subject into smaller, manageable sections and ensure each section has sufficient overlap with adjacent areas. Consider using drone photography for architectural or landscape photogrammetry, maintaining the same principles of overlap and consistent lighting.
Remember to check your images for quality as you shoot. Blurry or poorly exposed photos can significantly impact the final 3D model’s accuracy. It’s better to have more photos than necessary rather than discovering gaps in coverage during processing.
Post-Processing Tips
Once you’ve captured and processed your initial 3D model, applying the right post-processing techniques can dramatically improve your final results. In Agisoft Metashape, focus on optimizing your dense cloud by gradually increasing the quality settings while monitoring your computer’s performance. Use the built-in decimation tool to reduce polygon count without sacrificing visual quality.
For RealityCapture users, take advantage of the software’s powerful texture blending capabilities. Start with the default settings, then fine-tune the texture size and quality based on your project’s needs. The component merger tool is particularly useful for combining multiple scans seamlessly.
Meshroom enthusiasts should pay special attention to the depth map and meshing nodes. Experiment with different mesh filtering strengths to find the sweet spot between detail preservation and noise reduction. The texturing node offers various unwrapping methods – try them all to determine which works best for your specific model.
When using 3DF Zephyr, leverage its advanced color correction tools to ensure consistent texture across your model. The hole-filling algorithms are particularly effective, but use them judiciously to maintain authenticity. Remember to export your model in the appropriate format for your intended use, whether that’s for web viewing, 3D printing, or professional applications.
3D photogrammetry software has revolutionized the way we capture and recreate three-dimensional objects from photographs. As we’ve explored throughout this guide, these powerful tools offer incredible possibilities for both enthusiasts and professionals alike, making the once-complex world of 3D modeling more accessible than ever.
For beginners, free options like Meshroom and COLMAP provide an excellent starting point to learn the basics without financial investment. These tools offer core functionality that can help you understand the fundamental principles of photogrammetry while producing respectable results. As your skills advance, mid-range solutions like RealityCapture and 3DF Zephyr offer enhanced features and improved accuracy, making them ideal for serious hobbyists and semi-professionals.
Professional users requiring the highest level of precision and extensive feature sets will find Agisoft Metashape and Bentley ContextCapture worth the investment. These premium solutions deliver unparalleled accuracy and workflow optimization tools that can significantly improve productivity in commercial applications.
Remember that successful photogrammetry relies not just on the software you choose, but also on proper photography techniques, adequate lighting, and careful planning of your capture sequence. Start with simple projects, master the basics, and gradually work your way up to more complex subjects as your confidence grows.
Whether you’re creating 3D models for virtual reality, preservation, or artistic purposes, the key is to choose software that matches both your skill level and project requirements. As technology continues to advance, we can expect even more innovative features and improved accessibility in photogrammetry software, making this exciting field increasingly approachable for creators at all levels.