Evaluate bokeh quality by shooting test scenes with points of light against dark backgrounds—Christmas lights, streetlamps at dusk, or sunlight filtering through leaves work perfectly. The out-of-focus highlights will reveal your lens’s bokeh character immediately: smooth, circular discs indicate pleasing bokeh, while harsh edges, onion rings, or cat’s-eye shapes suggest optical compromises that can distract in portraits and shallow depth-of-field work.
Study the transition zone between sharp and blurred areas next. Quality bokeh creates gradual, creamy transitions rather than abrupt shifts that draw attention away from your subject. Photograph a person against varied backgrounds at wide apertures—f/1.4 to f/2.8—and notice whether busy backgrounds melt away smoothly or retain distracting texture and definition.
Compare how different lenses render foreground and background blur separately. Some lenses excel at background bokeh but produce nervous, busy foreground defocus that undermines the three-dimensional separation photographers prize. Shoot the same scene with multiple lenses at equivalent apertures to build your own reference library of bokeh characteristics.
Understanding bokeh evaluation matters because two lenses with identical sharpness specifications can produce vastly different aesthetic results. While one lens might deliver technically perfect resolution but harsh, distracting blur, another creates images with dimensional depth and visual elegance that elevates your work beyond mere technical excellence. This knowledge empowers you to choose lenses that match your creative vision, not just specifications on paper.
What Is Bokeh (And Why Most People Get It Wrong)
Let’s clear up one of photography’s most commonly misunderstood terms. Bokeh (pronounced “BOH-keh” or “boh-KAY,” from the Japanese word “boke” meaning blur or haze) doesn’t simply refer to blurry backgrounds. That’s the mistake most people make, and it’s an important distinction that affects how you evaluate lenses.
Bokeh specifically describes the *aesthetic quality* of the out-of-focus areas in your images—not the amount of blur itself. Think of it this way: two lenses might create equally blurred backgrounds when shot at f/1.8, but one produces smooth, creamy rendering while the other creates harsh, distracting patterns. That difference in character is bokeh.
Here’s a real-world example that makes this crystal clear. Imagine photographing someone with string lights in the background. With good bokeh, those lights transform into soft, pleasant circles that complement your subject. With poor bokeh, those same lights might become harsh, onion-ring shaped discs with bright edges that pull attention away from your subject. The blur amount could be identical in both scenarios—the background is equally out of focus—but the quality of that blur dramatically differs.
This distinction matters because you can’t simply add more blur to fix bad bokeh. Stopping down from f/1.4 to f/2.8 reduces blur but doesn’t change its character. A lens with nervous, busy bokeh at f/1.4 will still have nervous bokeh at f/2.8, just less of it.
When evaluating lenses, you’re not just asking “how blurry can the background get?” but rather “when the background does blur, does it look pleasing or distracting?” This quality assessment involves examining how the lens renders highlights, transitions between in-focus and out-of-focus areas, and the overall smoothness of the blur—topics we’ll explore in detail throughout this guide.
The Science Behind Beautiful Bokeh
Aperture Blade Design and Bokeh Balls
The number and shape of aperture blades in your lens directly influence how out-of-focus highlights—often called “bokeh balls”—appear in your images. These circular or near-circular shapes become particularly noticeable in scenes with point light sources like street lamps, fairy lights, or sunlight filtering through leaves.
Lenses with more aperture blades generally produce smoother, more circular bokeh balls. A lens with nine rounded blades, like the Canon RF 85mm f/1.2L, creates beautifully circular highlights even when stopped down a stop or two from wide open. In contrast, lenses with fewer blades—say, five or six—tend to produce more polygonal shapes, especially at mid-range apertures like f/5.6 or f/8.
The key distinction is between straight and curved blades. Straight blades create distinct polygonal shapes: a seven-blade aperture produces heptagons, while a five-blade design yields pentagons. Some vintage lenses, like certain Helios models, are famous for their swirly bokeh and distinctive hexagonal highlights. Modern premium lenses often feature rounded blades that maintain near-circular shapes across a wider aperture range.
Here’s what matters practically: at maximum aperture, nearly all lenses produce circular bokeh balls since the aperture is fully open. The blade design becomes evident only when you stop down. If you frequently shoot at f/2.8 to f/5.6 and want smooth, circular highlights, prioritize lenses with nine or more rounded blades. For portraits with twinkle lights or nighttime cityscapes, this difference becomes immediately apparent.

Optical Aberrations: The Good, The Bad, and The Character
Optical aberrations are the wild cards in bokeh rendering—they can elevate your out-of-focus areas into creamy perfection or turn them into distracting chaos. Let’s explore how these imperfections shape character.
**Spherical aberration** occurs when light rays passing through different parts of the lens don’t converge at the same point. In bokeh terms, this creates the dreamy “soap bubble” effect—those beautiful, glowing outlines around highlight discs with softer, slightly dimmed centers. Portrait photographers often adore this quality because it adds an ethereal glow to backgrounds. Classic lenses like the Canon 85mm f/1.2L are famous for this characteristic.
**Chromatic aberration** happens when different wavelengths of light focus at different distances, producing color fringing—typically green and magenta halos around bright highlights. While generally unwanted in sharp areas, moderate chromatic aberration in bokeh can add subtle color transitions that some find appealing, though excessive fringing creates what photographers call “nervous bokeh” that draws unwanted attention.
**Coma** distorts off-center highlights into comet-like shapes, particularly near frame edges. This typically produces less desirable bokeh, creating visual tension rather than smoothness. Wide-aperture wide-angle lenses frequently struggle with coma.
**Smooth bokeh** results from well-corrected optics that minimize these aberrations, producing uniform, gentle transitions without distracting artifacts. Think modern designs like the Sony 85mm f/1.4 GM. The choice between character-rich aberrations and clinical smoothness ultimately depends on your artistic vision—neither is inherently superior.
Focal Length and Aperture’s Role
Focal length and aperture work together as the primary controllers of bokeh in your images. Wider aperture settings (like f/1.4 or f/2) create shallower depth of field and larger background blur circles, giving you more pronounced bokeh to evaluate. Longer focal lengths—say, an 85mm versus a 35mm—magnify this effect by compressing the background and increasing blur intensity.
However, these factors affect bokeh *quantity* (how much blur you get), not necessarily *quality* (how pleasing it looks). A 50mm f/1.8 might produce tons of blur, but if the lens has harsh aperture blades or optical aberrations, that blur could appear nervous or distracting. This is why evaluating bokeh requires looking beyond simple specifications to examine the actual character of the out-of-focus rendering—something we’ll explore through practical testing methods.
How to Actually Evaluate Bokeh Quality
The Background Test: Smooth vs. Busy Bokeh
The most revealing test for bokeh quality is photographing subjects against varied backgrounds. Start by finding a scene with strong contrast—think branches against a bright sky, or a portrait subject in front of city lights at dusk. Position your subject about six to ten feet from the background, then shoot wide open at your lens’s maximum aperture.
Pay close attention to three key characteristics in your out-of-focus areas. First, observe the **smoothness** of the bokeh. Quality lenses render backgrounds like cream, with soft transitions between light and dark areas. Lower-quality optics often create nervous, jittery backgrounds that distract from your subject.
Next, examine the **texture** within the blur. Some lenses maintain a pleasant micro-texture that looks organic and painterly. Others produce harsh, irregular patterns that feel mechanical. Photograph foliage or complex textures to reveal these differences—a tree canopy in afternoon light works beautifully for this test.
Finally, study the **transition zones** where sharp areas meet blur. The best lenses create gradual, natural-looking transitions. Problematic lenses produce abrupt shifts that draw unwanted attention to the plane of focus.
Try this practical scenario: photograph someone near a chain-link fence or string lights. Quality bokeh will melt these busy elements into gentle shapes. Poor bokeh will preserve distracting edges and create double-line artifacts. The fence test is particularly unforgiving—it immediately reveals how a lens handles linear elements in the background, which is exactly what you’ll encounter when shooting portraits in urban environments or through vegetation.
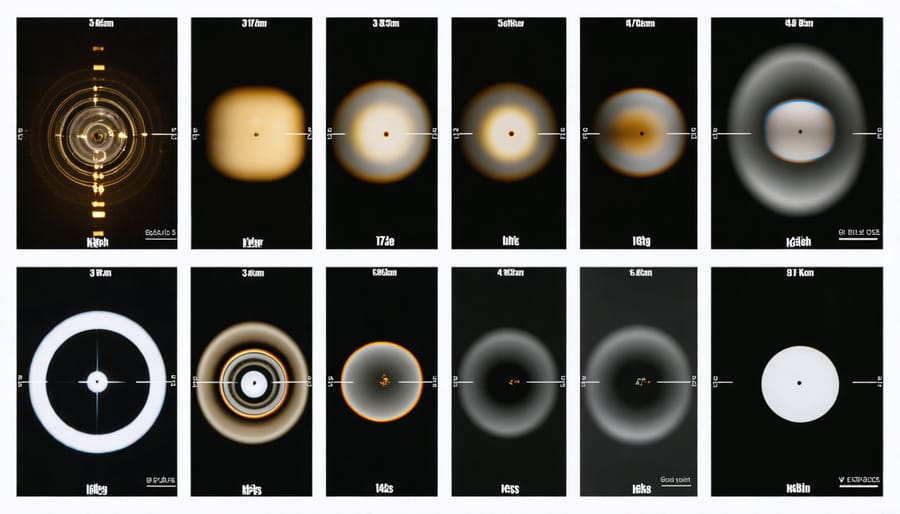
The Highlight Test: Analyzing Bokeh Balls
One of the most revealing ways to evaluate bokeh quality is the highlight test—photographing small, bright point light sources against a dark background. These out-of-focus highlights, often called “bokeh balls,” reveal characteristics that tell you a lot about a lens’s optical design and construction.
To conduct this test yourself, find or create a scene with distant point lights—think Christmas lights, string lights, or even city lights at night. Set your lens to its widest aperture and focus on something much closer, ensuring those background lights fall well out of focus. Take shots at various apertures and examine the results closely.
**Center versus edge rendering** is perhaps the most obvious difference you’ll notice. High-quality lenses render bokeh balls as smooth, circular shapes throughout the frame. Lesser lenses often show perfectly round highlights in the center that progressively distort toward oval or “cat’s eye” shapes at the frame edges. This cat’s eye effect results from optical vignetting and becomes more pronounced at wider apertures—it’s not necessarily a fatal flaw, but something to be aware of.
Look carefully at individual bokeh balls for **onion ring patterns**—concentric circles visible within the highlight. These stem from aspherical lens elements and their manufacturing process. Some photographers find them distracting, especially in busy backgrounds, while others barely notice them in real-world shooting.
**Bright outlining** creates a harsh ring around the highlight’s edge, often with a darker center. This “donut” effect can make backgrounds feel busier and more nervous rather than smoothly melting away.
Finally, test across the aperture range. Many lenses show smoother bokeh stopped down one or two stops from wide open, as optical aberrations decrease. Understanding your specific lens’s sweet spot helps you make informed creative decisions when depth of field allows flexibility.
Bokeh Transition and Subject Separation
The quality of bokeh isn’t just about how blurred the background becomes—it’s equally about *how* it gets there. The transition zone between sharp and soft areas can make or break your image’s visual appeal.
When you examine a portrait, notice how the focus falls off from your subject’s eyes to their ears, then gradually melts into the background. A lens with smooth bokeh transition creates a gentle, natural progression that feels organic to the eye. This gradual shift helps your subject appear to float within the frame, adding that coveted three-dimensional quality to what is, after all, a flat photograph.
Harsh transitions, on the other hand, create visible “bands” where sharpness abruptly gives way to blur. This can make your subject look cut-and-pasted onto the background—technically separated, but not aesthetically pleasing. Think of it like a graduated neutral density filter: the best ones transition so smoothly you can’t detect where they start working.
Testing this is straightforward. Photograph a subject with elements at varying distances—perhaps someone standing near a fence that extends both toward and away from the camera. Study how the focus rolls off. Does it feel natural, or do you see distinct zones of sharpness? This simple test reveals how effectively a lens will isolate subjects in real-world shooting.

Distance and Aperture Variables
Bokeh quality isn’t static—it shifts noticeably as you adjust your aperture and change your shooting distance. A lens that produces creamy, smooth bokeh at f/2.8 might develop harsher edges at f/5.6, while the character of out-of-focus highlights can transform completely when you move closer to or farther from your subject.
Start your testing at maximum aperture, where bokeh effects are most pronounced. Position your subject at a comfortable portrait distance—around 6 to 10 feet—and photograph a scene with varied backgrounds containing point light sources or textured elements. Then systematically stop down one full stop at a time (f/1.8, f/2.8, f/4, f/5.6) while keeping everything else constant. You’ll notice how highlight shapes change from circular to polygonal, and how background rendering transitions from silky to more defined.
Next, vary your subject distance. Photograph the same scene with your subject at three distances: very close (minimum focusing distance), medium (typical portrait range), and far (environmental portraits). The bokeh at minimum focusing distance often looks dramatically different—sometimes better, sometimes worse—than at infinity focus. This is particularly important if you’re a macro or product photographer.
For real-world validation, take your lens to a location with string lights or backlit foliage during golden hour. These conditions ruthlessly reveal bokeh quality issues like onion rings, nervous backgrounds, or cats-eye distortion in frame corners. Compare your results side-by-side on a large screen, and you’ll quickly identify which aperture-distance combinations produce the most pleasing results for your typical shooting scenarios.
Good Bokeh vs. Bad Bokeh: Real Examples
Let’s look at some real-world examples to understand how different lenses render bokeh—and why certain models have earned their reputations.
**Excellent Bokeh Examples**
The Canon RF 85mm f/1.2L is frequently praised for its creamy, smooth bokeh that seems to melt backgrounds into dreamy gradients. Why does it excel? Its nine-blade rounded aperture and sophisticated optical design minimize onion rings and harsh transitions. Out-of-focus highlights remain round and soft across the frame, while background elements blend seamlessly. This lens demonstrates why many portrait photographers explore various Canon lens options when bokeh quality matters.
The Sony FE 135mm f/1.8 GM delivers similarly beautiful results. Its 11-blade aperture creates wonderfully circular highlights, and its optical construction controls spherical aberration to produce that sought-after three-dimensional rendering. Background transitions feel gentle rather than jarring, making subjects appear to float naturally in the scene.
Even budget-friendly lenses can surprise. The Canon EF 50mm f/1.8 STM, despite its modest price, produces pleasant bokeh when shot wide open. While not quite as refined as its premium siblings, its background rendering remains smooth and flattering for everyday shooting.
**Average to Poor Bokeh Examples**
The classic Canon EF 50mm f/1.4 USM, despite being sharp and versatile, shows visible onion rings in out-of-focus highlights—a common complaint. Its five-blade aperture creates pentagonal highlight shapes when stopped down, which can feel busy in certain backgrounds.
Many older zoom lenses struggle with bokeh quality. Kit zooms like the Canon EF-S 18-55mm, while practical, produce nervous, distracting backgrounds due to smaller maximum apertures and simpler optical designs. This illustrates one advantage when comparing prime versus zoom lenses—primes typically dedicate more design effort to rendering quality.
Mirror lenses create distinctive “donut bokeh” with ring-shaped highlights—a polarizing effect that some find distracting while others embrace creatively.
When exploring the Sony lens lineup or any manufacturer’s offerings, remember that price doesn’t always predict bokeh quality. Some affordable lenses render beautifully, while certain expensive designs prioritize sharpness over background smoothness. Testing your specific needs remains essential.
When Bokeh Actually Matters (And When It Doesn’t)
Understanding where bokeh quality truly impacts your images can save you thousands of dollars and prevent unnecessary gear anxiety. Let’s cut through the noise and talk about when it genuinely matters.
**Portrait photography** sits at the top of the bokeh-critical list. When you’re shooting headshots or fashion work with shallow depth of field, background blur occupies a significant portion of your frame. Harsh, nervous bokeh creates distracting rings and edges that pull attention away from your subject’s eyes. Smooth, creamy rendering keeps viewers focused exactly where you want them. That’s why portrait photographers obsess over lenses like the 85mm f/1.4—the bokeh quality directly affects the professional polish of their work.
**Macro photography** presents a similar scenario. With such extreme magnification and razor-thin depth of field, backgrounds become abstract fields of color and light. Quality bokeh transforms cluttered garden settings into dreamy, artistic backdrops. Poor bokeh creates busy, distracting halos around your tiny subjects.
For wildlife photography, bokeh matters when you’re working with longer telephoto lenses at wide apertures to isolate animals from their environment. That silky background separation helps your subject pop, though it’s less critical than sharpness and autofocus performance.
**Street photography** generally renders bokeh concerns irrelevant. Most street work happens at f/5.6 to f/8 where you’re capturing context and environmental storytelling, not isolating subjects with blur.
**Landscape photography**? Bokeh barely registers. You’re typically shooting at f/8 to f/16 for maximum sharpness throughout the frame. Edge-to-edge clarity matters infinitely more than how out-of-focus areas render.
The bottom line: if you regularly shoot wide open with significant background separation, invest in quality bokeh. If you primarily work at narrower apertures, prioritize sharpness and other optical characteristics instead.
At the end of the day, bokeh remains one of photography’s most beautifully subjective qualities. While we can measure sharpness with charts and quantify chromatic aberration with precision, the aesthetic appeal of out-of-focus areas ultimately comes down to personal preference and your specific creative vision. What looks creamy and pleasing to one photographer might appear too soft or clinical to another—and that’s perfectly fine.
The key is understanding that bokeh quality shouldn’t be your only consideration when choosing a lens. Yes, gorgeous bokeh can elevate portrait and macro work, but it’s just one piece of the puzzle alongside sharpness, autofocus speed, build quality, weight, and price. A lens with spectacular bokeh but sluggish autofocus might frustrate you during fast-paced shoots, while a technically perfect lens with harsh bokeh might still serve you well for landscape photography where everything stays in focus anyway.
So how do you move forward? Start by evaluating your current lenses using the practical methods we’ve discussed. Take test shots with simple backgrounds, examine specular highlights, and photograph at various distances and apertures. Compare your results with other lenses if possible, but more importantly, ask yourself whether the bokeh supports or distracts from your creative intent. Build a reference library of images that showcase bokeh you love and analyze what makes them work.
Remember, the best lens isn’t always the one with the smoothest bokeh—it’s the one that helps you create the images you envision.