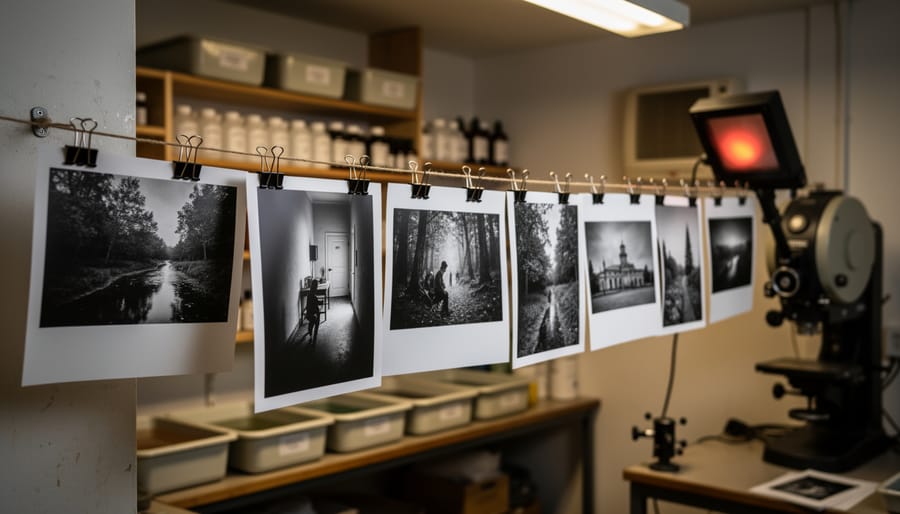
Standing in a darkroom watching an image slowly emerge in the developer tray creates a connection to photography that digital workflows simply cannot replicate. This hands-on process transforms your negatives into tangible prints through a series of chemical reactions you control entirely, making each print a unique physical object rather than another file on a hard drive.
The darkroom remains relevant because it offers complete creative control over your final image. When you adjust exposure time by seconds, dodge shadows with your hands, or burn in highlights with carefully shaped cards, you’re making artistic decisions that shape mood and emphasis in ways that feel immediate and intuitive. Many contemporary photographers, from fine art practitioners to editorial shooters, maintain darkroom practices specifically because this tactile engagement produces results with a distinctive character and depth.
Setting up a functional darkroom is more accessible than most people assume. A spare bathroom, basement corner, or converted closet can work perfectly well, and the essential equipment—an enlarger, trays, basic chemicals, and a safelight—costs less than many digital camera lenses. The initial investment typically ranges from 300 to 800 dollars for a complete beginner setup using quality used equipment.
This guide walks you through understanding darkroom fundamentals, selecting appropriate equipment, establishing your workspace efficiently, and mastering the printing process from first test strip to finished print.
What Makes Darkroom Printing Different from Digital
The moment you slide a blank sheet of paper into the developer tray and watch an image materialize before your eyes, you understand what sets darkroom printing apart from clicking “print” on a computer. It’s the difference between cooking a meal from scratch and reheating something pre-made—both get you fed, but the experience couldn’t be more different.
Darkroom printing is fundamentally physical. Your hands are constantly engaged: adjusting the enlarger height, dodging specific areas with pieces of cardboard, burning in skies by cupping your hands over the easel. You’re working with chemistry that has temperature requirements, timing that matters down to the second, and light that needs precise control. Digital printing happens at arm’s length through a screen, but in the darkroom, you’re intimately connected to every stage of the process.
The aesthetic differences run deeper than nostalgia. Silver gelatin prints have a tonal range and depth that stems from actual silver particles suspended in the paper’s emulsion. Light passes through these layers slightly differently than it reflects off inkjet prints, creating what many photographers describe as a luminous quality. The blacks are truly black, not a combination of colored inks trying to simulate darkness. This is why museums and galleries still value traditional prints—they have an archival quality and visual character that remains distinctive.
“I can replicate most things digitally,” explains Sarah Chen, a photographer who maintains both digital and darkroom practices, “but there’s something about the way highlights roll off in a silver print that I’ve never quite matched on screen. It’s subtle, but it’s there.”
The hands-on nature also means each print is unique. Even following the same formula, slight variations in your dodging motion or developer temperature create minute differences. Some photographers view this as a limitation; others see it as part of the print’s character and authenticity.
Why choose this method when digital is faster and more forgiving? For many, it’s precisely because the darkroom demands your full attention. There’s no multitasking with fifty browser tabs open. You’re in a dim room, working with light and chemistry, making decisions that can’t be undone with Command-Z. Similar principles apply to color darkroom printing, though with additional complexity.
The constraints force intentionality. You learn to get things right in-camera and make thoughtful choices during printing because mistakes cost time and materials, not just a few mouse clicks.

Essential Darkroom Equipment You Actually Need
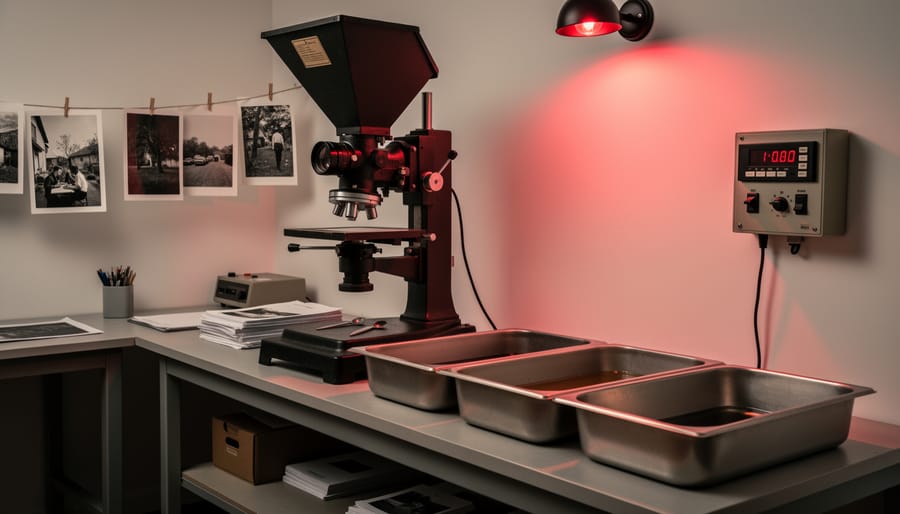
The Core Equipment
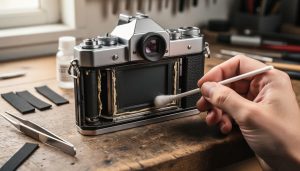
Setting up a darkroom starts with acquiring the right core equipment, and the good news is that you don’t need to buy everything brand new. The used market offers excellent opportunities, though knowing what to inspect before purchasing makes all the difference.
The enlarger is your most important investment. This device projects your negative onto photographic paper, and quality matters here. Look for models from reputable manufacturers like Beseler, Omega, or Durst. When buying used, check that the lamphouse isn’t cracked, the bellows have no light leaks, and the focus mechanism moves smoothly without wobbling. A condenser enlarger provides sharper, more contrasty prints, while a diffusion enlarger offers gentler tones with less visible grain. For beginners, either works fine, but ensure it accommodates your negative format—35mm enlargers are most common and affordable.
You’ll need three chemical trays, each about two inches larger than your intended print size. If you’re starting with 8×10 prints, get 11×14 trays. Buying new trays is inexpensive and worthwhile since used ones may have chemical contamination. Choose durable plastic versions in different colors to help you remember which chemical goes where—a practical trick that prevents costly mistakes.
A safelight provides visibility without exposing your paper. The classic amber or red safelight with a 15-watt bulb works perfectly for most black-and-white papers. Test any used safelight by placing paper under it for five minutes, then developing it—any fogging means it’s too bright or the wrong color.
An accurate timer is essential for consistent results. Mechanical timers cost less but electronic versions offer better precision. Used timers are generally safe purchases if they’re functioning properly when you test them.
Beyond these items, you’ll need graduates for measuring chemicals, print tongs to keep your hands clean, and a thermometer to monitor developer temperature. Focus finders help achieve sharp prints and are worth the small investment. The used market thrives for darkroom equipment as photographers downsize, making now an excellent time to start building your setup affordably.
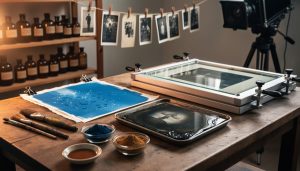
Chemicals and Papers
Understanding darkroom chemistry might seem intimidating at first, but it’s actually quite straightforward once you grasp the basics. The chemical process relies on three essential solutions working in sequence: developer, stop bath, and fixer.
The developer is where the magic happens. When exposed photographic paper hits this solution, it reveals the latent image captured during your enlarger exposure. Different developers produce different results—some create warmer tones, others cooler ones. A standard developer like Ilford Multigrade works beautifully for most applications and stays stable for weeks when stored properly.
Stop bath does exactly what its name suggests: it stops the developing action by neutralizing the alkaline developer with a mild acetic acid solution. While some photographers use plain water or diluted white vinegar, a proper stop bath indicator solution changes color when exhausted, taking the guesswork out of the equation.
Fixer makes your image permanent by removing unexposed silver halides from the paper. Without proper fixing, your print would eventually darken and deteriorate. Always use two fixer baths—the first does most of the work, while the second ensures complete fixing.
When it comes to paper selection, you’ll encounter two main types: resin-coated (RC) and fiber-based papers. RC papers have a plastic coating that speeds up processing and drying—perfect for learning and testing. Fiber-based papers take longer to process but offer superior archival qualities and a distinctive tactile quality that collectors appreciate.
Paper grades control contrast, ranging from grade 0 (soft, low contrast) to grade 5 (hard, high contrast). Variable contrast papers offer flexibility through filtration, letting you adjust contrast without maintaining multiple paper stocks. If you’re curious about color work, RA-4 color printing uses different chemistry entirely.
Store your chemicals in airtight bottles away from light and heat, and always label them clearly with mixing dates. Properly stored working solutions can last several weeks, making darkroom work surprisingly economical once you establish a routine.
Nice-to-Have Upgrades
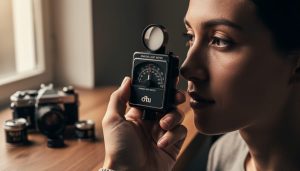
Once you’ve mastered the basics, a few upgrades can significantly improve your printing quality and workflow. A grain focuser helps you achieve razor-sharp focus by magnifying the actual film grain structure, eliminating guesswork when focusing your enlarger. Enlarging meters take the uncertainty out of exposure calculations by measuring light and calculating precise exposure times, especially helpful when dodging and burning. An archival print washer ensures thorough washing with proper water flow, which is crucial for print longevity—fiber-based prints especially need efficient washing to remove residual chemicals. Consider a print dryer for consistent, flat results, and perhaps a better quality easel with adjustable blades for more precise cropping. These tools won’t make or break your darkroom experience, but they’ll streamline your process and help you achieve more consistent, professional results as your skills develop.
Setting Up Your Darkroom Space
Choosing Your Space
Setting up a film darkroom doesn’t require a mansion or professional studio space. I’ve seen photographers create functional darkrooms in spaces ranging from converted closets to sections of basements, and even temporarily transformed bathrooms. The key is understanding what’s negotiable and what’s essential.
At minimum, you need a space large enough to accommodate your enlarger, developing trays, and some working room to move between wet and dry areas. A space of about 5×7 feet is workable for basic black-and-white printing, though more room certainly makes the process more comfortable. If you’re considering expanding to color film printing later, plan for additional equipment space.
Light-proofing is non-negotiable. Your darkroom must be completely dark when you’re exposing paper. Test this by sitting in the space with lights off for five minutes, allowing your eyes to adjust. Any light leaks will fog your prints. Weather stripping around doors, blackout curtains, or temporary light-blocking panels can solve most issues without permanent modifications.
Ventilation matters more than many beginners realize. Chemical fumes, while manageable, require air circulation. A bathroom with an exhaust fan offers a ready solution, or you can install a small vent fan in other spaces. Some photographers use ducted fans that exhaust outdoors while maintaining darkness.
Water access simplifies everything but isn’t mandatory. Bathrooms naturally excel here, but many darkroom workers successfully carry trays to sinks for washing prints. Using archival washers with water containers offers another portable solution.
For apartment dwellers or those without dedicated space, temporary setups work remarkably well. Many photographers transform bathrooms for weekend printing sessions, storing equipment in closets between uses. This approach requires more setup time but proves perfectly viable for hobbyists.
The Wet and Dry Sides
One of the most important principles in darkroom organization is maintaining a strict separation between wet and dry areas. This isn’t just about tidiness—it’s about protecting your work from contamination that can ruin hours of effort.
Your dry side houses everything that shouldn’t come into contact with chemistry: your enlarger, negative carriers, focusing tools, paper boxes, and negatives. Think of this as your clean zone where you handle light-sensitive materials before and after exposure. Your wet side contains all processing equipment: developing trays, chemistry bottles, measuring graduates, tongs, and washing facilities.
Why does this matter so much? Even a tiny drop of fixer on your negative carrier can permanently damage film. Chemistry residue on your hands while handling unexposed paper can cause mysterious spots and marks that won’t appear until after processing. I’ve seen photographers lose entire printing sessions because they absentmindedly reached across their workspace with wet hands.
In practice, this means establishing a clear workflow. Load your paper and negative on the dry side, make your exposure, then move to the wet side for processing. Never bring chemistry containers to your dry area, and always wash and dry your hands thoroughly when moving between zones. If space is tight, you can accomplish this even in a small bathroom by designating opposite ends of the counter or using a folding table that extends your workspace.
Making It Work Long-Term
Sustainable darkroom practice starts with smart organization. Label all your chemistry bottles clearly with mixing dates—your future self will thank you when you’re working in dim light. Keep frequently used items like tongs, timers, and grain focusers within arm’s reach of your enlarger to minimize movement and fatigue during long printing sessions.
Ergonomics matter more than you might think. Position your enlarger and trays at comfortable heights to avoid hunching over for hours. Many experienced printers use anti-fatigue mats and take regular breaks to rest their eyes and stretch their backs. Consider printing in shorter, focused sessions rather than marathon four-hour stretches that leave you exhausted.
Develop a consistent workflow to build muscle memory. Always arrange your trays in the same order—developer, stop bath, fixer—and move prints in the same direction every time. This rhythm becomes second nature and reduces mistakes when you’re working in near-darkness. Keep a darkroom notebook to record exposure times, contrast grades, and dodging notes for prints you want to reproduce later, turning each session into a learning experience that compounds over time.
The Black-and-White Printing Process Step by Step
Preparing Your Negative and Making a Test Strip
Before you start exposing paper, you need to evaluate and prepare your negative. Hold it up to a light source and look for proper density—a well-exposed negative should have detail in both shadow and highlight areas. If your negative looks too thin (underexposed) or too dense (overexposed), you’ll face challenges in printing, but don’t give up. Even imperfect negatives can often yield beautiful prints with the right approach.
Clean your negative carefully using a soft brush or compressed air to remove dust particles. Even tiny specks will show up as white marks on your print, requiring tedious spotting work later. Handle negatives by the edges only, and consider wearing cotton gloves if you’re working with particularly important images.
Now comes the test strip, your roadmap to the perfect exposure. Place your negative in the enlarger’s carrier and project it onto your baseboard. Focus the image using the enlarger’s focusing knob—a grain focuser makes this easier, but your eyes will work fine too. Set your enlarger lens to f/8 as a starting point, which provides good sharpness.
Cut a sheet of photo paper into strips or use a full sheet. With the safelight on and room lights off, place a strip across an area of your projected image that contains both highlights and shadows. Cover most of the strip with a piece of cardboard, exposing only one section for five seconds. Move the cardboard to reveal more of the strip and expose for another five seconds. Repeat this process four or five times, creating segments with exposures of 5, 10, 15, 20, and 25 seconds.
Process this test strip through your chemistry, and you’ll see bands of varying darkness. The correctly exposed section should show good detail in both bright and dark areas without appearing muddy or washed out. This becomes your baseline exposure time for the full print.
Making Your First Print
Your first print is an exciting milestone in the chemical printing process. Start with a well-exposed negative that has good contrast and clear details, making it easier to see results without extensive adjustments.
Begin by setting up your enlarger with the negative properly positioned in the carrier, emulsion side down. Focus the image on your easel using a focusing aid or grain focuser. Choose an aperture around f/8 for sharpness, then conduct a test strip to determine exposure time. Cut a 2-inch strip of photographic paper and expose it in 3-second intervals, covering sections with cardboard to create steps showing 3, 6, 9, 12, and 15 seconds of exposure.
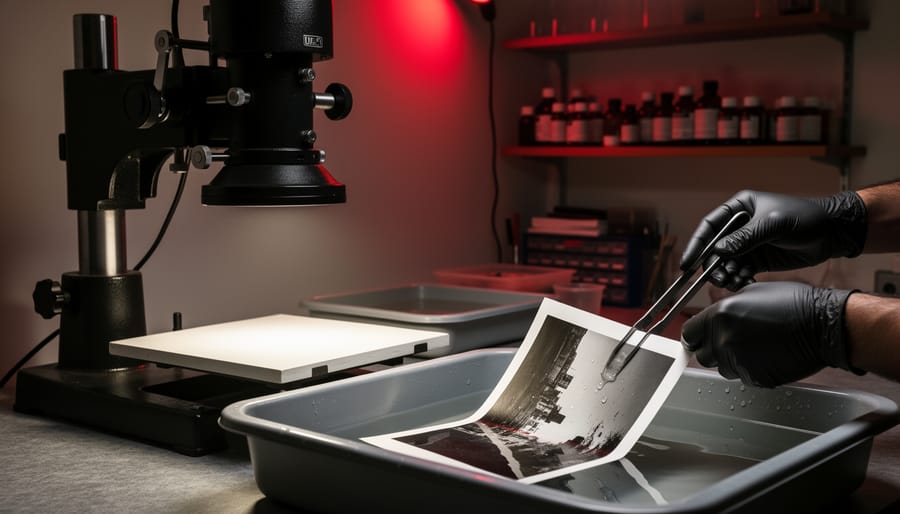
Once exposed, immediately slide the paper into your developer tray. Standard dilution for developers like Dektol is typically 1:2 with water. Start your timer for 2 minutes and gently agitate the tray continuously. Within the first 15 to 30 seconds, your image will begin appearing like magic, slowly building density. This emergence never gets old, but resist the temptation to pull the print early. Full development matters for proper contrast and archival quality.
At exactly 2 minutes, lift the print with tongs and let it drain for a few seconds, then transfer it to the stop bath. This acidic solution immediately halts development. Agitate for 30 seconds, then move the print to the fixer using separate tongs to avoid contamination.
In the fixer, your print becomes permanent and light-safe. Standard fixing time is 5 to 10 minutes with regular agitation. You can turn on room lights after 2 minutes if you’re eager to see your work properly. After fixing, transfer your print to the wash tray where running water should circulate for at least 20 minutes, ensuring all chemicals are removed for longevity.
Dodging, Burning, and Local Control
This is where darkroom printing truly becomes an art form. Dodging and burning allow you to selectively lighten or darken specific areas of your print, giving you control that even sophisticated digital editing struggles to replicate with the same intuitive feel.
Dodging means blocking light from reaching certain parts of your paper during exposure, effectively lightening those areas. You’ll typically use your hands, a piece of cardboard on a wire, or commercially available dodging tools. Keep the tool moving slightly during exposure to avoid creating hard edges. This technique is perfect for bringing out detail in shadows that would otherwise print too dark, like rescuing facial features in a backlit portrait.
Burning does the opposite by giving additional exposure to specific areas, darkening them to add depth or reduce distractions. After your main exposure, use your hands or a card with a hole cut in it to expose only the areas needing more density. Bright skies that threaten to wash out, distracting bright spots in corners, or areas lacking dimension all benefit from burning.
The beauty of these techniques lies in their flexibility. You can spend seconds or minutes adjusting different areas, building up the image gradually. Start conservatively with 20-30 percent adjustments, then increase as needed. Keep detailed notes about your dodging and burning times so you can reproduce successful prints.
Common Darkroom Problems and How to Fix Them
Let’s be honest—darkroom work involves a learning curve, and everyone makes mistakes along the way. The good news is that most problems have straightforward solutions once you understand what’s causing them.
Fogged prints are probably the most common frustration for beginners. If your prints look gray or muddy instead of having deep blacks and bright whites, you’ve likely got a light leak. Check your safelight first. Even though it looks dim to your eyes, it might be too bright or the wrong color for your paper. Position your safelight at least four feet from your work surface and use the proper filter (typically an OC filter for most black-and-white papers). I’ve also seen people accidentally use expired paper or paper that was stored improperly—heat and humidity are paper’s worst enemies, so keep your unopened boxes refrigerated when possible.
Uneven development shows up as blotchy or streaky prints and usually points to poor agitation technique. When developing your print, don’t just drop it in the tray and hope for the best. Use smooth, consistent rocking motions or continuously shuffle prints if you’re processing multiple sheets. The developer needs to flow evenly across the entire surface. Also check your darkroom chemistry temperature—if it’s too cold, development becomes unpredictable.
Muddy midtones with no contrast range typically means you’re using the wrong contrast grade or filter. If you’re printing on multigrade paper, experiment with higher contrast filters (grade 3 or 4) to add punch to flat negatives. Sometimes the issue is actually with your negative—thin, underexposed negatives produce flat prints no matter what you do in the darkroom.
Stains and marks on finished prints usually trace back to incomplete fixing or washing. Make sure you’re using fresh fixer and giving prints adequate time in both the fixer and wash water. A simple fixer test using a few drops of sodium sulfite solution will tell you if your fixer is exhausted. Brown or yellow stains that appear months after printing almost always indicate insufficient washing—invest in a proper print washer or at least use multiple water changes with adequate washing time.
What Darkroom Printing Actually Costs
Let’s talk numbers, because this is probably what’s on your mind. The good news? You can start printing for significantly less than you might think. The reality? Like most hobbies, costs can range from modest to eye-watering depending on your approach.
For a basic startup, budget around $300-500 if you’re scrappy. This gets you a used enlarger (the single most important piece, typically $100-250 on Craigslist or eBay), a developing tray set ($30-50), an enlarging timer ($40-80), a safe light ($20-40), and basic chemistry to get started. I’ve seen people set up functional darkrooms for even less by haunting estate sales and building their own equipment holders from scrap wood.
The premium route changes everything. A high-end enlarger with excellent optics runs $800-2000 or more. Professional-grade dichroic heads, precision easels, and calibrated timers can easily push your initial investment past $3000. Is it necessary? Not at all. But if you’re printing seriously and want consistency, better equipment does make a difference.
Ongoing expenses remain surprisingly reasonable. Chemistry costs roughly $30-60 every few months depending on how much you print. Paper is your bigger recurring expense, ranging from $40-80 for a box of 25 8×10 sheets. Fiber-based papers cost more than resin-coated but offer superior archival quality and tonal range.
Here’s the money-saving reality: darkroom equipment holds its value exceptionally well, and the used market is thriving. Many photographers are downsizing or moving fully digital, meaning quality gear appears regularly at reasonable prices. Join local photography groups, check university bulletin boards, and browse specialized forums where photographers sell directly to each other.
One often-overlooked cost: water and electricity. Running water for an hour-long printing session and keeping an enlarger bulb running adds up, though we’re talking dollars per session, not tens of dollars. Factor it in, but don’t let it scare you away from what remains one of photography’s most rewarding practices.
Why Photographers Still Choose the Darkroom
In an age where you can preview, adjust, and export a photograph in seconds, the deliberate slowness of darkroom work might seem counterintuitive. Yet many photographers maintain their darkroom practices precisely because of this slower pace. The darkroom offers something increasingly rare in our digital world: a meditative space where you’re disconnected from screens and fully present with your craft.
Sarah Chen, a commercial photographer based in Toronto, maintains a darkroom in her studio despite shooting primarily digital for client work. “When I’m in the darkroom, there’s no undo button, no layers panel,” she explains. “That limitation forces you to be intentional about every decision. It’s where I reconnect with why I fell in love with photography in the first place.”
This tangible connection to photographic history resonates with many practitioners. The basic principles of dodging, burning, and contrast control haven’t changed since Ansel Adams refined the Zone System. Working with analog printing techniques creates a direct link to generations of photographers before us, using essentially the same tools and chemistry.
The results themselves carry distinctive qualities difficult to replicate digitally. Film grain has an organic randomness that differs from digital noise, and the tonal transitions in a well-crafted silver gelatin print possess a depth that many find more pleasing than pixel-based alternatives. Each print becomes a unique physical object, with subtle variations even when working from the same negative.
Perhaps most importantly, darkroom work teaches valuable lessons applicable to all photography. Understanding how exposure, contrast, and development interact deepens your technical knowledge. The patience required for analog processes often translates to more thoughtful shooting habits, whether working with film or digital cameras.
For contemporary photographers, the darkroom isn’t about rejecting modern tools—it’s about expanding their creative toolkit and finding balance in their practice.
If you’ve made it this far, you already have everything you need to start your darkroom journey. The truth is, there’s no perfect moment to begin—only the decision to take that first step. Setting up a darkroom doesn’t require a massive investment or professional-grade equipment from day one. A temporary setup in your bathroom or a corner of your basement is exactly how many experienced printers started.
Your first prints won’t be perfect, and that’s not just okay—it’s expected. Those uneven exposures, mysterious spots, and muddy tonality? They’re not failures; they’re your education happening in real time. Every darkroom printer has a stack of learning prints tucked away somewhere, and most will tell you those imperfect images taught them more than any manual ever could.
What makes darkroom work special isn’t just the technical process or the aesthetic results. It’s the community you’re joining—a surprisingly welcoming group of people who remember their own early struggles and genuinely want to help others succeed. Online forums, local photography clubs, and darkroom collectives are filled with printers eager to share techniques, troubleshoot problems, and celebrate your progress.
Darkroom printing is a journey without a final destination. Even decades in, printers discover new techniques, refine their approach, and find fresh ways to interpret their negatives. The learning never stops, but that’s precisely what keeps it engaging. So mix your chemistry, load that first negative, and see where the process takes you.