
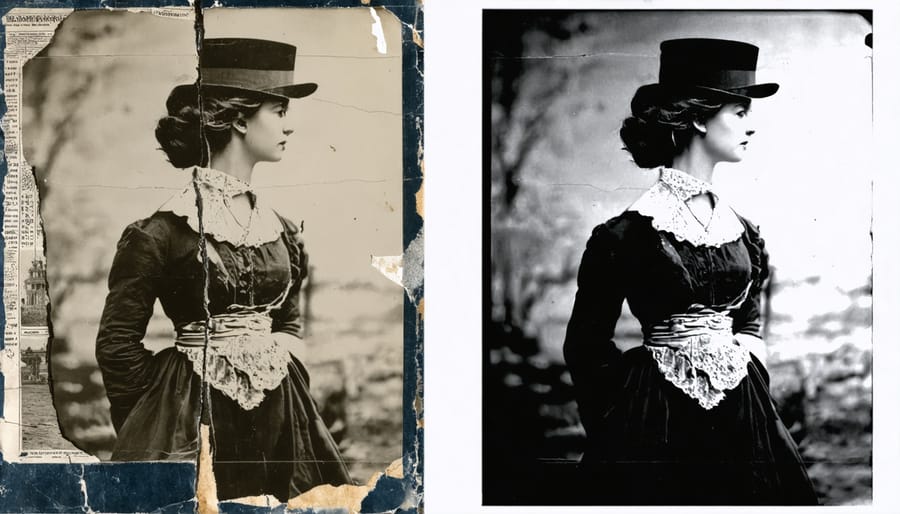
Every faded photograph holds a story waiting to be revived. In our digital age, historic revival has transformed from a specialized craft into an accessible art form, empowering photographers and archivists to breathe new life into centuries of visual heritage. Through advanced AI algorithms, traditional restoration techniques, and meticulous conservation methods, we’re now able to rescue damaged photographs that once seemed lost to time.
Preserving family stories through photographs has never been more crucial or achievable. Whether it’s a Civil War-era daguerreotype or your grandmother’s wedding album, modern restoration tools can reverse decades of deterioration, revealing details and emotions long hidden beneath layers of damage and decay.
The convergence of artificial intelligence and traditional conservation expertise has democratized photo restoration, making it possible for both professionals and enthusiasts to participate in this vital work of cultural preservation. As we stand at this technological crossroads, we have an unprecedented opportunity to safeguard our visual heritage for future generations while honoring the original photographers’ artistic vision.
Understanding Historical Photographs
Types of Historical Photographs
Historical photographs come in various fascinating formats, each representing different eras and technological advancements in photography. Daguerreotypes, popular in the 1840s and 1850s, were created on silver-plated copper sheets, producing unique, mirror-like images that capture incredible detail. These delicate pieces were often housed in decorative cases and remain crucial for documenting cultural heritage.
Tintypes, introduced in the 1850s, utilized a direct positive process on thin iron plates coated with dark enamel, making them more durable and affordable than daguerreotypes. Their distinctive dark appearance and slightly metallic sheen make them easily identifiable.
Silver gelatin prints, which became standard in the early 1900s, used light-sensitive silver halides suspended in gelatin on paper. This process dominated photography throughout the 20th century, producing the classic black-and-white photographs many of us associate with vintage imagery.
Other notable processes include albumen prints, which used egg whites to bind photographic chemicals to paper, and cyanotypes, known for their striking blue color. Each of these processes requires specific restoration approaches to preserve their unique characteristics and historical authenticity.
Common Damage Patterns
Historic photographs commonly exhibit several distinctive patterns of damage that restoration experts frequently encounter. Light damage often manifests as fading or color shifts, particularly noticeable in areas directly exposed to sunlight or improper storage conditions. Physical deterioration typically includes creases, tears, and corner damage from handling, while surface scratches and abrasions can result from photos rubbing against each other or rough storage materials.
Chemical degradation presents unique challenges, appearing as yellowish or brownish discoloration known as “foxing.” Silver mirroring, where a bluish-metallic sheen develops on dark areas of silver-based photographs, is another common chemical issue. Moisture damage can lead to mold growth, causing spotting and deterioration of the emulsion layer, while adhesive residue from old photo albums often leaves stubborn stains.
Many vintage photographs also suffer from improper processing issues from their original development, resulting in uneven tones or chemical staining. These technical flaws, combined with decades of environmental exposure, create complex restoration challenges that require a thorough understanding of both historical photographic processes and modern restoration techniques.
Digital Restoration Tools and Techniques
Essential Software Tools
In the world of photo restoration, having the right software tools is essential for achieving professional results. Adobe Photoshop remains the industry standard, offering unparalleled control over restoration work with its comprehensive healing, cloning, and adjustment tools. Its powerful layers system and masking capabilities make it particularly effective for complex repairs and colorization projects.
For those seeking a more affordable alternative, GIMP provides many similar features to Photoshop and is completely free. While it may have a steeper learning curve, it’s capable of handling most restoration tasks effectively. Luminar Neo has gained popularity for its AI-powered restoration tools, particularly excelling at facial reconstruction and automatic damage repair.
Photo restoration specialists often pair their main editing software with specialized tools. DxO PhotoLab excels at noise reduction and lens corrections, while Topaz Labs’ suite of AI-powered tools – particularly Gigapixel AI and Sharpen AI – are invaluable for enhancing image resolution and clarity in old photographs.
For beginners or those preferring a streamlined workflow, Photoshop Elements offers a more accessible interface while retaining many essential restoration features. Meanwhile, Capture One Pro, though primarily known for RAW processing, provides excellent color grading tools that prove invaluable when restoring old color photographs to their former glory.
Always remember that the best software choice depends on your specific needs, skill level, and the types of restoration projects you typically handle.

Scanning Historical Photos
Digitizing historical photographs requires careful attention to detail and the right equipment to preserve their essence. Start with a high-quality flatbed scanner capable of at least 600 DPI resolution – though 1200 DPI is preferable for archival purposes. Before scanning, gently clean the scanner bed with a microfiber cloth to prevent dust transfer.
Handle photographs with clean, dry hands or wear cotton gloves to avoid transferring oils onto the surface. Place photos face-down on the scanner, ensuring they’re perfectly flat to prevent shadows and distortion. If the photo is mounted or particularly delicate, consider using a dedicated photo scanning attachment to prevent damage.
For optimal results, scan in RGB color mode even for black and white photos – this captures more detail and gives you greater flexibility during restoration. Save your scans in TIFF format, which preserves all image data without compression. Create at least two copies: a high-resolution master file for archiving and a working copy for editing.
When batch-scanning multiple photos, leave space between each image and scan them together – this saves time while maintaining quality. Consider using scanning software with auto-cropping and de-skewing features to streamline the process. Always preview scans before finalizing them, checking for proper alignment and ensuring the entire image is captured, including edges and corners.
Remember to label your digital files systematically, including relevant details like dates, subjects, and original photo conditions. This documentation helps maintain the historical context of your digitized collection.
Advanced Restoration Techniques
Restoring historic photographs requires a delicate balance of technical skill and artistic sensitivity. Begin by creating a high-resolution scan of the original photograph, ideally at 600 DPI or higher, to capture every detail. Before any digital manipulation, document the photograph’s current condition and create multiple backup copies.
The first restoration step focuses on removing physical damage. Using a soft brush and compressed air, carefully remove surface dust and debris. For stubborn spots, a conservation-grade cleaning solution applied with a cotton swab can help, but always test on a small corner first.
Digital restoration starts with basic corrections in your editing software. Address contrast and exposure issues first, then move to spot healing for scratches and tears. For severe damage, utilize frequency separation techniques to separate texture from color, allowing precise repairs without losing the photograph’s original character.
Color restoration requires special attention, particularly in cases of fading or color shifts. Reference similar photos from the same era to ensure historically accurate color grading. This is especially important when working with historical urban photography, where architectural details can provide crucial color reference points.
Finally, focus on fine details like grain matching and texture preservation. Use noise reduction sparingly, as period-appropriate grain is essential for maintaining authenticity. Save your work in multiple formats, including a layered file that documents each restoration step.
Physical Conservation Methods
Handling and Storage
Proper handling and storage of historical photographs is crucial for their preservation and successful restoration. Always wear clean, lint-free cotton gloves when handling original prints to prevent oils and dirt from damaging the surface. Hold photographs by their edges, and avoid touching the image area, as fingerprints can cause irreversible damage over time.
Store photographs in a cool, dry environment with stable temperature and humidity levels. The ideal conditions are between 65-70°F (18-21°C) with relative humidity between 30-40%. Avoid basements and attics, which often experience extreme temperature fluctuations and moisture issues.
Use archival-quality storage materials specifically designed for photographs. Store prints flat in acid-free boxes or folders, separating individual photos with archival tissue paper. For valuable collections, consider using museum-quality storage sleeves made from inert materials like polyester or polypropylene.
Keep photographs away from direct sunlight and fluorescent lighting, which can cause fading and deterioration. When displaying historical photos, use UV-protective glass or acrylic glazing to minimize light damage. Create high-quality digital scans of your photographs as backups, storing them in multiple locations for safekeeping.
Regular inspection of your collection helps identify potential issues early. Look for signs of deterioration like yellowing, curling, or mold growth, and address problems promptly with professional conservation methods when needed.

Conservation Materials
When working with historical photographs, the choice of conservation materials plays a crucial role in preserving these precious artifacts for future generations. Archival-quality materials are specifically designed to protect photographs from deterioration, acid damage, and environmental factors that could compromise their integrity.
The foundation of proper conservation starts with acid-free storage materials. These include archival boxes, folders, and sleeves made from materials that have passed the Photographic Activity Test (PAT), ensuring they won’t react chemically with photographic elements. Cotton gloves are essential when handling original prints, as the oils from our hands can leave lasting damage on delicate surfaces.
For mounting and repairs, conservators use pH-neutral adhesives and Japanese tissue paper, known for its strength and compatibility with photographic materials. Polyester sleeves, often referred to as Mylar, provide excellent protection while allowing clear visibility of the photograph without direct contact.
Environmental controls are equally important. Silica gel packets help maintain stable humidity levels in storage areas, while UV-filtering materials protect against harmful light exposure. Temperature-controlled storage environments, ideally kept between 65-70°F (18-21°C) with relative humidity between 30-40%, help prevent chemical deterioration and biological growth.
When selecting conservation materials, always look for products labeled “archival quality” or “museum grade” from reputable suppliers. These materials might cost more initially, but they’re essential investments in preserving photographic heritage for decades to come.
Ethical Considerations
When approaching historic photo restoration, ethical considerations play a crucial role in maintaining the integrity of these valuable artifacts. The primary challenge lies in striking a delicate balance between enhancing deteriorated images and preserving cultural authenticity.
Restorers must consider whether dramatic alterations to historical photographs serve the greater purpose of documentation or potentially mislead viewers about historical reality. For instance, when restoring portraits from the Victorian era, should we correct the stern expressions typical of that period’s photography, or maintain them as authentic representations of the time’s photographic conventions?
The question of historical accuracy extends beyond mere technical restoration. Color addition to black-and-white photographs, while sometimes necessary for educational or commercial purposes, requires extensive research to ensure period-appropriate choices. Clothing styles, architectural details, and even environmental elements must be verified through historical documentation.
Another crucial ethical consideration is transparency in the restoration process. Professional restorers should maintain detailed records of all modifications made to original photographs and clearly communicate these changes to clients or institutions. This documentation helps preserve the historical record and ensures future generations understand what elements of the image are original versus restored.
When working with culturally significant photographs, restorers must also consider the perspectives and wishes of the communities represented in these images. This often involves consulting with cultural historians or community representatives to ensure restorations respect cultural sensitivities and historical context.
The digital age has introduced new ethical challenges, particularly regarding the use of AI and advanced editing tools. While these technologies offer powerful restoration capabilities, they can sometimes generate details that, while visually pleasing, may not be historically accurate. Restorers must carefully weigh the benefits of these tools against the responsibility to maintain historical authenticity.
As we’ve explored throughout this journey into historic photo revival, the preservation of our photographic heritage is more than just a technical endeavor – it’s about safeguarding our collective memory for future generations. The tools and techniques available today, from advanced digital restoration software to traditional conservation methods, give us unprecedented opportunities to breathe new life into fading memories.
Remember that every photograph tells a story, and each restoration project contributes to the broader narrative of our shared history. Whether you’re working with cherished family portraits or historically significant images, approaching the task with patience, respect, and attention to detail will yield the best results.
Start your preservation journey today by properly storing your historical photographs in acid-free containers, creating digital backups, and documenting any known information about the images. Consider reaching out to professional conservators for valuable pieces, and don’t hesitate to experiment with digital restoration techniques on copies of less critical photographs to build your skills.
The revival of historic photographs is a rewarding pursuit that bridges the past and present, allowing us to connect with our history in meaningful ways. By taking action now to preserve and restore these visual time capsules, you’re not just maintaining photographs – you’re protecting pieces of history that will continue to educate and inspire future generations.