Transform your ordinary shots into stunning photographs with these battle-tested fundamentals that professional photographers rely on daily. Whether you’re capturing landscapes, portraits, or street scenes, mastering these seven essential techniques will help you harness the magic of post-processing and elevate your photography to the next level.
Think of these tips as your photography foundation – the building blocks that separate amateur snapshots from compelling visual stories. From understanding the critical role of lighting to mastering composition basics, these principles will become second nature with practice, allowing you to focus on capturing the perfect moment rather than getting caught up in technical details.
Even if you’re shooting with a smartphone or just beginning your photography journey, these fundamental techniques will dramatically improve your results. They’re the same core principles that professional photographers have relied on for decades, adapted for today’s digital age and modern equipment.
Let’s dive into these seven game-changing tips that will transform how you approach photography, regardless of your gear or experience level.
Start with Quality Source Material
RAW vs. JPEG: Making the Right Choice
When it comes to image formats, RAW is like having a digital negative that preserves all the data your camera’s sensor captures. Unlike JPEG, which compresses and processes the image in-camera, RAW files give you maximum flexibility when using photo editing software. Think of it as keeping all your options open for post-processing.
With RAW, you can adjust white balance, recover blown-out highlights, and rescue details from shadows without degrading image quality. This is particularly valuable when shooting in challenging lighting conditions or when you’re not entirely sure about your camera settings.
However, RAW files do take up more storage space and require processing before sharing. They’re also not immediately viewable on most devices. For casual shooting or when you need to share images quickly, JPEG might be more practical.
My recommendation? Start shooting in RAW+JPEG mode. This gives you both formats: JPEGs for immediate use and RAW files as a safety net for those special shots that deserve extra attention in post-processing.

Master Basic Exposure Adjustments

The Exposure Triangle in Post
While the exposure triangle primarily guides us during shooting, these same principles come into play during post-processing. Understanding how to adjust brightness, contrast, and shadows in editing can rescue underexposed photos or enhance already well-exposed images.
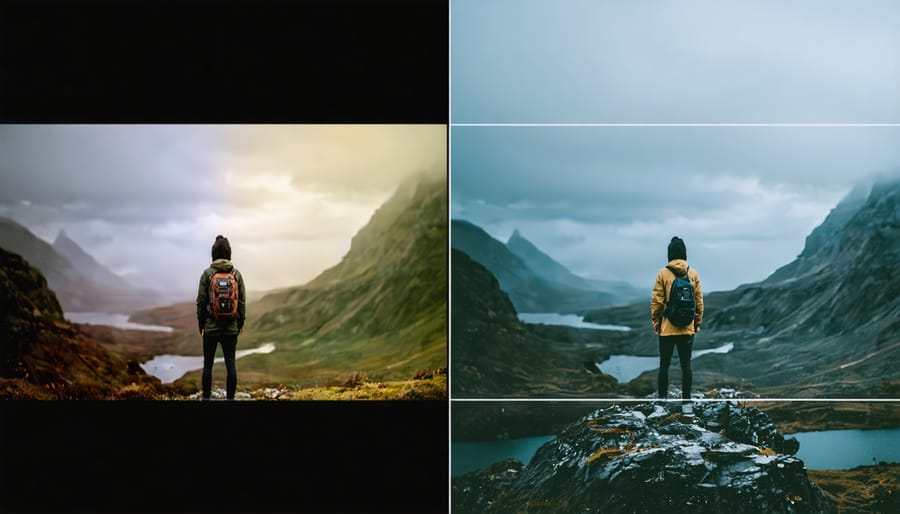
Start with the overall exposure adjustment, which acts like changing your ISO in-camera. Lifting the exposure can brighten dark images, but be careful not to push it too far as this can introduce noise. Next, fine-tune the highlights and shadows. Think of this as similar to adjusting your aperture’s light-gathering capabilities – you’re controlling how much detail shows in the brightest and darkest parts of your image.
Contrast adjustment is particularly powerful, affecting the relationship between light and dark areas. Increasing contrast can add drama and depth, while reducing it can create a softer, more ethereal look. For precise control, use the blacks and whites sliders to set the endpoints of your image’s tonal range.
Remember that these adjustments work together – changing one often affects how you’ll want to adjust the others. Start with subtle adjustments and build up gradually. A helpful workflow is to begin with exposure, then adjust contrast, and finally fine-tune shadows and highlights. This methodical approach helps maintain image quality while achieving your desired look.
Aim for natural-looking results unless you’re going for a specific creative effect. Your final image should maintain detail in both highlights and shadows while presenting a balanced, pleasing exposure.
Color Correction Fundamentals
White Balance Mastery
White balance can make or break your photos by ensuring colors appear natural and true to life. Think of it as adjusting your camera’s “color temperature thermostat” to match the lighting conditions you’re shooting in. While your camera’s auto white balance usually does a decent job, learning to control it manually gives you both technical accuracy and creative freedom.
Start by familiarizing yourself with your camera’s preset white balance options: daylight, cloudy, tungsten, and fluorescent. These are excellent starting points for common lighting situations. For more precise control, use a gray card or white balance target to set a custom white balance, especially in mixed lighting conditions.
Don’t be afraid to break the rules for creative effect. A slightly warmer white balance can enhance golden hour portraits, while cooler tones can amplify the mood of a winter landscape. When shooting in RAW, you have the flexibility to adjust white balance in post-processing without losing image quality.
Pro tip: In tricky lighting situations, take a test shot of a white or gray object in your scene. This reference point can help you nail the perfect white balance adjustment later.

Cropping and Composition Refinement
Cropping is a powerful tool that can transform an average photo into a striking image by improving its composition after the shot. Think of cropping as your second chance at framing – it allows you to eliminate distracting elements and strengthen your subject’s impact.
When cropping, always consider the rule of thirds. Imagine your image divided into a 3×3 grid, and try positioning key elements along these lines or at their intersections. This simple adjustment can dramatically improve your photo’s visual appeal.
Pay attention to your subject’s breathing room – the space around your main subject. Too much empty space can make your subject feel lost, while too little can create a cramped feeling. For portraits, ensure you’re not cropping at awkward points like joints or mid-limb, as this can make your subject appear unnaturally cut off.
Consider your aspect ratio carefully. While the standard 3:2 ratio works well for many situations, don’t be afraid to experiment with square crops for social media or panoramic crops for landscapes. Just remember that aggressive cropping can reduce your image resolution, so try to get your composition right in-camera whenever possible.
Look for strong leading lines or patterns that might have been overlooked in the original frame. Sometimes, cropping can help emphasize these elements and create a more dynamic composition that draws viewers into your image.
Selective Adjustments
Selective adjustments are like having a magic brush that enhances specific parts of your photo while leaving others untouched. Instead of applying global changes that affect the entire image, masks and local adjustments allow you to target particular areas with precision.
Start by identifying the areas that need attention – perhaps a darker foreground that needs brightening, or a sky that could use more drama. Using adjustment masks, you can paint these changes exactly where needed. For instance, you might want to increase contrast in the mountains while preserving the delicate details in the shadowy forest below.
Modern editing software makes this process intuitive with tools like luminosity masks, gradient filters, and brush adjustments. These tools are essential parts of an efficient editing workflow, allowing you to make subtle yet impactful improvements to your images.
Remember to work with a light touch – selective adjustments should enhance your photo naturally, not make it look artificially processed. Pay special attention to edges where adjustments meet, ensuring transitions appear smooth and realistic. Start with subtle changes and build up gradually until you achieve the desired effect. This approach helps maintain the authenticity of your image while bringing out its best qualities.
Sharpening and Noise Reduction
Sharpening and noise reduction are two critical post-processing techniques that can make or break your final image. When applying sharpness, start with a light touch – aim for enhancing edge detail without creating unnatural-looking halos around subjects. The key is to zoom in to 100% view while adjusting to ensure you’re not over-sharpening, which can create unwanted artifacts.
For noise reduction, focus first on color noise, which appears as random colored specks in your images, particularly in shadows. Then tackle luminance noise, the grainy texture often visible in high-ISO shots. Remember that too much noise reduction can make your photos look artificially smooth, so maintain a balance between noise removal and detail preservation.
Pro tip: Apply these adjustments selectively using masks or local adjustments. For instance, you might want stronger noise reduction in shadow areas while preserving sharpness in the main subject. For more precise control over these and other advanced editing features, consider using dedicated plugins or specialized software that offer more sophisticated algorithms for optimal results.
Mastering photography is a journey that combines technical knowledge with creative vision. By focusing on composition, understanding your camera’s settings, managing light effectively, shooting in RAW, considering perspective, practicing patience, and maintaining steady shots, you’ll see significant improvements in your work. Remember, these fundamentals are just the beginning – the real growth comes from consistent practice and experimentation. Take your camera out regularly, challenge yourself with different subjects, and don’t be afraid to make mistakes. With time and dedication, these basic principles will become second nature, allowing your unique photographic style to shine through.