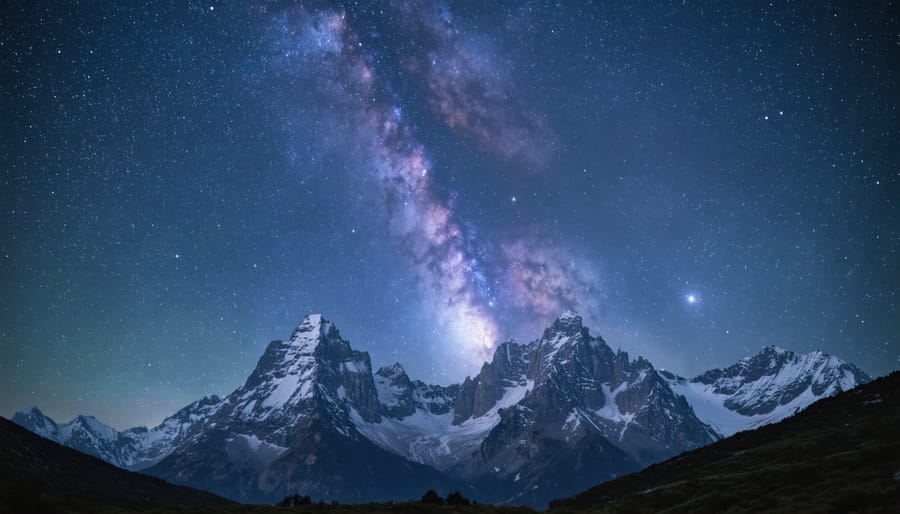
Stand beneath a star-filled sky, where rugged mountains meet the Milky Way, and you’ll understand why landscape astrophotography captivates both viewers and creators alike. This powerful fusion of earthbound beauty and celestial wonder demands technical precision and artistic vision, transforming ordinary landscapes into otherworldly scenes.
Master the art of capturing the night sky by combining the fundamental elements of both landscape and astronomical photography. While daytime photographers chase golden hours, astrophotographers pursue astronomical twilight, when darkness reveals the hidden cosmos above our familiar terrain.
The challenge lies in balancing two distinct worlds within a single frame: the terrestrial foreground requiring careful composition and focus, and the celestial canvas demanding precise exposure and tracking. Modern digital cameras have transformed what was once impossible into an accessible art form, allowing photographers to reveal what the human eye can only imagine.
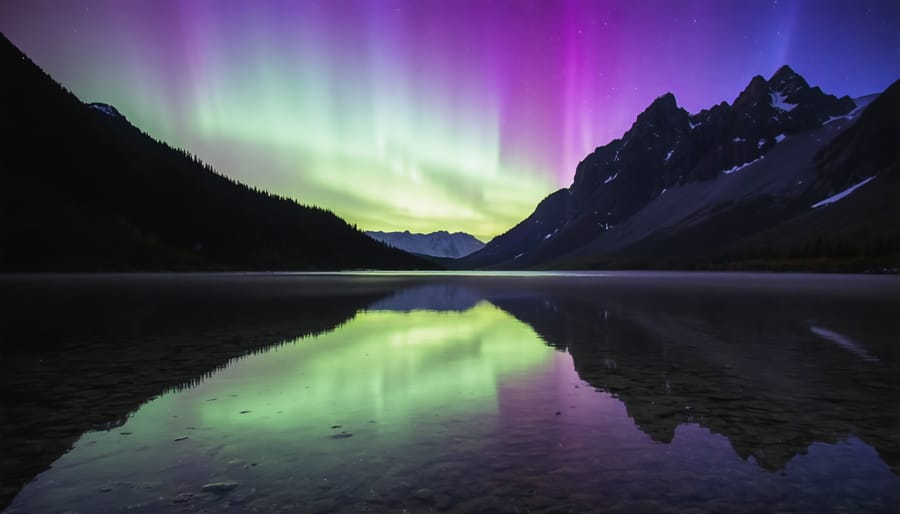
For those willing to venture into the darkness, landscape astrophotography offers more than just photographs—it presents an opportunity to document the increasingly rare conjunction of pristine dark skies and untouched landscapes, creating compelling visual stories that remind us of our place in the universe.
Essential Gear for Landscape Astrophotography
Camera and Lens Selection
Selecting the right camera and lens combination is crucial for capturing stunning night sky landscapes. For the camera body, full-frame sensors are ideal due to their superior low-light performance and ability to gather more light. Cameras like the Sony a7 series, Nikon Z6/Z7, or Canon EOS R series excel in this genre, offering excellent high-ISO capabilities and dynamic range.
When choosing a lens, fast wide-angle options with maximum apertures of f/2.8 or wider are your best bet. A focal length between 14mm and 24mm provides an ideal field of view for capturing both landscape elements and expansive star fields. The Sigma 14mm f/1.8 Art and Sony 24mm f/1.4 GM are popular choices among astrophotographers for their exceptional sharpness and minimal coma distortion.
Keep in mind that while newer, expensive gear can make things easier, you can still capture impressive night sky images with crop-sensor cameras and budget-friendly lenses. The key is understanding your equipment’s limitations and working within them. Look for lenses with good edge-to-edge sharpness and minimal chromatic aberration, as these characteristics become particularly important when shooting stars.
Manual focus capability is essential, as autofocus often struggles in low light. Weather sealing is also worth considering, as nighttime shooting often involves dealing with dew and moisture.
Supporting Equipment
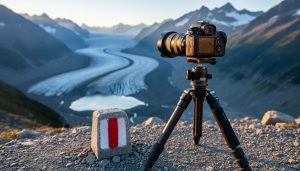
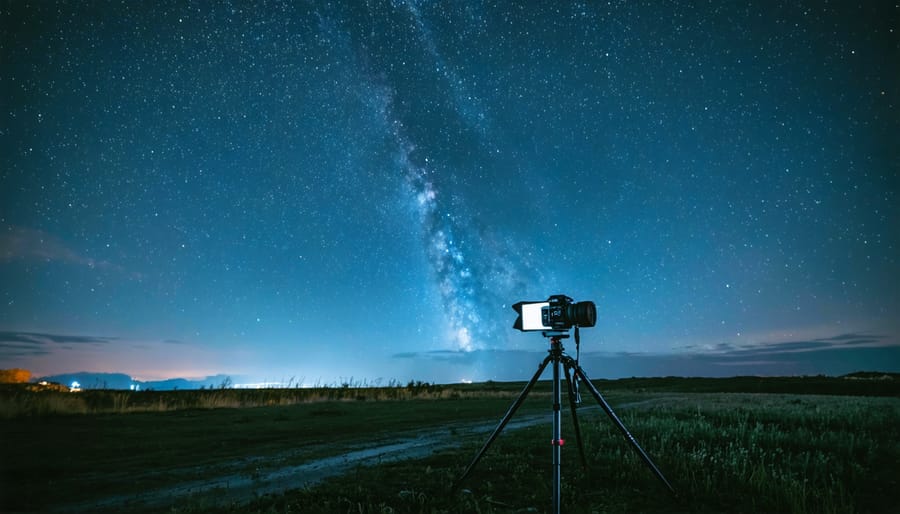
Success in landscape astrophotography relies heavily on having the right supporting equipment alongside your camera and lens. A sturdy tripod is absolutely essential – you’ll be working with long exposures, often in challenging terrain and weather conditions. Look for a tripod that’s both stable and portable, ideally with features like a built-in bubble level and reversible center column for low-angle shots.
Remote triggers or intervalometers are another crucial tool, helping you avoid camera shake during long exposures. Many modern cameras offer smartphone connectivity for remote control, but a dedicated intervalometer gives you more precise control over exposure timing and can be more reliable in cold conditions.
Don’t overlook the importance of proper lighting tools. A quality headlamp with a red light mode helps preserve your night vision while setting up gear, and a small flashlight can be useful for light painting foreground elements. Some photographers also carry LED panels for creative lighting effects.
Additional accessories that prove invaluable include a lens cleaning kit (dew can be a major issue at night), spare batteries (cold temperatures drain them quickly), and memory cards. A reliable star-tracking app on your phone helps with composition and timing, while a weather app with cloud coverage forecasting is essential for planning shoots.
Consider investing in lens heating strips to prevent condensation on cold nights, and always pack emergency gear like a basic first aid kit and extra warm clothing.
Location Scouting and Planning
Finding Dark Sky Locations
Finding the perfect dark sky location is crucial for capturing stunning astrophotography landscapes. While mastering night photography techniques is essential, even the best camera settings won’t help if there’s too much light pollution in your shooting location.
Start by consulting dark sky maps like Darksitefinder.com or Light Pollution Map to identify areas with minimal artificial light. These tools use color-coded overlays to show light pollution levels, with darker areas being ideal for astrophotography. National parks, wilderness areas, and remote locations at higher elevations typically offer the best conditions.
When scouting locations, consider both the darkness of the sky and the potential for interesting foreground elements that align with landscape composition principles. Look for natural features like mountains, rock formations, or trees that can create compelling silhouettes against the starry sky.
Timing is crucial – plan your shoot around the lunar calendar, as a full moon can wash out the stars just like city lights. The best conditions are during the new moon or when the moon is below the horizon. Also consider seasonal factors; the Milky Way core is most visible during summer months in the Northern Hemisphere.
Before heading out, research access points, parking availability, and any permits required. Always scout your location during daylight hours first to identify potential hazards and composition opportunities. Remember to check weather forecasts specifically for cloud cover and atmospheric conditions, as clear skies are essential for successful astrophotography.
Weather and Astronomical Conditions
Success in landscape astrophotography heavily depends on understanding and monitoring both weather and astronomical conditions. Clear, dark skies are essential, but there’s more to consider than just checking if it’s cloudy.
Weather-wise, you’ll want to look for nights with low humidity and good visibility. High humidity can create unwanted haze and condensation on your lens, while atmospheric particles can scatter light and reduce star visibility. Apps like Clear Outside and AccuWeather provide detailed atmospheric conditions that are particularly relevant for astrophotography.
The moon phase plays a crucial role in your shooting schedule. While moonlight can add interesting elements to your landscape, it can also wash out the stars and Milky Way. New moon periods offer the darkest skies, ideal for capturing faint celestial objects. During first or last quarter phases, you can take advantage of moonset or moonrise times for a brief window of dark sky shooting.
Seasonal timing matters too. The Milky Way core is most visible in the Northern Hemisphere from March to October, with peak visibility during summer months. Winter brings different opportunities, including longer nights and clearer atmospheric conditions in many locations.
Light pollution is another critical factor. Use dark sky maps and apps like Dark Site Finder to locate areas away from city lights. Even on clear nights, artificial light can significantly impact your images. Consider planning your shoots around astronomical events like meteor showers or conjunctions, which can add unique elements to your compositions.
Remember that perfect conditions rarely align by chance – successful landscape astrophotography requires careful planning and patience.
Camera Settings and Techniques
Exposure Settings
Getting the exposure right in landscape astrophotography requires carefully balancing settings to capture both the starry sky and earthbound elements. Let’s break down the essential camera settings that will help you achieve stunning results.
Start with your ISO setting, typically between 1600 and 6400, depending on your camera’s capabilities and the amount of ambient light. Higher ISO values will reveal more stars but also introduce more noise, so finding the sweet spot for your equipment is crucial.
For shutter speed, follow the “500 rule” to avoid star trails: divide 500 by your lens’s focal length. For example, with a 24mm lens, you’d use approximately 20 seconds (500/24). However, modern high-resolution sensors might benefit from using the more conservative “400 rule” or even “300 rule” for sharper stars.
When it comes to optimal f-stop settings, aim for f/2.8 to f/4 to gather maximum light while maintaining reasonable depth of field. Some photographers prefer stopping down slightly from their lens’s widest aperture to improve corner sharpness.
Consider using exposure blending techniques by taking multiple shots:
– A longer exposure (2-4 minutes) at lower ISO for the landscape
– A shorter exposure (15-25 seconds) at higher ISO for the stars
– Additional exposures for foreground elements if needed
Focus is equally critical. Set manual focus using your camera’s live view, zooming in on a bright star or distant light source. Once sharp focus is achieved, switch off autofocus to prevent hunting in the dark.
Remember that these settings serve as starting points – local conditions, light pollution, and your creative vision will influence the final settings you choose. Don’t be afraid to experiment and adjust based on your results.

Focusing Techniques
Achieving sharp focus in the dark presents unique challenges, but several reliable techniques can help you capture tack-sharp nightscape images. The key is to understand that autofocus typically struggles in low-light conditions, making manual focusing essential.
One of the most effective methods is using live view with maximum magnification (usually 10x) on a bright star. Center the star on your screen, zoom in digitally, and carefully adjust your focus ring until the star appears as a sharp point of light rather than a blurry blob. Remember that even slight adjustments can make a significant difference.
For landscape elements, you can use a powerful flashlight to illuminate distant objects, making them easier to focus on. Some photographers prefer focusing before sunset when there’s still enough light to see clearly, then taping down the focus ring to prevent accidental movement.
Another reliable technique is using your lens’s infinity mark, though it’s important to note that many modern lenses aren’t precisely calibrated for true infinity. Test your specific lens during daylight hours to find its exact infinity point, and make a small mark if needed.
For maximum precision, consider investing in a Bahtinov mask – a specialized focusing aid that creates a specific diffraction pattern around stars. When the pattern is symmetrical, you’ve achieved perfect focus. While primarily used in deep-sky astrophotography, it can be equally helpful for nightscape work.
Once you’ve achieved focus, it’s crucial to maintain it. Disable autofocus to prevent the camera from hunting in the dark, and avoid touching the focus ring. Some photographers use gaffer tape to secure the focus ring in position. Take test shots and check them at 100% magnification on your camera’s LCD screen to confirm sharpness before committing to a long series of exposures.
Remember that temperature changes can affect focus throughout the night, so periodically check and adjust as needed, especially during longer shooting sessions.
Post-Processing Workflow
Raw File Processing
Processing raw files is your first crucial step in bringing out the beauty of your nightscape images. Start by importing your RAW files into your preferred editing software – popular choices include Adobe Lightroom, Capture One, or DarkTable. The key advantage of shooting in RAW is the extensive data you have to work with, especially in those deep shadow areas where star details hide.
Begin with basic exposure adjustments, but be careful not to push too far – nightscape images can quickly become noisy when overexposed in post. Set your white balance to around 3800-4200K for a natural-looking night sky, though this can be adjusted to taste. Pay special attention to recovering shadow details in your landscape elements while maintaining the rich blacks of the night sky.
Lens corrections are particularly important in astrophotography. Enable profile corrections to address vignetting and distortion, which are often more pronounced in wide-angle shots taken at large apertures. Remove chromatic aberration, which can appear as colored fringing around bright stars.
Next, address any noise in your image. Start with luminance noise reduction to tackle the graininess, but be conservative – too much noise reduction can make stars look soft and unnatural. Color noise reduction helps eliminate the speckled artifacts often present in long exposures.
At this stage, don’t worry about local adjustments or creative effects – focus on getting a clean, well-balanced image that will serve as a solid foundation for more detailed editing. Make sure your histogram shows good detail preservation in both highlights and shadows, without clipping at either end.
Advanced Editing Techniques
Post-processing is where landscape astrophotography truly comes alive, transforming good shots into spectacular ones. The key is balancing the exposure between the darker landscape and the bright night sky. Start by working with RAW files, which provide maximum flexibility for adjustments.
One of the most powerful techniques is exposure blending, where you combine multiple exposures of the same scene. Take one exposure optimized for the sky and another for the foreground, then blend them seamlessly in Photoshop using layer masks. This approach preserves details in both the stars and landscape elements without introducing unwanted noise.
Advanced image stacking techniques can dramatically reduce noise while maintaining sharpness. Stack multiple sky exposures to bring out faint stars and nebulae, while keeping your foreground shots separate for cleaner blending.
Color temperature adjustment is crucial for creating mood. The night sky often benefits from cooler tones (around 3800K-4500K), while landscapes might need warmer adjustments to appear natural. Use selective color adjustments to enhance the Milky Way’s core colors while maintaining realistic earthbound hues.
Finally, master the art of dodging and burning to guide viewers’ eyes through your image. Subtly brighten key elements in your composition while darkening distracting areas. Remember to keep adjustments subtle – the goal is to enhance the natural beauty of the scene, not create something that looks artificial. Regular breaks during editing help maintain perspective on your adjustments.
Landscape astrophotography represents a perfect marriage between earthbound beauty and celestial wonder, offering photographers an opportunity to capture some of the most breathtaking images imaginable. As we’ve explored throughout this guide, success in this field requires careful planning, technical knowledge, and a dash of creative vision – but the rewards are truly spectacular.
Remember that every great shot starts with location scouting and timing. Whether you’re capturing the Milky Way over a mountain range or star trails above a desert landscape, understanding your environment and the night sky’s movements is crucial. The right equipment – from your camera and lens to essential accessories like a sturdy tripod and headlamp – will serve as your faithful companions on these nocturnal adventures.
Don’t let the technical aspects intimidate you. Start with the basic settings we’ve discussed: wide apertures, high ISO, and appropriate shutter speeds. As you gain confidence, experiment with different techniques like focus stacking and panoramic shots to expand your creative possibilities.
Most importantly, embrace the learning process. Your first attempts might not match the stunning images you’ve admired online, but each session under the stars will teach you something valuable. Join local photography groups, share your experiences, and learn from fellow astrophotographers. The community is incredibly supportive and always eager to help newcomers.
The night sky has been inspiring humans since the dawn of time, and now you have the tools to capture its majesty. So pack your gear, check the weather forecast, and head out into the darkness. Your next masterpiece awaits under the stars.