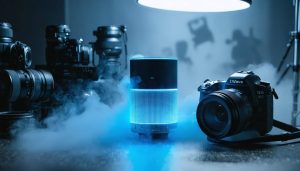
You’ve just pulled your studio strobes from storage for a portrait session, only to discover they’re firing inconsistently or not at all. The culprit isn’t a broken flash tube—it’s likely the capacitors degrading from disuse. This scenario plays out in studios and home setups worldwide, yet most photographers don’t realize that lighting equipment requires regular operation to maintain optimal performance, a practice known as maintenance lighting.
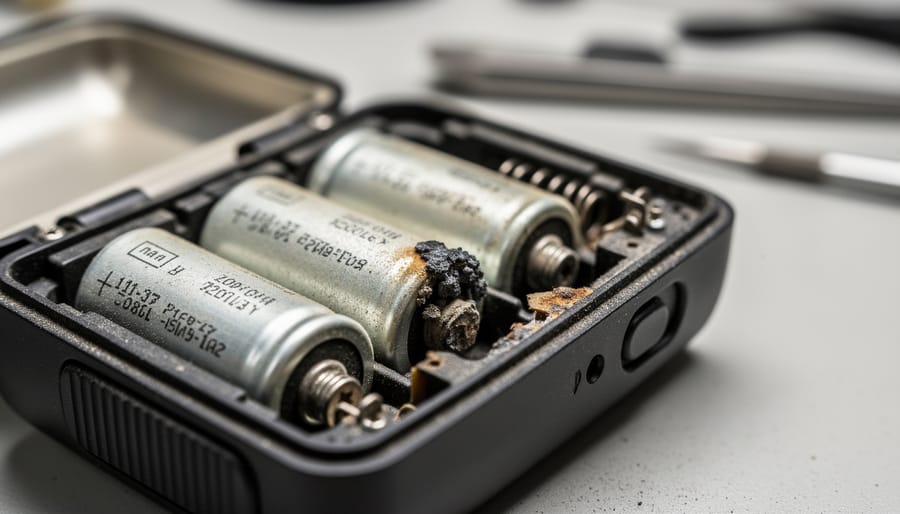
Unlike essential camera maintenance that focuses on cleaning and physical care, maintenance lighting addresses the electrical components inside your strobes, continuous lights, and speedlights. The electrolytic capacitors that store and release energy for your flashes actually deteriorate when left idle for extended periods. The electrolyte inside these components can dry out or crystallize, leading to reduced performance, longer recycle times, or complete failure.
The solution is surprisingly simple: fire your lighting equipment periodically, even when you’re not actively shooting. This process reforms the capacitors, keeping the electrolyte properly distributed and the components functioning as designed. Whether you own a single speedlight or a complete studio setup worth thousands of dollars, understanding and implementing maintenance lighting can extend your equipment’s lifespan by years and prevent costly repairs or replacements.
This article will guide you through the science behind capacitor degradation, provide specific maintenance schedules for different types of lighting equipment, and offer practical techniques to keep your gear ready for action whenever inspiration strikes.
What Exactly Is Maintenance Lighting?
If you’ve ever heard a photographer mention they need to “fire up” their strobes even when they’re not shooting, you’ve encountered the concept of maintenance lighting. In the photography world, maintenance lighting refers to the practice of periodically powering on and using your lighting equipment—even when you don’t have an actual shoot planned—to keep the internal components healthy and functioning properly.
This isn’t just photographers being overly precious about their gear. There’s genuine science behind why electronic equipment, particularly flash units and studio strobes, benefits from regular use. At the heart of most lighting equipment are capacitors, which store electrical energy and release it rapidly to create that brilliant flash. When these capacitors sit idle for extended periods, they can actually deteriorate through a process called dielectric absorption. Think of it like a muscle that weakens without exercise—capacitors need occasional charging and discharging cycles to maintain their full capacity and efficiency.
Beyond capacitors, other electronic components can suffer from prolonged storage. Solder joints may develop micro-cracks, electrical contacts can oxidize, and internal connections can become unreliable. You might have experienced this yourself: pulling out a speedlight that worked perfectly six months ago, only to find it now misfires, produces inconsistent output, or won’t fire at all.
Real-world examples abound in photography communities. Wedding photographers who store backup strobes for months often discover their “emergency” lights fail right when needed most. Studio photographers returning from off-season breaks sometimes face expensive repairs that could have been prevented with simple monthly testing. Even high-end professional equipment isn’t immune—a $2,000 studio strobe can develop the same issues as a budget speedlight if left dormant too long.
The good news? Maintenance lighting is simple and takes just minutes. By understanding this principle, you can extend your equipment’s lifespan and ensure reliability when it truly matters.
Why Your Flash Needs Exercise (Even When You Don’t)
The Capacitor Problem
At the heart of most studio strobes and speedlights sits a flash capacitor, typically an electrolytic type chosen for its ability to store and rapidly discharge large amounts of electrical energy. Here’s where things get interesting: these capacitors aren’t static components. They rely on a chemical process that, when left idle, begins to reverse.
Electrolytic capacitors contain a dielectric oxide layer that forms on the surface of one electrode. This layer is created and maintained through a process called “forming,” which happens when voltage is applied to the capacitor. Think of it like a protective coating that needs regular renewal. When your flash sits unused for months, this oxide layer gradually deteriorates. The electrolyte itself can also dry out or chemically degrade over time, reducing the capacitor’s ability to hold a charge efficiently.
The practical consequence? After extended storage, you might notice your flash takes longer to recycle between shots, doesn’t achieve full power output, or in severe cases, fails to fire at all. Some photographers have even experienced complete capacitor failure when powering up equipment that’s been dormant for years. The solution is surprisingly simple: regular use. By firing your flash periodically, you’re essentially performing that forming process again, maintaining the oxide layer and keeping the electrolyte chemically stable. It’s preventive maintenance disguised as a simple test shot.
Battery and Power Circuit Health
Your flash unit’s battery and power circuit are more like living systems than static components—they need regular activity to stay healthy. When lighting equipment sits unused for months, chemical processes inside the batteries can slow down, creating sulfate crystals on battery terminals and degrading the internal chemistry. Meanwhile, capacitors in the power management circuit can develop something called dielectric absorption, where they essentially “forget” how to hold a full charge efficiently.
Running your lights periodically through maintenance lighting sessions keeps these issues at bay. When you fire your strobes every few weeks, you’re essentially exercising the entire power pathway. The battery undergoes charge and discharge cycles that prevent crystallization and maintain the electrolyte balance. For example, lithium-ion packs used in modern speedlights perform best when they cycle through at least 20-30% of their capacity monthly.
The power circuit benefits equally. Capacitors need occasional voltage stress to maintain their dielectric properties—think of it as keeping their “memory” fresh. I learned this the hard way when a studio strobe that sat idle for eight months suddenly couldn’t deliver full power, even with fresh batteries. The capacitors had deteriorated from disuse.
Following proper battery life optimization practices through regular maintenance lighting also helps your charging circuitry stay calibrated. This ensures accurate power level readings and prevents the frustrating situation where your gear shows full charge but dies unexpectedly mid-shoot.
Creating Your Maintenance Lighting Schedule
Monthly Maintenance for Regular Users
For photographers who regularly work with their lighting equipment—say, a few times per month—a simple monthly routine keeps everything in top working order without becoming burdensome. Think of this as the sweet spot between casual hobbyist and working professional.
Start by powering up all your flashes and strobes, even the ones you didn’t use recently. Fire each unit at least 10-15 times at various power settings. This exercise, which forms the core of maintenance lighting, helps prevent capacitor degradation by cycling the stored charge through the system. If you notice slower recycling times or inconsistent output, it’s an early warning sign that deserves attention.
While you’re at it, inspect the contacts on your flash feet and light stands for any corrosion or debris. A simple wipe with a dry microfiber cloth usually does the trick. Check your sync cables and battery compartments too—battery leakage can sneak up on you, especially with backup units that sit idle for weeks.
Finally, rotate your batteries. If you keep freshly charged spares in your bag, swap them with the ones currently installed in your lights. This ensures all your batteries get regular use and prevents the dreaded “dead battery surprise” during a shoot. This entire routine takes maybe 20 minutes but saves countless headaches down the road.
Quarterly Routines for Backup Equipment
Every three months, your backup lights and specialty equipment need more than just a quick check—they deserve a proper workout. This quarterly routine prevents those disappointing moments when you pull out a backup strobe for an important shoot, only to find its modeling lamp has burned out or its battery is dead.
Start by powering up each backup unit for at least 15 minutes of continuous use. This cycling helps prevent capacitor degradation that occurs during long storage periods. For flash units, fire them at various power settings—full power, half power, and quarter power—to ensure all circuits are functioning properly. You’d be surprised how often a flash that works fine at one setting develops issues at others.
Seasonal gear requires special attention. If you stored beach or outdoor lighting equipment after summer, inspect O-rings and seals for cracks or deterioration before next season. Apply a thin layer of silicone lubricant to keep them flexible. Check weatherproof housings for any moisture intrusion that might have occurred during storage.
Replace the batteries in backup units even if they show charge remaining. Batteries that sit idle for months can develop internal resistance that makes them unreliable when you need them most. For professional photographers, this small investment beats explaining to a client why you couldn’t deliver their images.
Emergency Prep Before Important Shoots
When you’re pulling lights from storage the night before a wedding or commercial shoot, the last thing you need is equipment failure. A quick pre-shoot inspection can save you from disaster.
Start with a visual check. Look for any corrosion on battery contacts, which appears as white or green buildup and can prevent proper electrical connection. If you spot any, clean it gently with a cotton swab and rubbing alcohol. Inspect power cables for fraying or damage, paying special attention to where the cable meets the plug—this is where stress fractures typically occur.
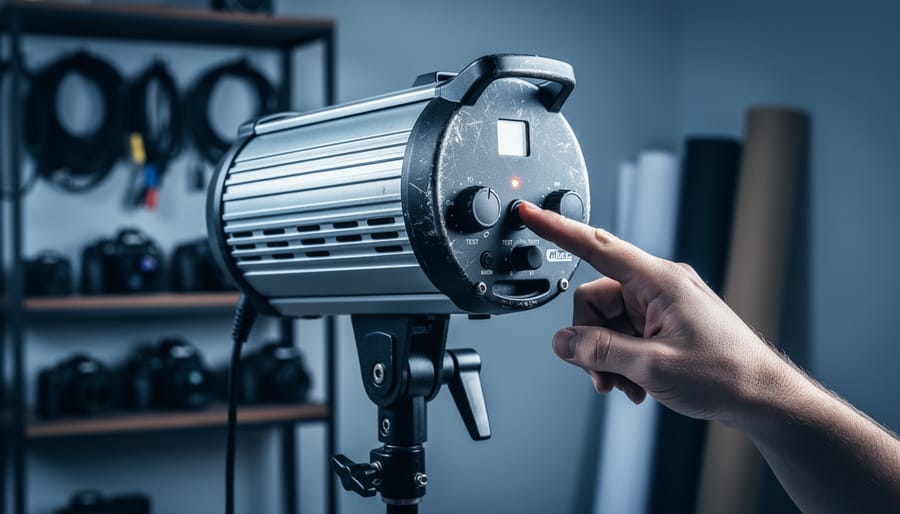
Next, power everything on and let it run for at least ten minutes. This allows capacitors in flash units to reform if they’ve been sitting idle. Watch for any unusual behavior: flickering that wasn’t there before, slower recycling times than you remember, or strange odors that might indicate overheating components.
Check your light stands and modifiers too. Tighten any loose joints and confirm that locking mechanisms engage properly. A wobbly stand mid-shoot wastes valuable time and risks damaging expensive equipment.
Finally, pack backup solutions. If you have a second strobe or speedlight, bring it along. Even if your primary lights pass inspection, having a contingency plan means you can confidently handle whatever the shoot throws at you.
Step-by-Step Maintenance Lighting Procedures
Speedlights and On-Camera Flashes
Speedlights and on-camera flashes are perhaps the most overlooked pieces of lighting equipment when it comes to maintenance lighting, yet they’re among the most sensitive to extended dormancy. These portable powerhouses contain high-voltage capacitors that can degrade if left uncharged for months at a time.
For speedlights and similar flash units, your maintenance routine should start simple. Remove the batteries if your flash has been sitting unused for more than two weeks. Corroded battery terminals are one of the leading causes of flash failure, and it’s entirely preventable. When you’re ready to perform maintenance, insert fresh batteries and power on the unit.
Here’s where the specific protocol matters: don’t immediately fire your flash at full power. Instead, start with a few test fires at quarter power, waiting about 10 seconds between each firing. This gentle approach allows the capacitors to charge gradually without shocking the system. After three or four low-power pops, you can safely fire at full power.
Perform this power-up sequence monthly for flashes in storage, or before any important shoot if your speedlight hasn’t been used in several weeks. This simple habit, which takes less than five minutes, can extend your flash’s lifespan by years and prevent the frustrating scenario of a dead flash when you need it most.
Studio Strobes and Monolights
Studio strobes and monolights demand more attention than smaller lighting equipment due to their higher power output and complex cooling systems. These workhorses of professional photography need regular maintenance cycling to keep their capacitors charged and prevent internal component degradation.
For studio strobes, power on your units every 4-6 weeks and fire them through a complete cycle at varying power levels. Start at quarter power, gradually working up to full power over 20-30 pops. This routine keeps the flash tubes properly seasoned and prevents capacitor voltage drift. Let the modeling lamp run for at least 15 minutes during each session to ensure the cooling fan operates correctly.
Pay special attention to recycle times during these sessions. If your strobe that normally recycles in 2 seconds suddenly takes 4 or 5, that’s an early warning sign of capacitor issues. For example, a photographer friend discovered failing capacitors in his aging pack-and-head system during a routine maintenance cycle, avoiding what would have been a disaster during a scheduled commercial shoot.
Clean cooling vents monthly using compressed air, keeping the can upright to prevent moisture release. Battery-powered strobes require additional care: remove batteries during extended storage periods and maintain a 50-60% charge level. Run a full charge-discharge cycle every three months to preserve battery health and ensure reliable performance when opportunities arise.
Continuous LED Lights
LED lights have revolutionized photography lighting, but they come with their own maintenance considerations that differ significantly from traditional flash units. The good news is that LEDs themselves are incredibly durable, but the supporting electronics require attention.
The primary concern with continuous LED lights is heat management. Unlike strobes that fire briefly, LEDs operate continuously during use, generating sustained heat that can degrade both the diodes and driver circuits over time. When storing LED panels, ensure they’re completely cool and keep them in environments where temperature fluctuations are minimal. Excessive heat during storage can damage internal components even when the unit isn’t powered on.
Driver circuits, which regulate power to the LEDs, are particularly vulnerable to capacitor degradation when left idle for extended periods. For LED fixtures you use infrequently, power them on for 15-20 minutes every two to three months. This practice keeps the circuitry active and prevents capacitor deterioration that can lead to flickering or complete failure.
Pay attention to cooling fans if your LED units have them. Dust accumulation restricts airflow and forces components to work harder. Use compressed air to clean vents and fan blades quarterly, especially if you shoot in dusty environments. This simple step can dramatically extend your LED fixture’s lifespan and maintain consistent color temperature output.
Warning Signs Your Equipment Needs Immediate Attention
Your lighting equipment often gives you plenty of warning before complete failure, but you need to know what to watch for. Think of these signs as your gear’s way of calling out for help before it leaves you in the dark during a critical shoot.
The most obvious red flag is inconsistent light output. If your strobe fires at different intensities shot-to-shot, even when set to the same power level, something’s wrong internally. This typically points to capacitor degradation or power supply issues that maintenance lighting alone won’t fix. I learned this the hard way during a wedding when my main light decided to play roulette with its power output, forcing me to rely entirely on my backup unit.
Unusual sounds deserve immediate attention. Capacitors shouldn’t whine excessively, transformers shouldn’t buzz loudly, and you definitely shouldn’t hear crackling or popping. These acoustic warnings often precede electrical failures. Similarly, if your modeling lamp flickers constantly or fails to illuminate at all, this could indicate deeper electrical problems beyond just a burned-out bulb.
Physical damage is another critical indicator. Cracked housing, loose connections, or corroded battery compartments all compromise your equipment’s safety and reliability. Moisture damage appears as condensation inside protective covers or white powdery residue around contact points. Don’t ignore these visible problems, they rarely improve on their own.
Recycle times that progressively lengthen signal capacitor weakness. If your strobe that once recharged in two seconds now takes five or more, the capacitors are losing their ability to hold and release charge efficiently. This degradation accelerates once it starts, so professional service becomes necessary rather than optional.
Temperature extremes also warrant attention. Equipment that becomes unusually hot during normal operation or takes abnormally long to warm up in cold conditions may have internal resistance problems. Your gear should operate within predictable temperature ranges, and deviations suggest component stress that could lead to failure.
When you notice any combination of these symptoms, don’t wait until your next scheduled maintenance lighting session. Professional evaluation can prevent complete failure and potentially save you from replacing expensive equipment entirely. Remember, catching problems early almost always costs less than emergency repairs or replacement.
Common Mistakes That Accelerate Equipment Failure
Even photographers who understand the importance of maintenance lighting sometimes sabotage their own efforts through well-intentioned but misguided practices. One of the most common mistakes is storing equipment in garages, attics, or basements where temperature swings and humidity levels wreak havoc on electronics and capacitors. I once worked with a wedding photographer who kept her backup strobes in an unheated garage—after two winters, three of her four units failed within months of each other due to capacitor degradation. Investing in proper storage solutions and implementing humidity protection techniques would have saved her hundreds in replacement costs.
Battery management represents another critical failure point. Many photographers make the mistake of leaving batteries installed in stored equipment, leading to corrosion from leakage or self-discharge damage. Conversely, some remove batteries and store them completely discharged, which can reduce lithium-ion battery capacity over time. The ideal approach is storing lithium batteries at approximately 40-60% charge in a cool environment.
Overzealous cleaning also causes unnecessary damage. Using compressed air directly on circuit boards can dislodge small components, while harsh cleaning solutions can strip protective coatings or damage LCD screens. A microfiber cloth and manufacturer-approved cleaning methods are usually sufficient.
Perhaps the most counterproductive mistake is ignoring manufacturer recommendations for service intervals. Strobe capacitors, for instance, have finite lifespans and benefit from periodic reformation regardless of use frequency. Skipping these maintenance cycles because equipment appears to function normally is like ignoring oil changes because your car still runs—it catches up with you eventually, usually at the worst possible moment.
Here’s the reality: spending fifteen minutes every few months on maintenance lighting is significantly less painful than discovering your $800 flash unit won’t fire during a crucial shoot, or worse, finding yourself shopping for replacement equipment years earlier than necessary. Think of it this way—you probably spend more time scrolling through social media before bed than it takes to properly maintain your entire lighting kit.
The beauty of establishing a maintenance routine is that it becomes second nature remarkably quickly. That first session might feel a bit awkward as you familiarize yourself with the process, but by your third or fourth maintenance cycle, you’ll breeze through it without consulting any notes. Many photographers find that pairing maintenance sessions with other regular tasks, like backing up image files or cleaning camera sensors, helps cement the habit.
Before you close this article, take a moment to actually calendar your first maintenance session. Choose a date within the next two weeks, set a reminder, and gather your lighting equipment in one place. Starting is genuinely the hardest part. Once you’ve completed that initial session and seen how straightforward the process really is, you’ll wonder why you didn’t begin sooner. Your future self—and your lighting equipment—will thank you for making this small investment in preventive care.