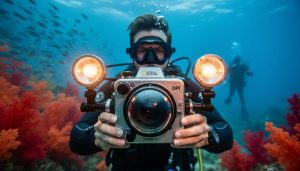
The moment you descend below the surface with your camera, everything changes. Light bends differently, colors disappear at specific depths, and your standard photography gear becomes completely useless without proper protection. That first leak into an inadequate housing, that disappointing blue-washed image from shooting without strobes, or that frustratingly blurry shot because you chose the wrong port—these are expensive lessons that most underwater photographers learn the hard way.
Understanding underwater photography gear isn’t just about protecting your equipment from water damage. It’s about compensating for an environment where red wavelengths vanish within fifteen feet, where refraction makes everything appear 25% closer than it actually is, and where the tiniest particle of suspended sediment can ruin your shot. A housing does more than keep water out—it must provide ergonomic access to critical controls while you’re wearing thick gloves and managing buoyancy. Your lighting system doesn’t just illuminate subjects; it restores the vibrant colors that water naturally filters out.
The gear decisions you make directly impact the images you’ll capture. Choose an acrylic dome port instead of glass for wide-angle work, and you’ll see optical distortion in your corners. Skimp on strobe power for macro photography, and you’ll struggle with backscatter in anything but pristine water conditions. But invest wisely in the right combination of housing, ports, and lighting tailored to your specific shooting style, and you’ll unlock creative possibilities that simply don’t exist on land—where you can photograph eye-to-eye with marine life in their natural habitat.
Understanding the Underwater Environment and Your Gear Needs
Why Water Changes Everything
The moment you submerge your camera underwater, the rules of photography completely change. Water isn’t just a different environment—it fundamentally alters how light behaves, and understanding these changes is essential before investing in any gear.
First, let’s talk about color loss. Water acts like a massive color filter, absorbing wavelengths of light as you descend. Red disappears first, typically within 15-20 feet of the surface. Then orange vanishes around 30 feet, followed by yellow at 50 feet. This is why everything looks blue or green in underwater photos taken without artificial lighting. No amount of post-processing can fully recover colors that never reached your camera sensor technology in the first place.
Water also reduces contrast and sharpness significantly. Even in crystal-clear tropical waters, visibility is measured in tens of meters, not miles. Suspended particles scatter light, creating a hazy effect that softens details and reduces the effective range of your equipment. This is why underwater photographers get as close as possible to their subjects—a principle often summarized as “get close, then get closer.”
Autofocus systems struggle underwater too. The density of water, combined with reduced contrast and floating particles, confuses phase-detection autofocus. Many underwater photographers rely on manual focus or zone focusing techniques for critical shots.
Finally, water magnifies everything by roughly 25 percent, making subjects appear closer and larger through your viewfinder. This affects your lens choice and composition strategies in ways land photographers never encounter.
Matching Gear to Your Diving Depth
Understanding depth ratings is crucial because your gear needs to withstand increasing water pressure as you descend. Think of it like choosing the right armor for different battle conditions—a mismatch can be costly.
For snorkeling and shallow freediving (up to 33 feet), you have the most options. Many action cameras and basic underwater housings are rated for this depth, making them budget-friendly entry points. These work beautifully for tropical reef photography and casual beach documentation.
Recreational diving (typically 60-130 feet) requires more robust equipment. Most dedicated underwater housings are rated to at least 200 feet, giving you comfortable headroom. This rating handles the vast majority of reef diving, wreck exploration, and marine life encounters you’ll experience. Always choose gear rated significantly deeper than your planned maximum depth—it’s not just about surviving one dive, but maintaining reliability over hundreds of pressure cycles.
Technical diving beyond recreational limits demands professional-grade housings rated to 300 feet or more. At these depths, even minor housing failures become serious safety issues. The investment jumps considerably, but so does the manufacturing precision and quality control.
Here’s a practical rule: never dive your gear to its maximum rated depth. A 130-foot housing should max out around 100 feet in real-world use, preserving both safety margins and equipment longevity.
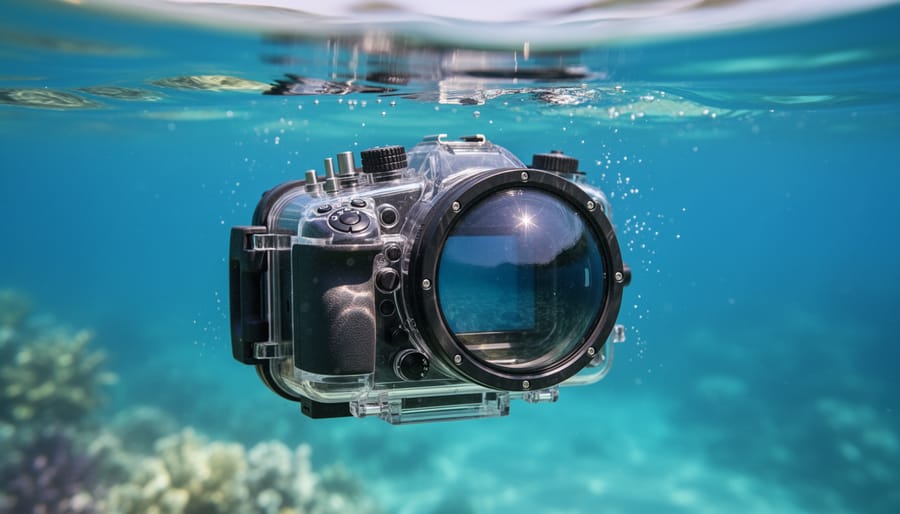
Housing Systems: Your Camera’s Protective Shell
Hard Housings vs. Soft Housings
When you’re shopping for an underwater housing, you’ll encounter two fundamentally different designs: hard housings and soft housings. Understanding the differences between these approaches will help you choose the right protection for your camera and shooting style.
Hard housings are constructed from rigid materials like polycarbonate or aluminum. These housings offer superior protection and can handle extreme depths—many are rated for 130 to 200 feet or more, with professional models going even deeper. The solid construction means your camera controls remain precise and accessible through mechanical buttons and dials. You’ll also get better optical quality since hard housings accommodate dome and flat ports specifically designed to minimize distortion. The trade-off? They’re bulky, expensive (often $500 to several thousand dollars), and camera-specific, meaning you’ll need a new housing if you upgrade your camera body.
Soft housings, sometimes called bag housings, use flexible waterproof materials similar to drybag technology. They’re incredibly affordable—often under $100—and their flexible design accommodates multiple camera models, making them more adaptable as your gear evolves. They’re also lightweight and perfect for travel. However, soft housings typically max out around 30 to 60 feet depth, and the flexible material can make accessing controls more challenging. The built-in lens element won’t deliver the same optical performance as dedicated ports, which can affect image sharpness and introduce distortion.
For casual snorkeling, pool photography, or beach vacations where you’re staying in shallow water, soft housings offer excellent value and convenience. If you’re serious about diving deeper than recreational snorkeling depths, need professional image quality, or plan extensive underwater photography sessions, investing in a hard housing makes sense. Many photographers actually own both: a soft housing for casual adventures and a hard housing for serious work.
Camera-Specific vs. Universal Housings
When shopping for an underwater housing, you’ll quickly encounter a fundamental choice: camera-specific housings designed for your exact model, or universal systems that accommodate multiple cameras. Understanding the trade-offs can save you both money and frustration down the line.
Camera-specific housings are precision-engineered for individual camera models, with perfectly positioned controls for every button and dial. If you’re shooting with a mirrorless camera or DSLR, these custom housings typically range from $1,500 to $4,000 or more for professional models. The advantage is unmistakable: you get full access to every camera function underwater, often with tactile feedback that lets you change settings without looking. Many professional underwater photographers won’t settle for anything less, particularly when split-second adjustments matter in fast-moving situations with marine life.
The downside? When you upgrade your camera body, that expensive housing becomes obsolete. I’ve seen photographers delay camera upgrades simply because they couldn’t justify replacing a perfectly good housing.
Universal housings, conversely, use adjustable systems or interchangeable port systems that work with multiple camera bodies. They’re particularly popular for compact cameras and smartphones, with prices starting around $100 to $500. While you sacrifice some ergonomic precision and may lose access to certain buttons, these systems offer remarkable flexibility for photographers who shoot with multiple cameras or upgrade frequently.
For beginners testing underwater photography, universal housings make excellent entry points. Experienced photographers with established camera systems typically find camera-specific housings worth the investment, especially when reliability and complete creative control matter most.
Critical Housing Features You Can’t Ignore
When evaluating housings, four features should top your priority list. First, the O-ring seal system is your primary defense against water intrusion. Quality housings use double O-rings with clear grooves that make inspection straightforward. Before every dive, examine these seals for sand, hair, or nicks, and apply a thin layer of silicone grease. Think of this as your pre-dive ritual—it takes two minutes but prevents thousands in damage.
Control access matters more than you might expect. You’ll need reliable access to shutter release, zoom, aperture, and focus controls. The best housings feature ergonomic button placement that mirrors your camera’s layout, letting you adjust settings without looking away from your subject. When testing housings, actually press the buttons—cheap mechanisms stick or require excessive force, which causes camera shake.
Port compatibility determines what subjects you can photograph. Dome ports are essential for wide-angle work and split shots, while flat ports suit macro photography. Verify that your housing manufacturer offers port options for your specific lenses, as retrofitting incompatible ports rarely works well.
Finally, vacuum systems provide peace of mind. These affordable additions pump air from your housing, creating negative pressure. If a seal begins failing, the system alerts you before water enters, giving you time to abort the dive safely.
Ports and Domes: Getting Sharp Images Through the Window
Flat Ports for Macro Work
Flat ports excel at macro photography because they maintain the natural magnification and angle of view of your lens underwater. Unlike dome ports that introduce optical distortion and effectively widen your field of view, flat ports preserve your lens’s intended focal length, making them perfect for capturing tiny nudibranchs, cleaning stations, and intricate coral details.
The physics are straightforward: flat ports create a simple air-to-water interface that doesn’t bend light as dramatically as a dome. This means your 60mm macro lens still behaves like a 60mm lens, giving you the working distance and magnification you expect. The optical quality remains sharp corner-to-corner, which is exactly what you need when photographing a seahorse’s textured skin or a goby’s colorful patterns.
However, flat ports have significant limitations for wide-angle work. The flat interface creates distortion and soft corners when used with wide lenses, and it effectively narrows your field of view by about 25 percent due to refraction. An 18mm lens behind a flat port will behave more like a 24mm lens, defeating the purpose of going wide.
Most underwater photographers invest in both port types. If your primary interest is reef life, portraits, and small subjects, start with a flat port matched to a quality macro lens. You’ll get sharper results and avoid the focus challenges that domes can introduce when shooting close.
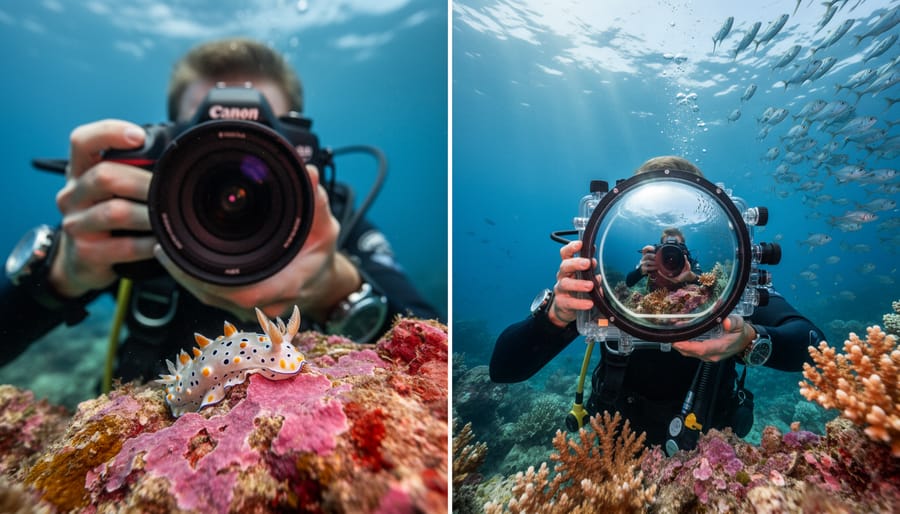
Dome Ports for Wide-Angle Magic
When you attach a wide-angle lens to your underwater housing, you’ll quickly discover that water plays optical tricks on your images. Without a dome port, refraction makes everything appear 25% closer and magnified, essentially stealing the wide perspective you’re trying to achieve. This is where dome ports work their magic.
A dome port acts as an additional optical element that corrects this refraction issue by creating a virtual image in front of the dome. Your lens focuses on this virtual image rather than the actual subject, restoring the wide field of view you’d expect on land. The result? You can capture sweeping reef scenes, split-shots showing above and below the waterline, and those dramatic close-focus wide-angle shots that define modern underwater photography.
Dome size matters significantly for image quality. Larger domes, typically 8 to 10 inches in diameter, provide better corner-to-corner sharpness because they maintain more consistent optical properties across the frame. This becomes crucial when working with rectilinear ultra-wide lenses paired with high-resolution camera sensors where any optical imperfection becomes visible in your corners.
Smaller 6-inch domes offer portability advantages but may show softness at the frame edges. For professional work, invest in quality glass domes rather than acrylic versions. While acrylic is lighter and less expensive, glass provides superior optical clarity and scratch resistance, ensuring your wide-angle images maintain sharpness throughout the frame, particularly important when shooting at smaller apertures where corner sharpness becomes critical.
The Virtual Image Problem and How to Solve It
Here’s something that trips up many underwater photographers: when you shoot through a dome port, you’re not actually focusing on your subject. Dome ports create what’s called a virtual image—an optical phenomenon where the camera “sees” the subject closer and smaller than it really is. Think of it like looking through a fishbowl; the image appears distorted and repositioned.
This matters because your autofocus might hunt or miss entirely, especially in low-contrast underwater environments. The solution? Switch to manual focus and understand that the virtual image typically appears about one-quarter of the distance from the dome to your actual subject. For example, if your subject is four feet away, your lens should focus at roughly one foot.
Practically speaking, many underwater photographers prefocus their wide-angle lenses to a sweet spot between one and three feet before diving. Since you’ll likely be shooting at f/8 or smaller for depth of field, this hyperfocal approach keeps most of your scene acceptably sharp. When you encounter larger subjects like whale sharks, just remember to refocus accordingly. With practice, judging these virtual distances becomes second nature, and you’ll spend less time fumbling with focus and more time capturing incredible images.
Lighting Equipment: Bringing Color Back to the Deep
Strobes vs. Continuous Lighting
Choosing between strobes and continuous lights is one of those decisions that can significantly shape your underwater images. Both lighting types have devoted followers, and understanding their strengths helps you pick the right tool for your shooting style.
Strobes deliver powerful bursts of light that freeze motion and reveal vibrant colors at depth. They’re the traditional choice for underwater photography, and with good reason. A quality strobe can overpower ambient light even in murky water, giving you complete control over your lighting. Because they only fire briefly during exposure, strobes are incredibly battery-efficient—you’ll typically get 200-300 full-power flashes per charge. They also have adjustable color temperatures, usually around 5000-5500K, which closely matches natural daylight and brings back those reds and oranges that water filters out.
Continuous LED lights, on the other hand, shine constantly. This makes them fantastic for video work and lets you preview exactly how your lighting affects the scene before you press the shutter. What you see is truly what you get. Modern LED panels have improved dramatically in recent years, offering impressive output and adjustable color temperatures between 3000-6000K. However, they drain batteries much faster than strobes, often lasting just 60-90 minutes at full brightness. Their continuous output also means slower shutter speeds in some situations, which can introduce motion blur with fast-moving subjects.
For still photography of fish and marine life, strobes generally excel. For video, macro work where you’re close to subjects, or when you’re learning and want immediate visual feedback, continuous lights offer real advantages. Many experienced shooters eventually invest in both systems to cover different shooting scenarios.
Strobe Positioning and Mounting Systems
Getting your strobes properly positioned makes the difference between murky, particle-filled images and crystal-clear underwater shots. The key challenge underwater is backscatter—those annoying white specks caused by your strobes illuminating suspended particles in the water column between your camera and subject.
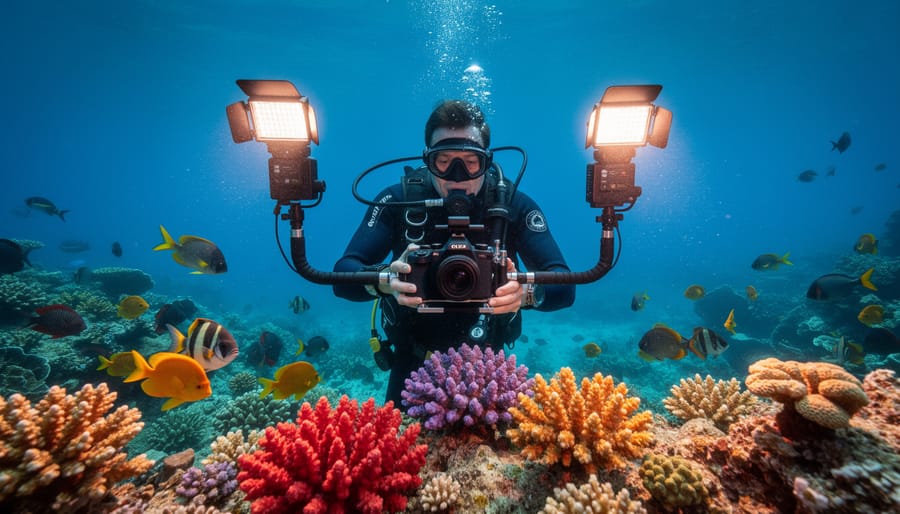
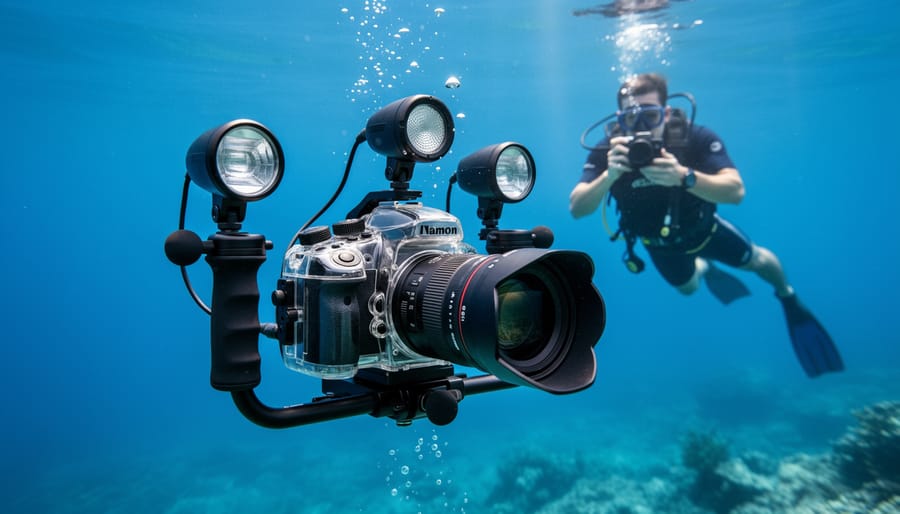
The foundation of any strobe setup is a reliable arm system. Most underwater photographers use adjustable arms with ball joints at each end, typically constructed from lightweight aluminum or carbon fiber. These arms connect your camera housing to your strobes, allowing precise positioning. For compact camera setups, a single short arm might suffice, but DSLR and mirrorless systems usually require dual arms for each strobe, giving you the extension and flexibility needed to position lights away from your camera’s lens axis.
Ball joints and clamps are where you’ll make hundreds of tiny adjustments during your diving career. Quality matters here—cheap clamps can slip under the torque of heavy strobes, ruining your carefully composed shots. Look for robust clamps with large adjustment knobs you can manipulate while wearing gloves. The standard sizes are 1-inch ball mounts, though some systems use different diameters.
The golden rule for positioning is to angle your strobes outward and forward, creating a triangle where the strobe beams cross just in front of your subject. This technique illuminates your subject beautifully while keeping that particle-filled water between you and your subject in shadow, virtually eliminating backscatter. For macro work, bring strobes closer and lower the power. For wide-angle scenes, extend them farther out on longer arms.
Adding small focus or modeling lights to your arms helps with composition in darker conditions and assists your camera’s autofocus system when ambient light is scarce.
Power and Recycling Times That Matter
When shopping for strobes, you’ll encounter specifications that directly impact your shooting experience underwater. Understanding these numbers helps you choose lighting that matches your workflow.
Guide numbers indicate a strobe’s maximum power output, typically measured at ISO 100. A guide number of 32 means the strobe can properly expose a subject 32 feet away at f/1.0 (though you’ll calculate actual aperture and distance combinations from this baseline). Higher guide numbers give you more flexibility with aperture choices and lighting larger subjects like reef scenes or sharks at distance. For macro work, even modest guide numbers around 20 work beautifully since you’re shooting close.
The choice between TTL (through-the-lens) and manual control affects how you work. TTL automatically adjusts flash output based on your camera’s metering, making it fantastic for fast-changing situations like swimming fish or unpredictable marine life behavior. You can fire away and trust the system to expose correctly. Manual mode requires you to set power levels yourself, but offers consistent, predictable results once dialed in. Many experienced shooters prefer manual for the precision it provides, especially in controlled macro situations.
Recycling time matters more underwater than topside. If your strobe takes four seconds to recharge between shots, that’s four seconds watching a fleeing octopus disappear. Quality strobes recycle in under two seconds at full power, keeping you ready for the next frame when opportunities surface.
Essential Accessories for Underwater Shooting
Focus Lights and Aiming Devices
Underwater environments absorb light rapidly, creating challenges that most land photographers never encounter. Even in clear tropical waters, colors disappear and autofocus systems struggle at depths beyond 15-20 feet. This is where focus lights become invaluable tools rather than optional accessories.
Modern cameras rely on contrast detection or phase detection for autofocus, and both systems need adequate light to function properly. Without a focus light, your camera may hunt endlessly or refuse to lock focus altogether, especially when photographing darker subjects like reef sharks or eels in crevices. A good focus light provides that crucial illumination your autofocus needs to grab onto.
Focus lights differ from your main strobes in two important ways: they stay on continuously rather than flashing, and they’re positioned to illuminate exactly where your lens is pointing. Many underwater photographers mount them directly to their camera housing or on articulating arms for precise positioning.
When shopping for focus lights, look for models with adjustable brightness and beam width. Narrow beams work well for macro photography, while wider beams suit wider scenes. Battery life matters too, since you can’t exactly swap batteries at 60 feet down. Quality options range from compact 1000-lumen units for casual diving to powerful 5000-lumen torches for professional work in deep or murky conditions.
Color Correction Filters for Natural Light
Color correction filters attach to your lens or housing port to restore warm tones that water absorbs, particularly reds and oranges that disappear within the first 15-20 feet. These screw-on or magnetic filters work brilliantly in shallow tropical waters where natural light is abundant—think snorkeling depths or free diving over coral reefs. The difference is immediate: fish regain their vibrant yellows and reds, and reef scenes look naturally colorful without editing.
However, filters have significant limitations. They reduce overall light reaching your sensor, which becomes problematic below 30 feet where light is already scarce. You’ll need slower shutter speeds or higher ISOs, potentially causing blur or noise. More importantly, filters apply a uniform correction across your entire frame, but water’s color cast varies with depth and distance. That nearby subject might look perfect while the background appears overcorrected and artificial.
The reality? Most underwater photographers today skip filters entirely, relying instead on strobes for close subjects and post-processing software for ambient light shots. Modern raw processing gives you far more control than a fixed filter ever could. Consider filters only if you’re specifically shooting shallow water video or want straight-out-of-camera JPEGs for immediate sharing.
Floatation Arms and Buoyancy Control
A properly balanced underwater camera rig transforms your shooting experience from an exhausting wrestling match into smooth, controlled photography. Without proper buoyancy control, you’ll find yourself constantly fighting to keep your gear level, which quickly leads to muscle fatigue and missed shots.
Floatation arms attach between your housing and strobe arms, providing lift that counteracts the weight of your equipment. The amount of floatation you need depends on your specific setup—a compact camera with a single strobe requires minimal support, while a full-frame DSLR with dual strobes and a large dome port needs substantial lift. Start by testing your rig’s buoyancy in a pool or shallow water. The goal is neutral buoyancy, where your camera neither sinks nor floats but hovers at whatever position you place it.
Most photographers use foam-filled floatation arms available in various sizes. These not only provide lift but also protect your gear if you accidentally drop it underwater. Beyond preventing sinkers, proper floatation reduces shoulder and wrist strain during hour-long dives, letting you focus on composition rather than fighting gravity.
Many housings also benefit from additional buoyancy elements like foam collars or stick-on floats. Remember that buoyancy changes as you descend—air compresses at depth, reducing lift—so test your rig at the depths where you’ll actually be shooting.
Leak Detection and Safety Gear
No matter how carefully you prepare your camera housing, water and electronics are natural enemies. A single flood can destroy thousands of dollars of equipment in seconds, which is why leak detection systems are genuinely non-negotiable accessories for serious underwater photographers.
Moisture alarms are your first line of defense. These small, battery-powered devices sit inside your housing and emit a loud beep the moment they detect even trace amounts of water. They typically cost between $30-$80 and provide precious seconds to surface before a minor seep becomes a catastrophic flood. I always position mine near the lowest point of the housing where water would naturally collect.
Vacuum systems take protection further by creating negative pressure inside your housing. Before your dive, you pump out air to create a partial vacuum, then monitor the gauge. If the vacuum holds, your seals are perfect. If it drops, you’ve got a leak—while you’re still on the boat. These systems run $100-$300 but offer incredible peace of mind, especially before important shoots or when traveling with rental gear.
Don’t overlook the basics: carry spare O-rings in multiple sizes, silicone grease, and lens tissue. A $5 O-ring can save a $5,000 camera. Smart underwater photographers treat these simple backup items as essential safety gear, not optional accessories.
Choosing Your Complete System: Budget to Professional
Entry-Level Systems for Beginners
If you’re curious about underwater photography but hesitant to invest thousands upfront, you’re in luck. Today’s entry-level options deliver impressive results without draining your bank account.
Action cameras like the GoPro Hero series or DJI Osmo Action represent the most accessible starting point, typically priced between $250-$500. These rugged little powerhouses come waterproof right out of the box, eliminating the need for separate housings. They’re incredibly forgiving for beginners—just point, shoot, and dive. While you won’t achieve the shallow depth-of-field that larger sensors offer, modern action cameras capture stunning 4K video and crisp stills in good lighting conditions. Mastering your action camera settings will dramatically improve your results, especially in challenging underwater environments.
For photographers seeking more creative control, compact camera systems offer an excellent middle ground. The Olympus TG-6 with its dedicated underwater housing costs around $600 total and provides manual controls, macro capabilities, and RAW shooting—features that let you grow your skills substantially. SeaLife’s Micro 3.0 represents another solid option in the sub-$1000 category, offering excellent image quality and user-friendly controls designed specifically for underwater use. These systems let you experiment with composition, lighting, and technique without the complexity of full DSLR or mirrorless setups.
Enthusiast Mirrorless and DSLR Setups
This sweet spot delivers impressive capabilities that’ll serve you well for years without requiring a second mortgage. We’re talking about setups built around cameras like the Olympus OM-D E-M1 series, Sony A6000 line, or entry-level full-frame options like the Canon EOS RP paired with quality aluminum housings from manufacturers like Ikelite, Sea & Sea, or Nauticam.
Here’s what makes these systems shine: you get interchangeable ports for different lenses, reliable depth ratings to 200 feet or more, and excellent ergonomics with customizable controls. A typical package might include an aluminum housing (around $1,200-$2,500), dome port for wide-angle work ($400-$600), macro port ($200-$400), and dual strobes with arms ($800-$1,500).
The real advantage at this level is versatility. You’re not locked into a single shooting style. Want to photograph coral formations in the morning and tiny nudibranchs in the afternoon? Just swap your dome port for a flat port and change lenses between dives. The image quality rivals professional systems from a decade ago, and modern mirrorless cameras offer fantastic autofocus performance even in challenging conditions.
Investment-wise, these rigs hold their value reasonably well. Quality housings often outlast the cameras inside them, so when you eventually upgrade your camera body, you might find compatible housing inserts available, extending your gear’s lifespan considerably.
Professional-Grade Equipment
When you’re ready to make the leap to professional-grade equipment, you’re committing to tools that won’t let you down in demanding conditions. These systems are built for photographers who need absolute reliability whether they’re shooting assignment work, leading dive tours, or creating portfolio pieces that require flawless technical execution.
Professional housings from manufacturers like Aquatica, Seacam, and Nauticam represent significant professional photography investment, typically ranging from $3,000 to $8,000. These aren’t just waterproof boxes—they’re precision-engineered systems with controls that feel natural even at depth, viewfinders that don’t strain your eyes during long shoots, and construction that handles repeated saltwater exposure season after season. The difference becomes apparent when you’re trying to nail focus on a fast-moving subject at 100 feet—smooth, responsive controls make the shot possible.
Port systems at this level offer optical clarity that doesn’t compromise your lens performance. Dome ports are precision-ground to maintain sharpness corner to corner, while macro ports feature parfocal designs that let you zoom without refocusing. Many professionals maintain multiple port configurations for different shooting scenarios.
Strobe systems like the Ikelite DS230 or Sea&Sea YS-D3 Lightning deliver consistent color temperature, fast recycle times, and the power needed for larger apertures in low-light conditions. Real reliability means capturing that once-in-a-lifetime moment without equipment failure.
Your underwater photography journey ultimately comes down to a simple truth: the right gear opens doors, but knowledge turns those opportunities into compelling images. As you’ve seen throughout this guide, underwater photography equipment ranges from essential housings and ports to specialized lighting systems and accessories, each serving a specific purpose in overcoming the unique challenges of shooting beneath the surface.
Start with the fundamentals. A reliable housing for your camera and a basic strobe setup will carry you surprisingly far, especially when paired with solid technique. Don’t feel pressured to assemble a complete professional kit before your first dive. Many underwater photographers began with entry-level equipment and gradually expanded their arsenal as they discovered what their shooting style demanded. That macro lens might seem essential now, but perhaps you’ll find your passion lies in wide-angle reef scenes instead.
Remember that the most expensive gear won’t compensate for poor buoyancy control or unfamiliarity with your camera’s settings. Spend time in shallow water mastering your equipment before tackling more ambitious dives. Understanding how your strobe positions affect backscatter matters more than owning three different light modifiers. The principles of composition and angles apply just as critically underwater as on land.
Invest thoughtfully, practice deliberately, and let your growing skills guide your gear decisions. The ocean rewards preparation, patience, and photographers who truly understand their tools.