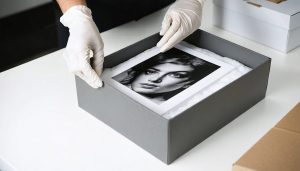
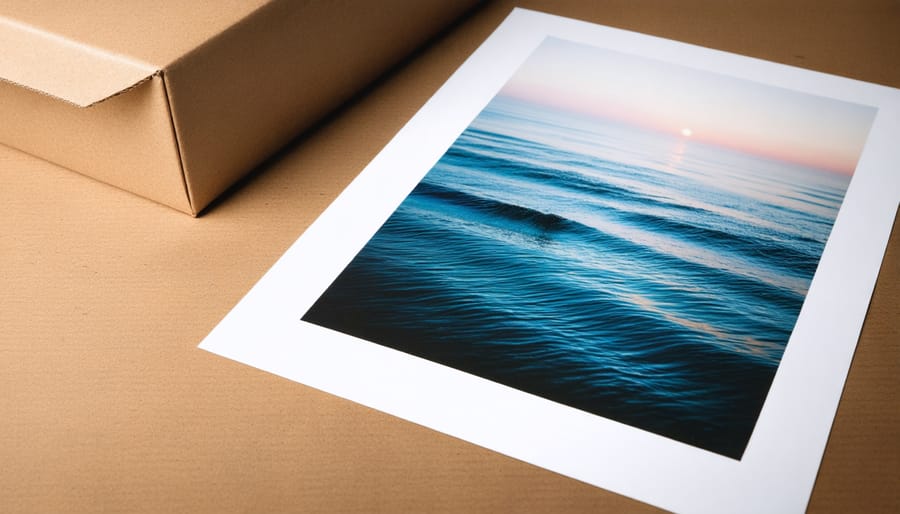
Protect your art prints from shipping damage by sandwiching them between two rigid backing boards that extend at least one inch beyond each edge—this prevents corner crushing and edge dents that plague even carefully wrapped packages. Place prints in crystal-clear protective sleeves before adding the backing boards, as moisture and fingerprints during handling are just as damaging as transit mishaps.
Invest in proper triangular or square cardboard tubes for larger prints over 16×20 inches, rolling them with the image facing outward around an acid-free core to prevent cracking in the ink or paper fibers. Many professional photographers learned this lesson the expensive way after refunding customers for prints that arrived with permanent creases from improper rolling direction.
Mark your packages clearly with “DO NOT BEND” stamps on all visible sides and reinforce corners with additional cardboard triangles—shipping carriers process thousands of packages hourly, and clear visual warnings genuinely reduce rough handling. The extra thirty seconds spent adding corner protectors can mean the difference between a five-star review and a refund request.
Package your prints in branded mailers or custom-printed outer sleeves that transform the unboxing into a memorable experience rather than just another delivery. First-time print buyers especially notice this attention to detail, often sharing their purchase on social media when the presentation exceeds expectations. Your packaging isn’t just protection—it’s the physical handshake between you and your customer, setting the tone before they even see your work.
Choose materials that reflect your professional standards while staying within realistic cost parameters for your pricing structure.
Why Art Print Packaging Matters More Than You Think
You might think packaging is just something you tape around your print before shipping, but here’s a sobering truth: studies suggest that approximately 11% of all shipped packages experience some form of damage during transit. For art prints—delicate, easily bent, and vulnerable to moisture—that number can climb even higher when packaging isn’t up to standard.
The real cost of poor packaging extends far beyond the material value of a single print. When a customer opens their package to find a creased corner or water-damaged image, you’re not just losing the revenue from that sale. You’re dealing with the immediate cost of a refund or replacement, plus shipping expenses both ways. But the deeper damage is to your reputation. A single negative review mentioning damaged goods can deter dozens of potential customers, and in today’s social media landscape, one disappointed buyer’s experience can reach hundreds or thousands of people.
Consider this scenario from a photographer who learned this lesson the hard way: after shipping fifty prints in basic cardboard mailers to save money, she received seven returns for damage. That’s a 14% failure rate. Beyond the financial hit of reprinting and reshipping, she spent hours managing complaints and worrying about her online ratings. The stress alone was enough to make her question whether selling prints was worth it.
There’s also an emotional dimension that matters. Your prints represent your artistic vision and the time you invested behind the camera. When a customer receives a pristine, beautifully packaged print, they’re experiencing your work exactly as you intended. They feel the care you put into every step of the process. Conversely, a damaged print isn’t just a logistical failure—it’s a broken promise and a missed opportunity to make someone’s day special.
The good news? Investing in proper packaging typically adds just a few dollars per shipment while dramatically reducing these risks. The protection you provide isn’t an expense—it’s insurance for your reputation and peace of mind for everyone involved.
Understanding Your Print Materials Before You Pack
Paper Prints and Their Vulnerabilities
Different paper types present unique packaging challenges, and understanding these vulnerabilities will save you from heartbreak (and costly reprints). Let’s break down what you need to know about protecting each variety.
Matte prints are wonderfully forgiving when it comes to minor handling, but they’re surprisingly susceptible to moisture damage. Because matte paper has a porous, non-reflective surface, it can absorb humidity from the air during shipping, leading to warping or buckling. If you live in a humid climate or ship during rainy seasons, consider adding silica gel packets to your packages. I learned this the hard way after shipping several prints to Florida during summer—they arrived with noticeable waves across the surface.
Glossy prints face the opposite problem: they’re scratch magnets. Any friction against the surface can leave permanent marks that catch the light. Always use glassine or acid-free tissue paper as a protective barrier, never plastic sleeves which can stick to the glossy surface and create a hazy appearance over time.
Fine art papers, including cotton rag and textured varieties, combine both challenges. Their thick, often hand-made quality makes them prone to corner damage during handling. The edges and corners are particularly vulnerable to crushing or bending. Use corner protectors religiously with these prints, and consider double-boxing for extra protection. These premium papers deserve premium care—your clients are paying for museum-quality prints, so package accordingly.
Canvas and Alternative Media
Canvas and alternative media require a different approach than traditional paper prints, but the basic principle remains the same: protect the printed surface and provide rigid support. Stretched canvas prints arrive ready to hang, so your priority is protecting those vulnerable corners and wrapped edges. Corner protectors made from cardboard or foam are essential—slide one onto each corner before wrapping the entire piece in bubble wrap or foam sheets. Many professional photographers then place the wrapped canvas in a telescoping box specifically sized for stretched canvas, which provides excellent corner protection during transit.
Rolled canvas offers more flexibility for shipping larger pieces at lower cost. Roll the canvas with the printed surface facing outward (this prevents cracking in the ink layer) and wrap it in glissine paper first, then bubble wrap. Insert the roll into a sturdy tube with at least two inches of diameter larger than your rolled canvas. Always use end caps and fill any empty space inside the tube with bubble wrap to prevent the roll from shifting.
Metal and acrylic prints are deceptively fragile despite their rigid construction. The high-gloss surfaces scratch easily, and corners can dent on impact. Wrap these prints in microfiber cloths or foam sheets before adding bubble wrap—never let bubble wrap touch the printed surface directly, as the texture can leave impressions. Wood prints need similar treatment, though their matte surfaces are slightly more forgiving. For all rigid alternative media, corner protectors and a snug-fitting box with at least two inches of cushioning on all sides will prevent the shifting that causes most damage during shipping.
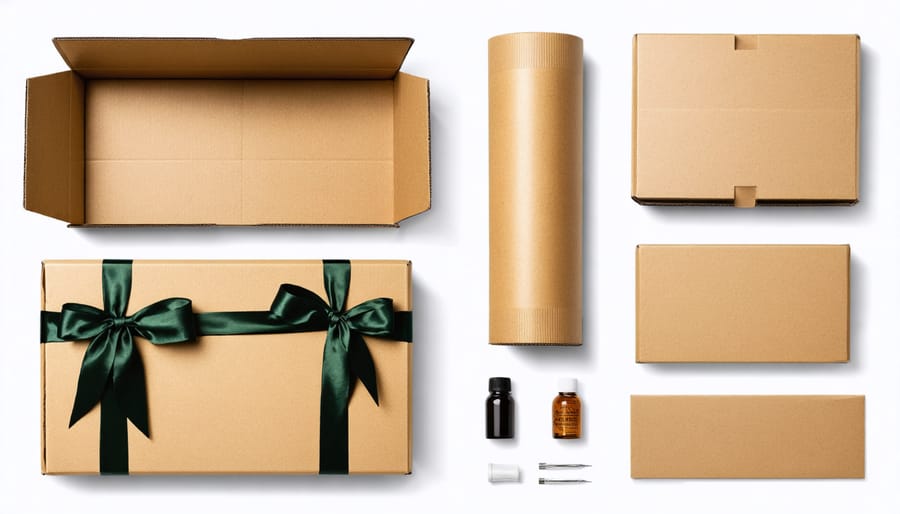
The Essential Packaging Materials You’ll Actually Use
Protective Sleeves and Bags
Your first line of defense against scratches, fingerprints, and moisture is a proper protective sleeve or bag. Think of these as the foundation of your packaging system—they create a barrier between your print and the outside world, keeping it pristine from your studio to your customer’s hands.
Crystal clear bags are your workhorses. Made from polypropylene or polyethylene, these transparent sleeves let your work shine through while protecting against dust and handling. They’re self-sealing with a resealable strip, which customers appreciate when storing prints long-term. Use these for everyday prints, especially when you want buyers to see the artwork without opening anything. They’re affordable enough for volume sales and professional enough for gallery-quality work.
Cellophane sleeves offer a more premium feel with their characteristic crinkle and clarity. True cellophane is biodegradable, making it popular with eco-conscious artists. However, it’s less moisture-resistant than plastic alternatives, so reserve these for climates or shipping methods where humidity isn’t a concern.
Glassine is the archival favorite. This smooth, glossy paper has a slight translucence and provides excellent protection against oils from handling. Museums and galleries use glassine because it’s acid-free, pH-neutral, and won’t stick to your prints over time. It’s particularly valuable for long-term storage or when shipping to collectors who understand archival standards.
For moisture protection, consider your destination’s climate. Shipping prints during winter to humid regions? Add a silica gel packet inside your bag before sealing. This small investment prevents the heartbreak of water-damaged prints and shows customers you’ve thought through every detail.
Backing Boards and Rigid Support
Backing boards serve as the unsung heroes of print packaging, preventing your images from bending, creasing, or arriving with that dreaded corner damage that makes your heart sink. Think of them as the spine of your package—they distribute pressure evenly and keep everything flat during transit, even when a delivery driver stacks heavier packages on top.
Chipboard is the most budget-friendly option and works well for prints up to 11×14 inches in protective sleeves. It’s essentially thick cardboard, sturdy enough for most domestic shipments. However, if you’re shipping internationally or sending larger prints, chipboard alone might not provide enough rigidity. I’ve seen photographers double up chipboard sheets for added protection, which works in a pinch but increases shipping costs.
Foam core boards offer superior protection with their lightweight foam center sandwiched between two paper surfaces. They’re ideal for prints 16×20 inches and larger, providing excellent rigidity without adding significant weight. The downside? They’re bulkier and more expensive than chipboard, so consider them for premium prints or valuable limited editions where presentation matters most.
Corrugated cardboard strikes a middle ground, offering good protection at reasonable costs. Look for double-wall corrugated for prints larger than 16×20 inches—the extra layer makes a noticeable difference.
For sizing, your backing board should extend at least half an inch beyond your print on all sides, giving the protective sleeve room to seal properly while ensuring the board, not your print edges, absorbs any impact.
Outer Packaging Options
Choosing the right outer packaging depends on your print size, paper thickness, and how much protection you need during shipping. Let’s break down your three main options.
Flat mailers are your go-to for prints up to about 11×14 inches. These rigid cardboard envelopes provide excellent crush protection and lie flat during transit, which helps prevent bending. The main advantage is their slim profile, which keeps shipping costs down while still offering solid protection. I’ve shipped hundreds of 8×10 and 11×14 prints in quality flat mailers without a single damage complaint. The downside? They’re only practical for smaller prints, and if you’re shipping internationally, customs agents sometimes bend them during inspection despite the “Do Not Bend” labels.
Cardboard boxes work beautifully for medium to large prints, especially when you’re shipping multiple prints together or including additional items like certificates of authenticity. A box gives you room to add extra padding and creates a more substantial unboxing experience that customers appreciate. The trade-off is higher shipping costs due to dimensional weight pricing, and you’ll need to stock various sizes if you sell different print dimensions. For valuable prints over 100 dollars, boxes provide the peace of mind that comes with multiple layers of protection.
Shipping tubes are ideal for larger prints, typically 16×20 inches and above. They’re lightweight, cost-effective for big prints, and nearly indestructible. However, many customers prefer flat shipping since rolled prints need time to flatten and may require re-framing techniques. Reserve tubes for budget-conscious customers or when flat shipping becomes prohibitively expensive. A good rule of thumb: prints under 16×20 ship flat, larger prints offer both options with flat as the premium choice.
Step-by-Step: Packaging Flat Prints for Shipping
Let’s walk through packaging a flat print together, step by step. I’ve seen plenty of prints arrive damaged because someone skipped a crucial step or rushed through the process, so we’ll take this methodically to ensure your work arrives in pristine condition.
Start by preparing your workspace with all materials within arm’s reach: your print, backing board, protective sleeve, rigid mailer or cardboard sandwich, and tape. Having everything organized prevents that panicked moment when you’re holding a print and realize the backing board is across the room.
First, inspect your print carefully under good lighting. Check for any existing issues like fingerprints, dust, or imperfections. Once it’s packaged, you won’t see it again until your customer opens it, so this is your quality control checkpoint. If you spot dust particles, use a clean microfiber cloth or compressed air to remove them gently.
Next, place your print face-up on a clean, flat surface. Here’s where many people make their first mistake: they handle the print too casually. Always hold prints by the edges, never touching the printed surface. Even clean hands can leave oils that become visible over time.
Now, slide your print into a protective sleeve. This should be a crystal-clear bag slightly larger than your print dimensions. Hold the bag open at one end and slide the print in smoothly, like you’re putting a letter into an envelope. Don’t force it. If there’s resistance, you might have the wrong size sleeve or the print isn’t aligned properly. The sleeve protects against moisture and minor scuffs during the rest of the packaging process.
Position your backing board behind the sleeved print. The board should be the same size as your print or slightly larger, never smaller. This is your print’s structural support and the most critical element preventing bending damage. Place the sleeved print face-up on top of the board, ensuring all edges align. If your board is slightly larger, center the print so there’s equal overhang on all sides.
Here comes a step that separates amateur packaging from professional results: securing the print to the backing board. Use small pieces of removable tape on the back corners only, attaching the sleeve to the board without touching the print itself. This prevents the print from sliding around inside the mailer during transit. I learned this lesson after a customer received a print that had shifted during shipping and gotten creased against the edge of the mailer.
Add a piece of chipboard or another backing board on top, creating a sandwich with your print protected in the middle. This top board shields the print surface from any pressure or impacts from above. Some shippers skip this step to save money, but it costs pennies and prevents dollars worth of damage.
Slide this entire sandwich into your rigid mailer. The fit should be snug but not tight. If you have to force it, the mailer is too small and could cause the boards to bow. Orient the print so any graphics or text on the mailer face the same direction as your print for a professional touch.
Seal the mailer completely. Run your fingers along all edges to ensure there are no gaps where moisture could enter. Double-check that any peel-and-seal strips are fully adhered.
Finally, affix your shipping label to the flattest, most visible surface of the mailer. Add “DO NOT BEND” and “FRAGILE” markings on multiple sides. While carriers don’t always honor these warnings, they increase the chances of careful handling.
Before you hand it to the carrier, give the package a gentle shake test. You shouldn’t hear any sliding or shifting. If you do, something isn’t secured properly, and you’ll need to open it and add more support.
When to Roll vs. Ship Flat (And How to Roll Properly)
The decision between rolling and shipping flat isn’t one-size-fits-all, and getting it wrong can mean the difference between a delighted customer and a disappointed one asking for a refund.
Here’s the straightforward truth: prints smaller than 11×14 inches should almost always ship flat. The cost difference between flat and tube shipping is minimal at this size, and customers universally prefer receiving smaller prints ready to frame. I learned this the hard way when a customer ordered an 8×10 print for their mother’s birthday, and I shipped it rolled to save a dollar on postage. The print arrived safely, but the customer left a review mentioning the inconvenience of flattening it before framing. That dollar saved cost me far more in perception.
For prints between 11×14 and 16×20 inches, you’re in the judgment zone. Consider your paper type here. Thick fine art papers (300gsm and above) can develop stress marks when rolled tightly, especially papers with textured surfaces like watercolor or cotton rag. These are better candidates for flat shipping in reinforced mailers. Conversely, glossy or semi-gloss papers on lighter weight stock (around 200gsm) roll more forgivingly and ship well in tubes.
Anything larger than 16×20 inches typically needs to go in a tube unless you’re willing to invest in expensive oversized flat mailers and priority shipping. The economics simply don’t work for most photographers at this scale.
Customer expectations matter too. If you’re selling limited edition fine art prints at premium prices, flat shipping signals quality and care, even if it costs more. For open edition prints or more casual sales, tubes are perfectly acceptable and expected.
When you do roll prints, technique matters enormously. Always roll with the image facing outward, never inward. This seems counterintuitive, but it means the print naturally wants to flatten when unrolled rather than curling tighter. Use a tube diameter of at least 3 inches, preferably 4 inches for larger prints. Smaller diameter tubes create tighter curls that are harder to flatten.
Wrap the print in glassine or acid-free tissue paper before rolling. Roll slowly and gently, never forcing the paper. Secure with artist tape, never rubber bands which leave impressions. Place cardboard circles at both tube ends so the print can’t shift during transit and get crushed. This simple addition prevents about ninety percent of tube-shipping damage in my experience.
Archival Considerations: Protecting Prints for the Long Haul
When you’re selling fine art prints to collectors or creating pieces meant to last generations, archival packaging isn’t just a nice touch—it’s essential. The difference between standard materials and archival-quality options might seem subtle at first, but over time, that choice determines whether a print remains vibrant or deteriorates into a disappointing shadow of its original glory.
Let’s start with the foundation: acid-free materials. Standard paper and cardboard contain lignin, which breaks down over time and releases acids that yellow and weaken everything they touch. I learned this the hard way years ago when a client contacted me about prints I’d shipped in regular backing board. After just two years in storage, brown spots had appeared along the edges where the print contacted the backing. That’s acid migration in action, and it’s completely preventable.
Archival-quality backing boards, tissue paper, and sleeves are manufactured to be pH neutral or slightly alkaline, typically with a pH between 7.0 and 8.5. Look for products labeled “acid-free” and “lignin-free”—both designations matter. Museum-quality tissue paper costs only marginally more than standard options, usually around 15 to 20 cents extra per sheet, but it creates a protective barrier that prevents chemical transfer.
For prints destined to become heirloom pieces, consider crystal-clear archival sleeves made from polyethylene, polypropylene, or polyester. These materials are chemically stable and won’t degrade or off-gas over decades. Avoid PVC sleeves entirely—they release chlorine as they age, which damages artwork. A simple test: if a plastic sleeve has that distinct “new shower curtain” smell, it’s likely PVC and shouldn’t touch your prints.
UV protection enters the conversation when you’re packaging prints for display rather than storage. While your packaging won’t provide ongoing UV protection once the print is hung, including a card about framing recommendations shows collector-level attention to detail. Some artists include small information sheets explaining that museum-quality UV-filtering glass or acrylic blocks up to 99 percent of harmful ultraviolet light, which causes fading over time.
The practical application doesn’t need to be complicated. For most print sales, using acid-free foam board as backing, wrapping the print in glassine or archival tissue, and placing it in a polyethylene sleeve covers your archival bases. Add a sturdy outer mailer, and you’ve created packaging worthy of serious collectors without requiring specialized equipment or excessive cost.
Real-World Shipping Challenges and How to Handle Them
Weather and Environmental Factors
Weather conditions during transit pose a real threat to your art prints, but protecting them doesn’t require expensive solutions. I learned this the hard way when a summer shipment arrived with moisture damage between the print and backing board—a costly mistake that could have been avoided with simple precautions.
Temperature extremes are your first concern. During winter months, prints left in freezing delivery trucks can become brittle, while summer heat can cause warping or adhesive failure in mounting materials. The solution is choosing packaging materials that provide insulation. Corrugated cardboard naturally offers some temperature buffering, and using double-wall boxes rather than single-wall versions adds another protective layer without significant cost increase.
Humidity is the silent killer. Moisture can seep into packages during rainy deliveries or in humid climates, causing prints to buckle or develop mold. Including silica gel packets in your packages is an affordable insurance policy—you can buy them in bulk for pennies per packet. Place one or two inside the plastic sleeve with your print, ensuring they don’t directly touch the artwork. Some sellers use glassine paper as an additional moisture barrier, which also prevents prints from sticking together.
For photographers shipping internationally or to areas with extreme climates, consider adding a simple note on your package exterior: “Photographs—Keep Dry.” While it won’t guarantee careful handling, it alerts carriers to take extra precaution during poor weather conditions.
Insurance and Tracking for Peace of Mind
Protecting your work during transit isn’t just about bubble wrap and sturdy boxes—it’s about ensuring your customers receive their prints in perfect condition and feel confident throughout the process. That’s where insurance and tracking become essential parts of your packaging strategy.
For most art print shipments, insurance is a smart investment once your prints reach a certain value. As a general rule, consider insuring any print worth more than $50. If you’re shipping limited editions or larger format prints priced at $100 or more, insurance becomes non-negotiable. The cost is typically minimal—usually around $2-5 for coverage up to $200—but it protects both you and your customer from the financial loss of damage or lost packages.
When determining coverage amounts, insure for the full retail value of the print plus your actual shipping costs. This ensures complete reimbursement if you need to file a claim. Keep detailed records including photos of your prints before packaging, receipts for materials, and proof of the print’s value. These documents make the claims process significantly smoother.
Tracking numbers are equally important for every single shipment, regardless of value. Modern customers expect to monitor their purchases in real-time, and tracking provides transparency that builds trust. When a customer emails asking “where’s my order,” you can immediately provide concrete information rather than vague estimates.
Proactive communication makes all the difference. Send tracking numbers automatically as soon as prints ship, ideally through your selling platform or via email. Include the carrier name and expected delivery date. For higher-value shipments, consider setting up automated delivery notifications or personally following up to confirm safe arrival. This extra touchpoint shows you care about the entire customer experience, not just making the sale. One photographer I know includes a simple note saying “Your tracking number is below—expect delivery by [date]. If anything seems amiss when it arrives, contact me immediately before opening.” This simple message sets clear expectations and opens the door for quick problem resolution.
Making Your Packaging Professional (Without Breaking the Bank)
Professional packaging doesn’t require a massive budget, but it does demand thoughtful attention to detail. The difference between a memorable unboxing experience and a forgettable one often comes down to a few strategic touches that communicate care and professionalism.
Start with the basics: clean, unbranded kraft mailers or white boxes can look surprisingly professional when paired with a simple branded sticker or stamp. Many photographers find success with custom stamps featuring their logo or studio name, which cost around $20-30 and can brand hundreds of packages. This approach feels handcrafted rather than mass-produced, which actually works in your favor when selling art prints.
The thank-you note is perhaps your most powerful branding tool, yet it costs pennies per print. A simple card that says “Thank you for supporting my work” along with your signature creates a personal connection that Amazon can never replicate. Include your website or Instagram handle so customers can follow your future work. One landscape photographer I know includes a postcard-sized print of a different image as a surprise extra—it costs her about $0.50 per order but generates tremendous goodwill and social media shares.
Care instructions serve a dual purpose: they show professionalism and reduce future complaints. A small printed card explaining how to handle, frame, and display the print demonstrates expertise. Include simple guidance like “avoid direct sunlight” and “handle by edges only” along with recommended framing approaches. This positions you as an expert guide, not just a vendor.
Consider the unboxing sequence carefully. When someone opens your package, they should encounter elements in this order: a branded element or thank-you note on top, then protective tissue paper or glassine, and finally the print itself. This layered approach builds anticipation and signals that something valuable lies within.
The most cost-effective branding investment? Consistency. Whether you’re shipping one print or one hundred, maintaining the same packaging standards reinforces your brand identity and encourages repeat purchases. Customers remember how you made them feel, and professional packaging creates confidence in both your current work and future offerings.
Your packaging isn’t just protection—it’s the final impression your work makes before it reaches your client’s hands. Think of it as an extension of your photographic craft. Just as you wouldn’t send out underexposed images or poorly edited files, you shouldn’t let subpar packaging undermine the quality of your prints.
The essentials we’ve covered—rigid mailers, corner protectors, archival sleeves, and proper labeling—form the foundation of a reliable system. But remember, the best packaging method is one you’ve actually tested. Before shipping to your first customer, send a test package to yourself or a friend. Check how it survives the journey. Does everything arrive intact? Is the unboxing experience satisfying? This simple step can save you from costly mistakes and disappointed clients.
As you refine your approach, pay attention to feedback. If multiple customers mention similar issues, adjust accordingly. Some photographers discover that their local postal service handles packages differently than others, or that certain seasons require extra protection against humidity.
Your next step is straightforward: gather your materials and pack your next print with intention. Take photos of your process to create a reference guide for yourself. Over time, efficient packaging becomes second nature, letting you focus on what matters most—creating stunning work that deserves to arrive in pristine condition.