Choose the Nikon AF-S VR Micro-Nikkor 105mm f/2.8G IF-ED as your first macro lens—it delivers sharp 1:1 magnification with built-in vibration reduction that’s essential for handheld shooting. Mount your camera on a sturdy tripod and activate Nikon’s Focus Shift Shooting mode in your Z-series or select DSLRs to automatically capture a sequence of images at different focus points, which you’ll later stack for maximum depth of field. Set your camera to Aperture Priority mode at f/8 to f/11 for the sweet spot between sharpness and workable depth of field, while keeping ISO between 200-400 when possible to maintain clean, detailed images.
Invest in the Nikon R1C1 Wireless Close-Up Speedlight System, which positions two small flashes around your lens for even, shadowless illumination that brings out texture and detail in your subjects. This system works seamlessly with Nikon’s Creative Lighting System, letting you control flash power directly from your camera. Practice with subjects that don’t move first—flowers, household objects, or textures—to master macro photography fundamentals before attempting insects or other living creatures.
Understanding your Nikon system’s specific capabilities transforms good macro shots into exceptional ones. The combination of native lenses, focus-stacking technology, and integrated flash control gives you a complete ecosystem for exploring the miniature world. Whether you’re shooting with a Z-mount mirrorless or F-mount DSLR, these tools and techniques will unlock creative possibilities you’ve been missing.
What Makes Nikon’s Macro System Different
Nikon has cultivated a distinctive approach to macro photography that sets it apart from other camera systems, and understanding these differences can help you maximize your close-up imaging results.
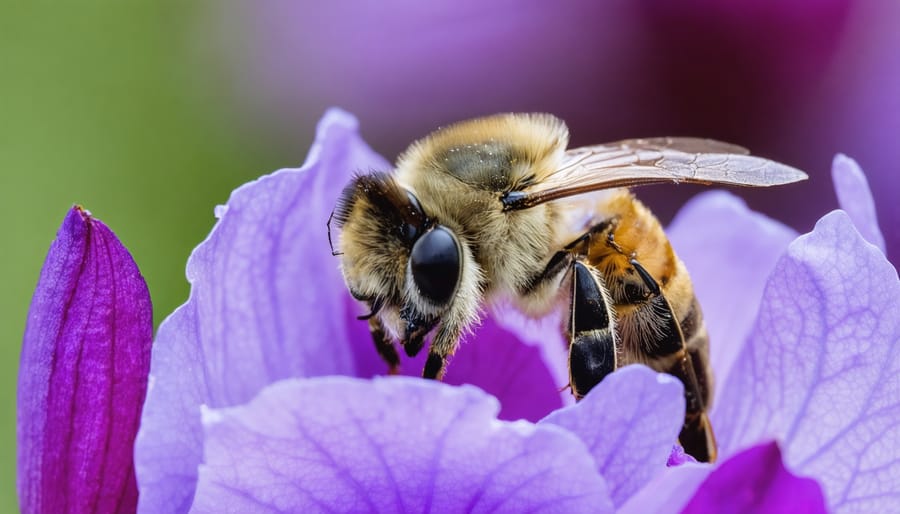
At the heart of Nikon’s macro advantage is their lens design philosophy. Nikon macro lenses are renowned for their exceptional corner-to-corner sharpness and minimal distortion, even at closest focusing distances. Take the legendary 105mm f/2.8G VR Micro, for example. Professional insect photographers consistently praise how this lens maintains optical quality across the entire frame when shooting at 1:1 magnification, something that becomes critical when you’re trying to capture every detail of a butterfly’s wing scales or the compound eyes of a dragonfly.
The Creative Lighting System (CLS) represents another significant differentiator. Nikon’s wireless flash system allows you to control multiple Speedlights directly from your camera without additional triggers or complicated setup. For macro work, this flexibility proves invaluable. You can position an SB-700 as your main light source while using an SB-500 as a rim light, adjusting power ratios through your camera menu. Many macro specialists working in the field appreciate being able to modify their lighting setup between shots without physically touching their flash units, which might disturb skittish subjects or compromise carefully arranged compositions.
Nikon’s color science particularly benefits macro photography in subtle but meaningful ways. The color rendering tends toward accurate, neutral tones that preserve the natural appearance of subjects. When photographing flowers, mushrooms, or other colorful macro subjects, you’ll find that reds don’t oversaturate and greens maintain natural separation. This becomes especially noticeable during post-processing, where you have more latitude to adjust colors without introducing unwanted artifacts.
Professional photographers often cite Nikon’s focus shift shooting feature as a game-changer for macro work. This automated focus stacking capability, available on cameras like the Z series and D850, intelligently captures multiple images at varying focus points. Unlike manual focus stacking methods, Nikon’s implementation adjusts both focus position and exposure compensation to account for focus breathing and light changes, producing more consistent stacks that blend seamlessly in post-processing software.
The combination of these elements creates a cohesive macro ecosystem where hardware and software work in harmony, allowing you to concentrate on composition and timing rather than technical workarounds.
Essential Nikon Macro Lenses: Which One Actually Fits Your Style
The 60mm f/2.8: Your Gateway to Macro
The Nikon 60mm f/2.8G ED AF-S Micro is often where many photographers begin their macro journey, and for good reason. This lens hits a sweet spot between affordability and performance, making it an excellent testing ground to discover if macro photography is your passion.
Where this lens truly shines is in controlled environments. If you’re interested in product macro photography, shooting flat-lay compositions, or capturing small objects on your kitchen table, the 60mm is nearly perfect. Its moderate focal length provides comfortable working distance for tabletop subjects without feeling cramped. I’ve used mine extensively for photographing coins, stamps, and small crafts with excellent results.
The limitations become apparent outdoors. That 60mm focal length means you’ll need to get quite close to butterflies or flowers, often just a few inches away. Skittish insects will flee before you’re in focusing range, and you might cast shadows on your subject. The compact size does make it wonderfully portable for hiking, though.
For studio work, food photography, or documenting collections, this lens delivers sharp images with beautiful rendering at a reasonable price point, making it ideal for photographers exploring macro without a massive investment.
The 105mm f/2.8: The Workhorse Everyone Recommends
Walk into any photography forum and ask about Nikon macro lenses, and you’ll hear the same recommendation over and over: the 105mm f/2.8G VR Micro. There’s a reason this lens has earned its reputation as the gold standard.
The magic lies in its working distance. At 105mm, you get about 5.8 inches between your lens and subject at 1:1 magnification. That might not sound like much, but compare it to a 60mm lens where you’re practically touching your subject, and the difference becomes clear. This extra space means you’re not casting shadows on delicate flowers or spooking skittish insects before you get the shot.
The built-in Vibration Reduction makes a genuine difference when you’re handholding at life-size magnification. Even with good technique, macro work amplifies every tiny movement. The VR system gives you roughly three extra stops of stability, which translates to sharper images when a tripod isn’t practical or would disturb your subject.
What really sets this lens apart is its versatility beyond macro work. Professional photographers regularly use it for portraits, taking advantage of that flattering focal length and gorgeous background separation. One wildlife photographer I know carries just this lens and a 24-70mm for entire day trips, confident the 105mm will handle both butterflies and backlit portraits.
The optical performance delivers consistently sharp results from corner to corner, with smooth bokeh that makes subjects pop. While the newer Z-mount version offers incremental improvements, the F-mount 105mm remains a workhorse that rarely disappoints.
The 200mm f/4: When You Need Distance
The 200mm f/4 macro sits at the extreme end of Nikon’s macro lens lineup, and it’s decidedly not for everyone. At nearly four pounds and with a price tag that makes even seasoned professionals pause, this lens demands justification. But in specific scenarios, nothing else comes close.
Its primary advantage is working distance. You’ll maintain about 19 inches between your lens and subject at 1:1 magnification, compared to roughly 6 inches with a 105mm lens. This matters enormously when photographing skittish dragonflies that won’t tolerate close approach, or venomous spiders you’d prefer to keep at arm’s length. Wildlife photographers documenting poison dart frogs or photographing bees in flight find this extra reach invaluable.
The 200mm also excels at isolating subjects with compressed backgrounds. That butterfly perched on a flower becomes dramatically separated from distracting elements behind it, creating images with professional polish.
Consider your shooting style before investing. If you primarily photograph cooperative subjects like flowers or products in controlled settings, shorter focal lengths make more sense. But if you’re chasing nervous insects, documenting wildlife that demands caution, or shooting macro in challenging field conditions where you can’t physically get close, the 200mm f/4 transforms from luxury to necessity. Just be prepared for the workout—handheld shooting requires solid technique and possibly a monopod for extended sessions.
Third-Party Options Worth Considering
While Nikon’s native macro lenses are exceptional, third-party manufacturers offer compelling alternatives that deliver outstanding image quality at more accessible price points.
Sigma’s macro lineup deserves serious attention. Their 105mm f/2.8 EX DG OS HSM matches the focal length sweet spot for versatile macro work, and the optical stabilization proves genuinely useful when shooting handheld. The build quality feels substantial, and sharpness rivals first-party options. The main trade-off? Autofocus can hunt slightly more than Nikon glass in challenging conditions, though manual focus override works seamlessly.
Tamron’s 90mm f/2.8 Di VC USD has earned a devoted following among macro enthusiasts. It’s noticeably lighter than comparable lenses, making it ideal for extended field sessions. The vibration compensation system is particularly effective, and the lens produces beautiful bokeh. Some users report the focus ring feels less refined than Nikon’s, but for the price difference, it’s a minor concession.
Tokina’s 100mm f/2.8 AT-X PRO offers exceptional value for budget-conscious photographers. While it lacks stabilization, the optical quality punches well above its price point. It’s built like a tank with weather-resistant construction.
All three manufacturers maintain full compatibility with Nikon’s metering and electronic systems, ensuring reliable operation across current Nikon bodies.
Building Your Nikon Macro Kit Beyond the Lens
Flash Solutions: Making Nikon’s CLS Work for You
Nikon’s Creative Lighting System (CLS) opens up incredible possibilities for macro photography, giving you wireless control and precise lighting without complicated setups. Let me walk you through practical options that actually work in the field.
The Nikon SB-700 and SB-5000 speedlights are workhorses for macro CLS setups. Both offer excellent power output and iTTL compatibility, which means your camera automatically calculates exposure for you. I’ve found the SB-700 particularly versatile because it’s compact enough to mount on a bracket without weighing down your setup. Position it on a custom macro bracket at roughly 45 degrees to your subject, and you’ll get beautiful directional lighting that reveals texture while minimizing harsh shadows.
Ring flash alternatives deserve special attention. While dedicated ring flashes like the Nikon R1C1 macro flash kit provide shadowless illumination perfect for scientific documentation, the twin-light approach offers more creative control. The R1C1 system includes two SB-R200 speedlights mounted on a ring adapter, letting you adjust each light independently for dimensional lighting.
For budget-conscious photographers, a simple DIY solution works remarkably well. Mount your SB-700 on an L-bracket attached to your lens collar, then add a small white bounce card to soften the light. This setup costs under $50 beyond the speedlight itself and produces professional results.
Here’s a real-world example: photographing butterflies requires fast recycling times between shots. Set your commander flash (mounted on-camera) to trigger mode only, then position an SB-700 on a bracket for main illumination. The CLS system lets you adjust flash compensation on-the-fly without touching the remote unit, essential when chasing moving subjects.
Understanding macro lighting techniques becomes simpler with CLS because you can experiment with ratios between multiple flashes wirelessly, building your lighting skills progressively.

Tripods, Focusing Rails, and Stability
Macro photography demands stability beyond what typical shooting requires—even the slightest camera movement becomes magnified at reproduction ratios of 1:1 or greater. A sturdy tripod forms the foundation of your macro setup, and this is where you’ll want to invest in quality. Look for a tripod that allows your camera to get low to the ground, since many macro subjects live close to the earth. Models with removable center columns or legs that spread completely flat prove invaluable when photographing mushrooms or wildflowers.
A macro focusing rail transforms your precision work. This device allows you to move your camera forward and backward in minute increments rather than adjusting the tripod itself. When working at high magnification, moving the camera just millimeters changes focus dramatically. A good tripod and focusing rail setup gives you the control needed for focus stacking and precise composition.
For head selection, ball heads offer quick adjustments ideal for field work when chasing insects or adapting to changing light. Geared heads provide slower but more precise control, making them perfect for studio work or methodical focus stacking sessions. Many macro photographers keep both types available depending on the situation.
In the field, prioritize portability and versatility. For studio work, absolute stability trumps weight considerations—heavier means steadier at extreme magnifications.
Extension Tubes and Teleconverters
Extension tubes offer an affordable way to increase magnification with lenses you already own. These hollow spacers fit between your camera body and lens, reducing minimum focusing distance and boosting magnification. Nikon offers two versions: the PK-11A and PK-13, with different extension lengths for varying magnification levels.
The beauty of extension tubes is their versatility. While they work brilliantly with standard 50mm or 85mm lenses, they’re compatible with most Nikon F-mount glass. Keep in mind that tubes sacrifice infinity focus, so your lens will only focus at close distances. Electronic contact tubes maintain autofocus and aperture control, though AF performance may slow down considerably.
For real-world application, I’ve found the PK-13 excellent for transforming a 60mm lens into a super-macro setup when photographing tiny insects or jewelry details. Stack multiple tubes for even greater magnification, though image quality may soften slightly.
Teleconverters, like the Nikon TC-14E or TC-20E, multiply focal length but also reduce maximum aperture. They’re less ideal for macro work since they don’t significantly improve close-focusing ability. However, they shine when you need working distance for skittish subjects like butterflies, pairing well with longer focal lengths where getting physically closer isn’t practical.
Camera Settings That Transform Your Macro Shots

Focus Peaking and Live View Strategies
Nikon’s live view mode transforms macro focusing from guesswork into precision work. When shooting at reproduction ratios where depth of field measures in millimeters, the electronic viewfinder or rear LCD becomes your best friend for critical sharpness.
Focus peaking is a game-changer for macro work. This feature overlays colored highlights on areas in focus, letting you see exactly what’s sharp before you take the shot. On most Nikon cameras, you’ll find focus peaking in the live view menu under “Peaking display.” Set it to a high sensitivity level and choose a highlight color that contrasts with your subject—red or yellow typically works well for nature subjects. As you manually adjust focus, watch how the colored overlay shifts across different parts of your frame.
Here’s the practical reality: live view slows you down, which is exactly what macro photography demands. For static subjects like flowers or product shots, magnify your live view to 100 percent and fine-tune focus using the peaking indicators. The screen won’t lie about what’s sharp.
However, viewfinder shooting still has its place with active subjects. When photographing insects that might flee at any moment, the optical viewfinder keeps you reactive and mobile. Save live view for subjects that aren’t going anywhere, letting you take those extra seconds to nail perfect focus on the exact spot you’ve chosen.
The Depth of Field Preview Trick
The depth of field preview button often confuses macro shooters, but it’s incredibly valuable once you understand what you’re seeing. When you press it, your Nikon stops down to your chosen aperture, showing the actual depth of field in your viewfinder. The catch? Your viewfinder gets dark, sometimes dramatically so at f/16 or f/22.
Here’s the practical approach: use DOF preview to check sharpness zones, not brightness. Your final image will be properly exposed, even though the preview looks dim. This is where experience pays off. After pressing the button, give your eyes 3-5 seconds to adjust to the darkness. You’ll start seeing which parts of your subject fall into acceptable sharpness.
The real trick is coupling this with exposure compensation. If you’re shooting a bright flower against dark foliage, check your histogram after a test shot. You’ll often need to dial in +0.7 to +1.3 stops of compensation in macro work because your camera’s meter gets fooled by high-contrast scenes at close distances.
AF Mode Selection for Moving Subjects
Choosing the right autofocus mode can make or break your macro shots, especially when dealing with unpredictable subjects like butterflies or beetles. Nikon’s AF systems are remarkably capable, but you need to match the mode to your subject’s behavior.
For stationary subjects like flowers or mushrooms, single-point AF gives you precise control over exactly where you focus. Select the smallest AF point available and place it deliberately on your subject’s most important feature. This prevents the camera from hunting or locking onto background elements, which happens frustratingly often in macro work where everything is compressed.
When photographing moving insects, AF-C (Continuous AF) paired with Dynamic-area AF or 3D tracking becomes your best friend. The 3D tracking feature on Nikon bodies like the Z series or D850 is particularly impressive for following a crawling beetle or hovering bee. The camera recognizes color and pattern information to maintain focus as your subject moves within the frame. Start with 9-point Dynamic-area AF if you’re new to this technique, then graduate to wider patterns as you build confidence.
That said, don’t dismiss manual focus. For extreme magnifications beyond 1:1 or when working with flash setups, manual focus with focus peaking (on mirrorless bodies) or magnified live view often delivers more consistent results than any AF system. The shallow depth of field in macro photography sometimes confuses even advanced AF systems, and there’s real satisfaction in nailing focus manually when photographing intricate details like insect eyes or flower stamens.
Field Techniques: How to Actually Get the Shot
The Focus Stacking Workflow
Focus stacking transforms macro images by combining multiple shots taken at different focus distances into one perfectly sharp photograph. If you’re shooting with a newer Nikon body like the Z7 II, Z9, or D850, you’re in luck—these cameras include Focus Shift Shooting, which automates the entire capture process.
To use Focus Shift Shooting, navigate to your camera’s shooting menu and select the feature. You’ll set the number of shots (typically 30-100 for extreme macro work), the focus step width (smaller numbers for greater magnification), and the interval between shots. Start with a step width of 5 for general macro work and reduce it to 1 or 2 when shooting at life-size magnification or greater. The camera will automatically fire through the sequence, shifting focus incrementally from front to back.
For older Nikon bodies without this feature, you’ll need a manual approach. Mount your camera on a sturdy tripod and use either Live View with manual focus adjustments or a focusing rail that lets you physically move the camera forward in precise increments. Take overlapping shots by slightly adjusting focus between each frame—the key is maintaining consistent overlap so stacking software has enough information to work with.
Regardless of your method, keep these settings constant: use manual mode, disable autofocus, shoot in RAW, and use a two-second timer or remote release to eliminate camera shake. After capture, software like Helicon Focus or Adobe Photoshop will blend your sequence into a single, completely sharp image that reveals every intricate detail of your subject.
Lighting in the Field Without Looking Like a Tourist
Natural light remains your best friend for field macro work, especially during the golden hours when soft, directional light wraps around your subjects beautifully. Position yourself so the sun backlights translucent subjects like flower petals or insect wings—you’ll capture stunning details that harsh midday light simply crushes.
A 5-in-1 reflector collapsed to its smallest size fits easily in any camera bag and works wonders. The white side bounces gentle fill light into shadowed areas of your subject, while the silver provides more punch when needed. I’ve held mine with one hand while shooting handheld countless times—not elegant, but effective. For static subjects like mushrooms or flowers, prop it against your camera bag or use a small clamp.
When natural light isn’t enough, Nikon’s Creative Lighting System really shines. The SB-700 or SB-500 speedlight mounted off-camera with a simple TTL cord gives you directional control without bulk. Hold it at 45 degrees to your subject for natural-looking shadows. The R1C1 Wireless Close-up Speedlight System offers dedicated macro lighting with adjustable twin heads, though it’s pricier.
A DIY diffuser made from a white plastic container or tissue works surprisingly well to soften on-camera flash in a pinch. The key is keeping your lighting setup simple enough that you’ll actually use it when that perfect subject appears.
Working Distance and Subject Approach
Understanding working distance transforms your macro experience, especially when photographing small insects. Your lens’s focal length directly affects how close you need to get—a 60mm macro requires you to be roughly six inches from your subject at 1:1 magnification, while a 105mm gives you about twelve inches of breathing room.
This extra distance matters more than you might think. Butterflies and dragonflies tolerate photographers better at arm’s length rather than nose-to-nose. The additional working distance also prevents your camera from casting shadows on your subject, particularly important for natural light work.
Move slowly and deliberately when approaching subjects. Quick movements trigger escape responses. I’ve found that approaching from the side rather than head-on reduces disturbance. With static subjects like flowers, working distance becomes less critical, but consider how much room you need for reflectors or external lighting.

Common Mistakes That Kill Nikon Macro Shots
Even experienced photographers stumble when they first dive into Nikon macro work. The good news? Most problems have straightforward fixes once you know what to look for.
Motion blur remains the number one killer of otherwise stunning macro shots. At 1:1 magnification, even the slightest camera shake becomes dramatically magnified. Your standard 1/125 shutter speed won’t cut it here. Aim for at least 1/250 or faster, and consider using your Nikon’s electronic first curtain shutter to eliminate mechanical vibration. I learned this the hard way after an entire morning shooting water droplets resulted in nothing but soft images. If your shutter speed must stay slow, embrace a sturdy tripod and use the mirror-up mode combined with a cable release.
Focusing errors plague macro shooters because depth of field becomes razor-thin at close distances. A common mistake is relying on continuous autofocus modes, which hunt endlessly in macro work. Switch to single-point AF and select your focus point manually rather than letting the camera choose. Better yet, use manual focus with Live View and magnification zoomed to 100 percent for critical focusing. Nikon’s focus peaking feature, available on newer bodies, highlights in-focus areas and makes manual focusing considerably easier.
Exposure issues intensify at high magnification because lens extensions reduce the light reaching your sensor. Many photographers forget to compensate for this light loss when using extension tubes or bellows. Your camera’s through-the-lens metering helps, but understand that adding extension reduces effective aperture. A lens set to f/16 might perform like f/22 or smaller with tubes attached.
Flash photography introduces its own challenges. Positioning your speedlight too close creates harsh shadows and blown highlights. Use a diffuser or bounce card, and consider Nikon’s Creative Lighting System with wireless TTL control to position flashes off-camera. This creates more flattering, dimensional lighting than direct on-camera flash ever could.
Nikon’s macro photography ecosystem offers everything you need to capture stunning close-up images, from exceptional dedicated macro lenses to innovative camera features that simplify challenging shooting situations. Whether you’re working with the affordable 40mm f/2.8G Micro, the versatile 105mm f/2.8G VR, or exploring extension tubes and teleconverters, the system provides genuine flexibility for photographers at every skill level.
The real beauty of macro photography with Nikon gear is that you can start exactly where you are right now. If you already own a Nikon camera, you don’t need to invest in the most expensive lens immediately. Begin with what you have, perhaps adding an inexpensive extension tube or close-up filter to your existing lens. Experiment with natural light before investing in flash equipment. Learn to use your camera’s focus peaking and magnification features to nail critical focus. These foundational skills matter far more than having premium equipment.
As you develop your macro photography skills, Nikon’s system grows with you. The Focus Shift Shooting feature transforms focus stacking from a tedious process into an approachable technique. The CLS flash system provides reliable lighting control without complicated manual setups.
Your next step is simple: pick a single subject this week and photograph it from multiple angles, with different lighting, at various magnifications. Notice what works and what doesn’t. This hands-on experimentation, combined with your Nikon gear’s capable features, will teach you more about macro photography than any article ever could. The extraordinary world of small things awaits your creative vision.