Stand in the transitional zone between darkness and daylight—where the cave mouth frames your subject—and you’ll discover exposure challenges that make or break the shot. This is where the histogram becomes your essential tool: expose for the cave interior details while accepting blown highlights in the bright exterior, or bracket three to five shots at different exposures for later HDR blending.
Position yourself outside the entrance during golden hour when soft, angled light illuminates rock textures and vegetation without creating harsh shadows. The low sun transforms ordinary limestone into sculptural forms while reducing the dramatic contrast between cave darkness and exterior brightness by up to three stops.
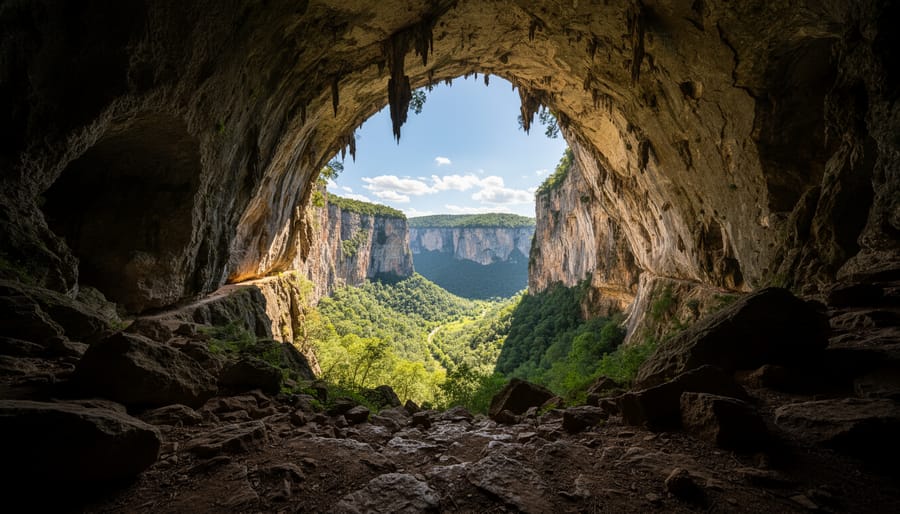
Include environmental context in your composition—the surrounding landscape, vegetation, or geological features that tell the cave’s story. A wide-angle lens capturing the entrance within its ecosystem provides scale and narrative that pure interior shots cannot deliver. This exterior perspective grounds viewers in place and explains how water, time, and geology created the formation.
Protect your gear during the transition by keeping a microfiber cloth accessible for lens condensation. The temperature shift from cool cave interior to warm exterior (or vice versa) causes immediate fogging that ruins shots. Wait thirty seconds after exiting before shooting, allowing your equipment to acclimate naturally.
Cave exterior photography isn’t supplementary work—it’s the visual context that transforms a collection of underground images into a complete photographic narrative. Master the entrance, and you’ve mastered the story’s beginning.
Why the Cave Entrance Defines Your Entire Shoot
The Light Transition Challenge
Standing at a cave entrance presents one of photography’s most demanding lighting scenarios. Your eyes naturally adapt as you glance from bright sunlight to dark recesses, but your camera sensor captures everything simultaneously, creating an extreme dynamic range that can easily measure 15 stops or more. Without proper technique, you’ll end up with either a beautifully exposed exterior and a black void inside, or perfectly rendered cave details with a blown-out sky.
The solution lies in understanding your exposure strategy for high-contrast scenes. Start by exposure bracketing, taking multiple shots at different exposure values. A typical bracket sequence might include five frames: your base exposure, then two stops under and over, plus intermediate half-stops. This gives you flexibility in post-processing and provides insurance against blown highlights or crushed shadows.
For immediate HDR results, many modern cameras offer in-body HDR modes that automatically blend multiple exposures. While convenient, shooting manual brackets gives you more control over the final image. When processing, avoid the temptation to create unnatural-looking composites. The goal is balancing light realistically, not creating a fantasy scene.
Camera settings matter too. Use your histogram religiously, exposing to the right without clipping highlights. A lower ISO maintains detail in shadows, while f/8 to f/11 keeps both foreground and background acceptably sharp. Consider graduated neutral density filters to naturally compress the scene’s dynamic range during capture, reducing post-processing workload.
Framing the Portal
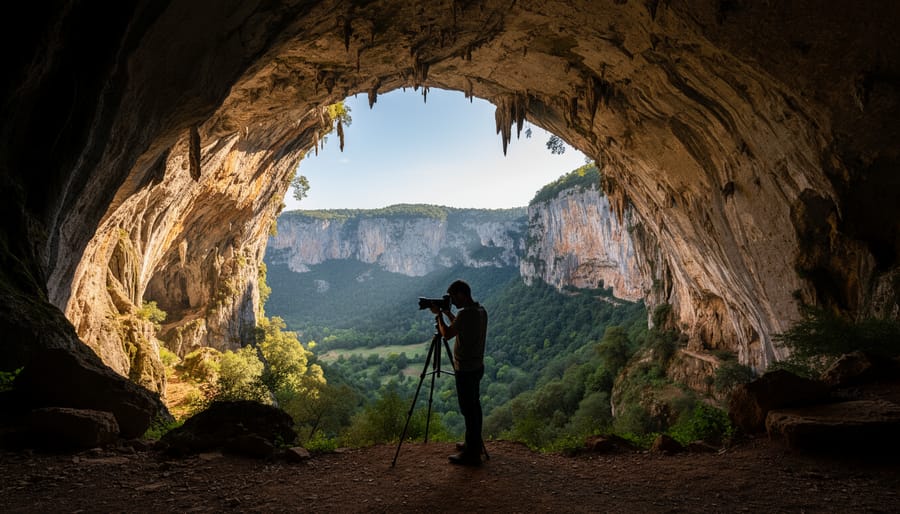
Cave entrances naturally create one of photography’s most powerful compositional tools: the frame within a frame. By positioning yourself outside the cave and shooting inward—or using the entrance itself as a framing element—you can add depth, context, and visual interest that pulls viewers into your image.
The key is finding the right distance and angle. Stand too close, and you’ll lose the surrounding landscape that gives the cave meaning. Position yourself too far back, and the entrance becomes a tiny detail in a broader scene. A good starting point is to compose your shot so the cave opening occupies roughly one-third to one-half of your frame, allowing the entrance to dominate without overwhelming the natural context around it.
Consider Mammoth Cave’s Historic Entrance in Kentucky, where photographers often position themselves on the hillside path to capture both the massive stone archway and the forested valley beyond. This perspective shows scale while maintaining the cave’s commanding presence.
Try different perspectives: shoot from below to emphasize the cave’s imposing nature, or from an elevated position to showcase the terrain leading to the entrance. Side angles can reveal the depth and layers of rock surrounding the opening. Don’t forget to include environmental elements like vegetation, weathered rock faces, or human figures for scale—these details transform a simple cave entrance into a compelling story about place and exploration.
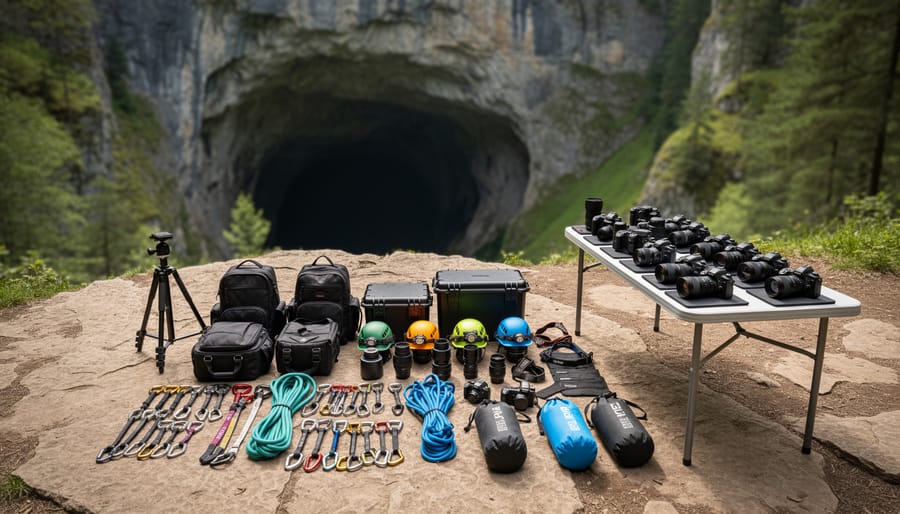
Essential Gear Preparation Outside the Cave
The Pre-Entry Equipment Checklist
Before you venture into the darker reaches of a cave system, take time outside the entrance to methodically organize your gear. This final checkpoint prevents frustrating moments when you’re deep inside and realize something critical is missing or improperly packed.
Start with your camera bodies. If you’re bringing a backup (which I strongly recommend), ensure both have freshly charged batteries and formatted memory cards with plenty of storage capacity. Cave photography often involves bracketing and multiple attempts at the same composition, so you’ll shoot more frames than expected. Set your primary camera to your preferred starting settings—typically manual mode with a moderate ISO around 400—so you’re ready to shoot the entrance itself without fumbling in transitional lighting.
Next, verify your lens selection. A wide-angle zoom covering 16-35mm handles most cave entrance compositions beautifully, while a standard 24-70mm offers versatility for detail shots and context images. Check that lens caps are secure but easily accessible, and that protective UV filters are clean and properly mounted.
Your lighting equipment deserves special attention. Test each speedlight or continuous light source before entering. Pack extra batteries separately in waterproof containers, and if using battery packs, confirm connections are tight. Organizing trigger systems, sync cables, and light stands outside means you won’t be troubleshooting connections in confined, muddy spaces.
Finally, distribute gear logically across protective cases or a dedicated camera backpack. Heavy items should sit close to your back for balance on uneven terrain. Keep frequently needed items—like lens cloths and your headlamp—in exterior pockets for quick access.
Testing Your Lighting Setup in Natural Light
Before you descend into the darkness, spend fifteen minutes outside the cave entrance testing every piece of lighting gear. This simple practice can save you hours of frustration underground and prevent the disappointment of discovering dead batteries or faulty connections when you’re already deep inside.
Start by assembling your strobes exactly as you’ll use them in the cave. Fire off several test shots at the power settings you anticipate needing. This confirms that your triggers are communicating properly with your strobes and that all cables are securely connected. Check the battery indicators on each unit and make mental notes of their charge levels. If you notice inconsistent firing or weak output now, you can swap batteries or troubleshoot connections while natural light still helps you see what you’re doing.
Continuous lights and video panels deserve equal attention. Power them on and cycle through different intensity settings to ensure they respond correctly. Many photographers have learned the hard way that a light that works perfectly at 100 percent brightness might flicker or fail at lower settings due to faulty electronics.
Don’t overlook your headlamp, either. Test both the main beam and any secondary red or low-power modes. Replace batteries if the beam appears dimmer than expected. Understanding various lighting equipment and techniques becomes especially important when working in challenging cave environments.
Finally, take a few test exposures combining your different light sources to verify your camera settings respond as expected before entering the cave system.
Capturing the Surrounding Landscape Context
Geological Story Above and Below
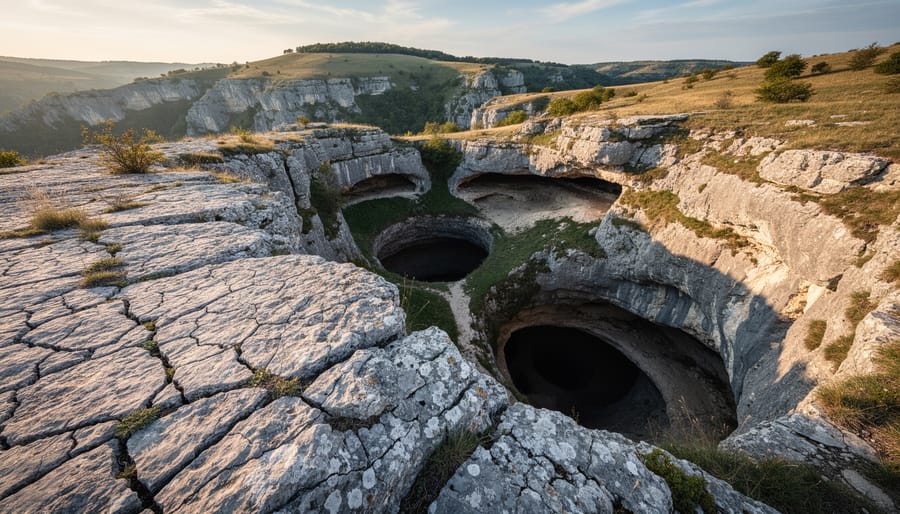
Before you even step inside a cave, the landscape above tells a compelling story about what lies beneath. Those weathered limestone outcrops, sinkholes, and distinctive rock formations you photograph at the entrance aren’t just scenic backdrops—they’re visual clues that help viewers understand the hidden world below.
Karst topography, the terrain formed by dissolving bedrock, creates telltale surface features that mirror underground structures. When you photograph a collapsed sinkhole near a cave entrance, you’re capturing evidence of the same water erosion that carved the passages inside. Those jagged limestone cliffs framing your composition? They show the layered rock strata that determine chamber heights and passage directions underground.
For photographers, this connection offers powerful storytelling opportunities. A wide shot showing how a cave entrance sits within a limestone escarpment provides geographic context that a tunnel interior alone cannot convey. The vegetation patterns around the opening—often lusher due to moisture and unique microclimates—hint at the cave’s ventilation and water systems.
Pay attention to surface water features too. Streams disappearing into cracks or emerging from cave mouths demonstrate active geological processes. These dynamic elements add narrative depth to your portfolio, showing caves as living systems rather than static voids.
When scouting locations, spend time observing the broader landscape. Those surface formations you photograph become educational tools, helping viewers grasp the three-dimensional relationship between visible terrain and subterranean spaces. This geological context transforms your cave photography from simple documentation into a more complete environmental story.
Weather and Atmospheric Conditions
The weather and atmospheric conditions outside a cave can transform a simple location shot into something truly magical. Fog rolling across a cave entrance creates an ethereal, mysterious quality that draws viewers into your story. Position yourself early in the morning when mist naturally accumulates around cave openings, and bracket your exposures to capture the delicate gradations between light and shadow.
Rain adds drama and texture to cave exteriors, though it requires proper gear protection. Use a rain sleeve or waterproof cover, and consider how wet rocks and vegetation create reflective surfaces that catch light differently. The contrast between the dry cave interior and rain-soaked exterior tells a compelling environmental story.
Golden hour light provides the perfect complement to dark cave interiors. When warm, directional sunlight illuminates the entrance while the interior remains cool and shadowed, you create natural contrast that needs minimal post-processing. Shoot with the sun at angles that highlight rock textures and vegetation.
Dramatic skies with storm clouds or sunset colors frame cave entrances beautifully. These conditions create mood and scale, showing the cave as part of a larger landscape rather than an isolated subject.
The Human Element: Documenting Entry and Exit
Scale and Perspective Through Human Subjects
Placing a person at or near a cave entrance instantly communicates scale in ways that rock formations alone cannot. That massive opening might photograph as surprisingly modest without a human reference point. Position your subject strategically—having them stand at the threshold creates an immediate size comparison that viewers instinctively understand.
For compelling action shots, capture genuine moments rather than static poses. A hiker pausing to look into the cave’s darkness, someone adjusting their headlamp, or a climber approaching the entrance all tell stories while establishing scale. These candid moments resonate because they mirror the viewer’s own potential experience.
Consider lighting carefully when including people. If your subject is backlit by the cave entrance, expose for their silhouette to emphasize the dramatic light transition. Alternatively, use fill flash or a reflector to illuminate faces while maintaining the atmospheric cave lighting. This requires experimentation—bracket your exposures and try different flash powers.
Communication matters when working with human subjects outdoors. Brief them on your vision, but also encourage natural movement. Sometimes the best shots happen between your directions, when people forget the camera and simply experience the environment. Remember, your subject shouldn’t just demonstrate scale—they should invite viewers into the scene’s narrative.

The Story of Preparation
The moments before entering a cave offer rich storytelling opportunities that many photographers overlook. These preparatory scenes capture the human element of exploration and provide context that makes your final collection more compelling.
Focus on authentic moments rather than staged poses. Photograph your team checking headlamps, organizing rope systems, or reviewing maps at the cave entrance. These candid shots reveal the careful planning behind successful cave photography and add depth to your narrative. The concentration on a teammate’s face while they adjust their harness or the methodical arrangement of gear on tarps tells a story of preparation and respect for the environment ahead.
Pay attention to the interaction between people and landscape. A wide shot showing your team dwarfed by the cave entrance establishes scale and drama. Close-ups of hands coiling rope or securing camera equipment in protective cases demonstrate the technical demands of the pursuit.
These preparation images also serve a practical purpose in your portfolio. They show potential clients or expedition partners your professional approach and safety consciousness. Consider the lighting during these setup moments too. The transition zone near cave entrances often provides beautiful natural light that flatters both subjects and surroundings, creating images with emotional resonance that pure documentation cannot achieve.
Technical Camera Settings for Harsh Transitions
Exposure Strategy for High-Contrast Scenes
Cave entrance photography presents one of the most challenging exposure scenarios you’ll encounter. The dramatic difference between the bright exterior and the dark cave interior can easily exceed your camera’s dynamic range, often spanning 10 stops or more. Getting this right requires a strategic approach to metering and exposure.
Start by understanding that your camera’s evaluative or matrix metering mode will struggle here. It attempts to balance the entire scene, which typically results in a blown-out exterior or an impenetrably dark cave interior. Instead, switch to spot metering and take readings from both the brightest exterior area and the darkest cave shadows you want to retain detail in. This gives you the actual dynamic range you’re working with.
For most cave entrance scenes, I recommend using exposure compensation between -1 and -2 stops. This preserves highlight detail in the bright exterior while accepting that you’ll lift shadows in post-processing. Modern cameras handle shadow recovery remarkably well, but blown highlights are usually unrecoverable.
Bracketing becomes essential when the contrast exceeds your sensor’s capabilities. Shoot at least three exposures: one metered for the exterior, one for the cave interior, and one in between. For extreme situations, consider a five-bracket sequence at one-stop intervals. This gives you options for HDR processing or manual blending later.
During golden hour, when exterior light is softer, you can often capture the scene in a single exposure at -1 stop compensation. Midday sun requires more aggressive bracketing strategies.
Lens Selection for Entrance Shots
Choosing the right lens for cave entrance photography can dramatically impact your final image, and the decision often comes down to the story you want to tell.
Wide-angle lenses, typically in the 16-35mm range, are the go-to choice for most cave entrance work. They excel at capturing the grand scale of the opening while including plenty of surrounding context—the forest canopy above, rock formations framing the entrance, or hikers providing scale. The extended depth of field at smaller apertures (f/11 to f/16) means you can keep everything from foreground rocks to distant cave interiors reasonably sharp. However, wide-angles introduce edge distortion that can bend straight lines and stretch elements at the frame borders. Position yourself carefully to minimize awkward distortions, especially if you’re including people near the edges.
Standard lenses between 35-70mm offer a more intimate perspective that closely matches human vision. They’re excellent when you want to isolate specific entrance features or compress the depth between the cave mouth and surrounding landscape. The reduced distortion creates more natural-looking results, particularly for architectural details like layered rock strata or carved formations. The trade-off? You’ll need more distance from your subject, which isn’t always possible in tight canyon or forest settings.
For practical shooting, I often start with a wide-angle to capture the overall scene, then switch to a standard lens for detail shots. This approach gives you creative flexibility during editing and ensures you haven’t missed important perspectives. Remember that narrower angles of view with standard lenses mean shallower depth of field, so focus carefully on your primary subject.
Protecting Your Gear During the Transition
Managing Condensation and Humidity
When photographing around cave environments, you’ll frequently move between vastly different temperature and humidity zones. The most common challenge occurs when bringing cold camera equipment from the cool, stable interior of a cave into warm, humid outside air, or vice versa. This temperature differential causes condensation to form on your lens elements, camera body, and even inside sealed equipment, potentially damaging electronics and ruining your shots.
The key to prevention is simple: allow gradual temperature equalization. Before exiting a cave, place your camera gear in sealed plastic bags while still in the cooler environment. As you transition outside, condensation will form on the exterior of the bags rather than on your equipment. Leave gear sealed for at least 30 minutes, allowing it to gradually reach ambient temperature. This technique works equally well when entering caves from hot exterior conditions.
For extended cave photography sessions, consider carrying silica gel packets in your camera bag to absorb excess moisture. Some photographers keep a dedicated microfiber cloth specifically for wiping down equipment between zone transitions. Remember that protecting camera gear from moisture damage preserves both your investment and your ability to capture those critical transitional shots without interruption.
Dust and Debris Management
Cave entrances are magnets for dust, moisture, and grit—a challenging combination for camera gear. The most critical moment for sensor contamination happens during lens changes in transition zones where air currents carry particles between environments. Plan your lens selections before approaching the cave entrance, minimizing swaps in dusty conditions. If you must change lenses, turn away from the cave mouth and shield your camera body with your jacket or a microfiber cloth.
Keep a rocket blower handy for quick sensor cleaning between shots, but save thorough cleaning for controlled environments back home. For external protection, use a UV filter as a sacrificial barrier against mud splatter and debris. A simple rain sleeve or even a plastic bag with a hole for the lens provides surprisingly effective protection during scrambles over wet rock or muddy banks. After each shooting session, brush off visible dirt with a soft brush before packing away equipment—dried mud becomes abrasive and can scratch lens barrels during transport.
Here’s the truth many photographers miss: the best cave photography portfolios don’t just document what’s underground—they tell complete stories. And that story begins before you ever step into darkness.
Exterior cave photography isn’t simply a nice addition to your collection; it’s the essential context that transforms a technically proficient underground image into a compelling visual narrative. The entrance establishes scale, the surrounding landscape provides geographic and ecological context, and those transitional zones capture the dramatic interplay between two worlds. Without these exterior perspectives, even your most stunning underground shots remain isolated moments rather than chapters in a broader story.
When planning your next cave photography expedition, resist the urge to rush past the entrance. Allocate genuine creative time to these exterior zones—scout the area during golden hour, experiment with different vantage points, and consider how seasonal changes might enhance your compositions. The photographers who consistently produce memorable cave portfolios understand this balance: they give equal respect to both the hidden chambers below and the revealing landscapes above. This holistic approach separates documentation from artistry, and it’s what your audience will remember long after they’ve scrolled past yet another stalactite photo.