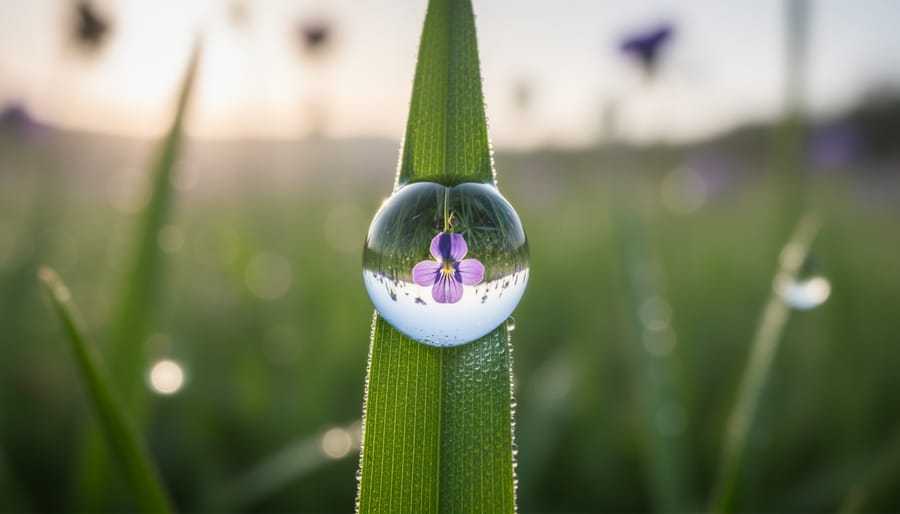
Year: 2025

Why Your Prints Don’t Match Your Screen (And How CMYK Changes Everything)

You’ve spent hours perfecting that landscape photograph on your calibrated monitor, sent it to the printer, and received back something that looks muddy, flat, or just wrong. The culprit isn’t a careless printer—it’s the fundamental difference between how screens and paper create color. Your monitor uses RGB (red, green, blue light), while professional printing relies on the 4 color print process using CMYK inks: cyan, magenta, yellow, and black.
This disconnect catches most photographers off-guard because the two systems work in opposite ways. Monitors add colored light together to create brightness, while …

How Online Proofing Tools Save Professional Photographers Hours Every Week

You’ve just finished an amazing wedding shoot, culled 800 images down to 200 keepers, and spent hours editing. Now comes the part that somehow takes longer than it should: getting client feedback. You’re juggling email threads with attached JPEGs, trying to decipher messages like “I don’t like the third one” when you’ve sent fifteen photos, and wondering if your client actually received the latest revision you sent yesterday.
Online proofing tools solve this specific headache by creating a dedicated digital space where clients can view, comment on, and approve images without the chaos of email …

How to Package Your Art Prints So They Actually Survive Shipping

Protect your art prints from shipping damage by sandwiching them between two rigid backing boards that extend at least one inch beyond each edge—this prevents corner crushing and edge dents that plague even carefully wrapped packages. Place prints in crystal-clear protective sleeves before adding the backing boards, as moisture and fingerprints during handling are just as damaging as transit mishaps.
Invest in proper triangular or square cardboard tubes for larger prints over 16×20 inches, rolling them with the image facing outward around an acid-free core to prevent cracking in the ink or paper fibers. Many professional …

Why Mobile Photographers Are Ditching Ring Lights for Umbrellas

Position your umbrella 45 degrees above and to the side of your subject to create flattering, dimensional lighting that mimics natural window light—this three-quarter positioning eliminates harsh shadows while maintaining texture and depth in your mobile photos. Choose white umbrellas for softer, more diffused illumination when photographing portraits or product details, or select silver-lined versions when you need increased contrast and punch for dramatic effect. Mount affordable LED panels or continuous light sources compatible with standard umbrella brackets, ensuring your smartphone camera can properly expose without the complicated…

How to Capture Yosemite’s Night Sky Without the Crowds (Or the Frustration)

Arrive at Glacier Point two hours before astronomical twilight to secure positioning for capturing Half Dome’s granite face against the Milky Way core, visible from late April through early September. This iconic vantage point requires advance planning—the road closes in winter, and summer parking fills by sunset—but rewards photographers with unobstructed views of Yosemite’s most recognizable formations framed by celestial drama.
Scout your specific compositions during daylight hours, marking GPS coordinates and noting foreground elements like Jeffrey pines or granite outcroppings that will anchor your star-studded …

Stop Throwing Away Failed Prints: How 3D Printing Is Revolutionizing Camera Customization Sustainably

Picture your camera bag: lens caps that cracked after a single drop, battery grips with stripped threads, cold shoe adapters that never quite fit right. Now imagine printing exact replacements at home using materials made from cornstarch that’ll break down in your compost bin within months. This isn’t science fiction—it’s the reality of environmentally friendly 3D printing for photographers.
The photography industry generates significant plastic waste through disposable accessories, proprietary parts with planned obsolescence, and packaging that ends up in landfills. Meanwhile, 3D printing technology has evolved …

Why Your Food Photos Look Flat (And How a Workshop Can Fix That)

Transform flat, uninspiring food shots into scroll-stopping images by mastering the interplay between natural light, composition angles, and styling techniques that professional food photographers use daily. A quality food photography workshop compresses years of trial-and-error into intensive hands-on sessions where you’ll photograph actual dishes, receive immediate feedback, and walk away with portfolio-worthy images alongside the technical knowledge to recreate them consistently.
The difference between free YouTube tutorials and a structured workshop lies in personalized instruction tailored to your specific challenges. …

Why Z-Wave Lighting Transforms Your Studio Workflow (And How to Set It Up)

**Transform Your Photography Studio with Smart Wireless Control**
Picture this: You’re mid-shoot, your model is perfectly posed, and the lighting is *almost* right. Instead of breaking the moment to manually adjust multiple stands, you tap your phone and fine-tune every light’s intensity without moving an inch. This is the promise of Z-Wave lighting for photographers.
Z-Wave is a wireless communication protocol that lets you control compatible smart lights, switches, and dimmers through a central hub—typically using a smartphone app or voice commands. Unlike photography-specific systems like PocketWizard (which …

Why X-Ray Optics Changed Everything We Know About Camera Lenses

X-ray optical systems represent cutting-edge technology borrowed from astrophysics and medical imaging that’s revolutionizing how camera manufacturers design modern lenses. While you won’t find actual X-ray components in your DSLR or mirrorless camera, the precision manufacturing techniques and optical design principles developed for X-ray telescopes and synchrotron facilities have directly influenced the ultra-high-resolution glass elements in today’s premium photography equipment.
Consider how Zeiss and Canon’s recent flagship lenses achieve unprecedented sharpness across the entire frame—this stems from …

Why Your Lens Bokeh Matters More Than Sharpness

Evaluate bokeh quality by shooting test scenes with points of light against dark backgrounds—Christmas lights, streetlamps at dusk, or sunlight filtering through leaves work perfectly. The out-of-focus highlights will reveal your lens’s bokeh character immediately: smooth, circular discs indicate pleasing bokeh, while harsh edges, onion rings, or cat’s-eye shapes suggest optical compromises that can distract in portraits and shallow depth-of-field work.
Study the transition zone between sharp and blurred areas next. Quality bokeh creates gradual, creamy transitions rather than abrupt shifts that draw attention away …