Protect your valuable photography equipment and ensure optimal image quality by mastering the essential art of lens care system maintenance. Beyond basic camera maintenance tips, proper cleaning and disinfection of your lens care tools directly impact image clarity and equipment longevity. Professional photographers understand that a contaminated cleaning system can transfer harmful particles onto delicate lens surfaces, potentially causing permanent damage. This comprehensive guide delves into proven methods for maintaining your lens cleaning arsenal, from specialized solutions to microfiber cloths and automated cleaning systems. Whether you’re shooting in dusty environments or controlled studios, implementing these professional-grade cleaning protocols will safeguard your investment and maintain pristine optical performance.
Essential Components of a Lens Cleaning System
Cleaning Solutions and Their Properties
Modern lens cleaning solutions come in various formulations, each designed for specific cleaning needs. The most common type is alcohol-free lens cleaner, which safely removes fingerprints, dust, and oils without risking damage to lens coatings. These solutions typically contain mild surfactants that break down contaminants while being gentle on delicate optical surfaces.
Pre-moistened lens cleaning wipes combine convenience with safety, featuring carefully measured amounts of cleaning solution. While effective for quick cleanups, they’re best suited for light cleaning rather than heavy-duty maintenance.
Optical cleaning solutions with anti-static properties help repel dust and prevent static buildup, particularly useful in dry environments. Some advanced formulations include anti-fogging agents that leave an invisible protective layer on the lens surface.
For more thorough cleaning, enzymatic solutions are available that specifically target protein-based deposits and stubborn residues. However, these should be used sparingly and only when standard cleaners prove insufficient.
Remember that natural cleaning alternatives like distilled water can be effective for basic cleaning but lack the specialized properties of dedicated lens solutions. Whatever solution you choose, always test it on a small area first and use only optical-grade microfiber cloths for application.
Tools and Materials
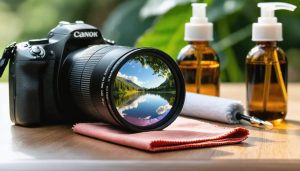
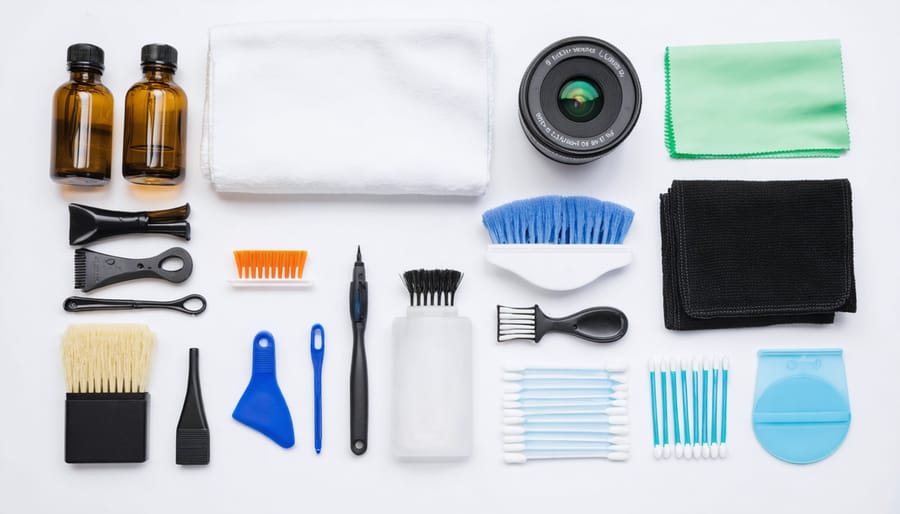
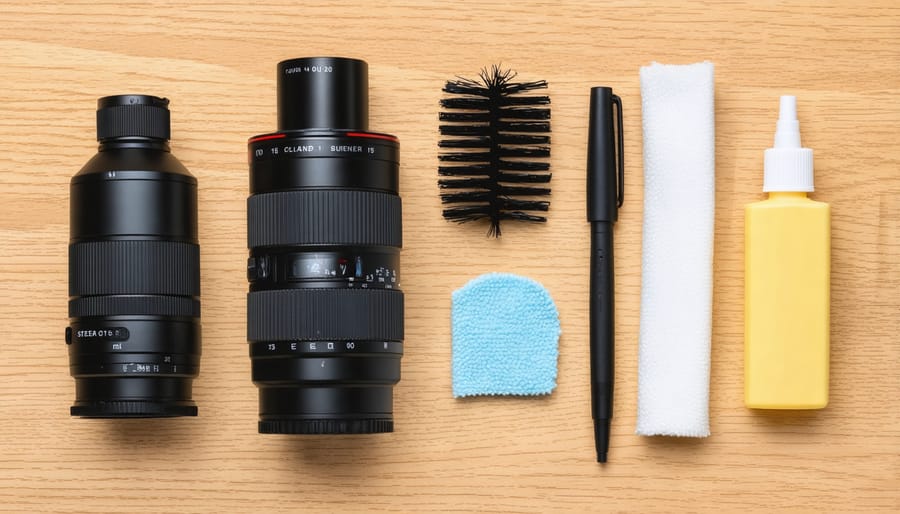
To properly clean and disinfect your lens care system, you’ll need several essential tools and materials. Start with a high-quality lens cleaning solution specifically designed for camera equipment – avoid household glass cleaners as they can damage lens coatings. A microfiber cloth is indispensable; invest in several premium-grade cloths and keep them clean and lint-free.
A lens cleaning pen with a brush on one end and a carbon-based cleaning element on the other is perfect for removing fingerprints and stubborn spots. For thorough cleaning, you’ll need lens tissues or pre-moistened lens wipes, which are designed to be gentle yet effective.
A rubber air blower is essential for safely removing loose particles before wiping. For detailed cleaning, consider having cotton swabs (preferably the ones designed for camera equipment) and a small soft-bristled brush. If you’re cleaning multiple pieces of equipment, disposable latex or nitrile gloves will prevent oil transfer from your fingers.
Store all these tools in a dedicated, dust-free container or pouch to maintain their cleanliness. Remember to regularly clean and replace your cleaning tools, especially microfiber cloths, to prevent cross-contamination.
Proper Cleaning and Disinfection Procedures
Preparing Your Workspace
Before you begin cleaning your lens care system, it’s essential to create a proper workspace that minimizes the risk of contamination. Start by choosing a well-lit, dust-free area away from air vents, open windows, or high-traffic zones. A clean, flat surface like a desk or table works best, and you’ll want to lay down a fresh, lint-free microfiber cloth as your working surface.
Wash your hands thoroughly with soap and water, and dry them completely before handling any equipment. Consider wearing powder-free nitrile gloves if you’re particularly concerned about fingerprints or contamination. Gather all your cleaning supplies within easy reach, including lens cleaning solution, microfiber cloths, lens tissues, and cotton swabs.
Ensure your workspace is free from beverages, food, or any liquids that could accidentally spill. Good lighting is crucial – use a desk lamp if needed, but avoid direct sunlight which can create glare and make it difficult to spot smudges or debris. Having a small LED flashlight handy can help you inspect your equipment more thoroughly during the cleaning process.
Remember to clear enough space to work comfortably without risking bumping or dropping your equipment. A clean, organized workspace is your first line of defense against accidents and contamination.
Cleaning Process
Start by gathering all your cleaning supplies: lens cleaning solution, air blower, microfiber cloth cleaning techniques, and a clean workspace. Begin with the lens caps and holders, washing them with mild soap and warm water, ensuring all soap residue is thoroughly rinsed away. Pat them dry with a lint-free cloth and let them air dry completely before use.
For lens cleaning brushes, gently wash the bristles with a specialized brush cleaner or mild soap solution, being careful not to damage or misshape the bristles. Rinse thoroughly and reshape the brush head while damp. Allow it to dry naturally in an upright position to maintain its form.
Clean your air blower by first checking for any debris in the nozzle. If necessary, use compressed air to clear any blockages. Wipe the exterior with a slightly dampened cloth and ensure it’s completely dry before use.
For lens cleaning solutions and bottles, inspect for any contamination or expired products. Transfer solutions to clean containers if needed, and sanitize spray bottles monthly by rinsing with a mixture of water and rubbing alcohol. Always label containers with the date of cleaning.
Remember to store all cleaning tools in a dust-free container or case after cleaning, and replace items showing signs of wear or contamination. Regular maintenance of your cleaning tools is just as important as maintaining your lenses themselves.
Disinfection Methods
Proper disinfection of your lens cleaning tools is crucial for maintaining both your equipment’s condition and the quality of your images. Start by washing your microfiber cloths in warm water with mild, fragrance-free detergent, avoiding fabric softeners that can leave residue. Air-dry the cloths completely before use, as trapped moisture can promote bacterial growth.
For lens cleaning brushes, a monthly cleaning with isopropyl alcohol (70% or higher) is recommended. Gently dip the bristles in the solution and allow them to air dry thoroughly. Never submerge the entire brush, as this could damage the handle or loosen the bristles.
Lens cleaning solution bottles should be wiped down regularly with alcohol wipes, paying special attention to the nozzle area. Replace any solutions that appear cloudy or have passed their expiration date. For air blowers, periodic cleaning of the intake valve with compressed air will prevent dust from being redistributed onto your lenses.
Store all cleaning tools in a sealed, dust-free container when not in use, and replace microfiber cloths every 3-4 months with regular use. This ensures your cleaning tools remain effective and won’t introduce contaminants to your valuable optics.
Maintenance Schedule and Best Practices
Regular Maintenance Timeline
To keep your lens care system in optimal condition, following a consistent maintenance schedule is crucial. Like other essential maintenance practices, regular cleaning of your lens care tools helps prevent cross-contamination and ensures reliable performance.
Daily maintenance should include wiping down lens cleaning brushes after each use and storing them in their protective cases. Microfiber cloths should be shaken out and stored in sealed containers to prevent dust accumulation. After using liquid cleaners, always ensure caps are tightly sealed to prevent evaporation.
Weekly tasks involve washing microfiber cloths according to manufacturer instructions and inspecting brush bristles for damage or wear. This is also the ideal time to check solution levels in bottles and verify expiration dates.
Monthly maintenance should focus on deep cleaning your entire system. Sanitize brush handles, clean storage containers with mild soap, and replace any cleaning solutions that appear contaminated or are approaching their expiration date.
Every three months, evaluate all components of your cleaning kit. Replace microfiber cloths showing signs of wear, inspect brush bristles for shedding, and thoroughly clean storage cases. This quarterly assessment helps maintain the integrity of your cleaning tools and protects your valuable lenses from damage caused by deteriorated cleaning implements.
Common Mistakes and Solutions
Even experienced photographers can make mistakes when cleaning their lens care systems. One common error is using the same microfiber cloth repeatedly without washing it, which can lead to scratches from accumulated debris. Always keep multiple clean cloths on hand and wash them regularly with mild soap and water.
Another frequent mistake is spraying cleaning solution directly onto lenses or filters. This can cause liquid to seep into the lens edges and damage internal components. Instead, always apply the solution to your cleaning cloth first.
Using facial tissues or paper towels as cleaning materials is a dangerous practice that can scratch your valuable optics. These materials contain wood fibers that can cause microscopic scratches. Stick to proper lens cleaning tissues or microfiber cloths designed specifically for optical equipment.
Some photographers overlook the importance of cleaning their cleaning tools themselves. Contaminated lens pens, blowers, or brushes can transfer dirt and oils back onto clean surfaces. Regularly inspect and clean your cleaning tools, replacing them when they show signs of wear.
Rushing through the cleaning process is perhaps the most damaging mistake. Taking shortcuts like dry-wiping lenses or skipping the air-blowing step can lead to scratches. Always follow the proper sequence: blow off loose particles, brush if necessary, then clean with solution and cloth.
Storage and Organization
Organizing your lens cleaning supplies properly not only extends their lifespan but also ensures they’re readily available when needed. Create a dedicated cleaning station in a clean, dust-free area of your workspace, away from direct sunlight and extreme temperatures. This approach aligns with best practices for proper gear storage and maintenance.
Store your cleaning solutions in their original containers with caps tightly sealed to prevent evaporation and contamination. Keep microfiber cloths in resealable plastic bags when not in use, protecting them from dust and debris. If you use pre-moistened lens wipes, ensure the package is properly resealed after each use to prevent them from drying out.
Consider investing in a small tackle box or organizer with separate compartments for different cleaning tools. Label each section clearly to maintain organization: one area for microfiber cloths, another for cleaning solutions, and separate spaces for lens brushes and air blowers. This systematic approach prevents cross-contamination and makes it easier to quickly locate what you need.
Maintain a cleaning log to track when you last replaced consumable items like cleaning solutions and microfiber cloths. Most cleaning solutions have a shelf life of about 12 months after opening, while microfiber cloths should be replaced every 3-6 months depending on usage.
Store your cleaning kit in a cool, dry place, ideally in the same room where you keep your camera equipment. This ensures consistent temperature and humidity levels, preventing potential degradation of cleaning solutions. Consider adding silica gel packets to your storage container to absorb any excess moisture that could compromise your cleaning supplies.
Remember to inspect your cleaning tools regularly for signs of wear or contamination. If you notice any deterioration in cleaning cloths or changes in solution consistency, replace them immediately to avoid risking damage to your valuable lenses.

Maintaining a clean and properly disinfected lens care system is crucial for both the longevity of your equipment and the quality of your photographs. Regular cleaning, proper storage, and following manufacturer guidelines are essential habits that every photographer should develop. Remember that even small particles of dust or debris can significantly impact image quality and potentially damage your valuable lenses. By incorporating these cleaning and disinfection practices into your routine maintenance schedule, you’ll protect your investment while ensuring optimal performance. Make it a habit to check your cleaning tools regularly, replace solutions as needed, and store everything in a clean, dry environment. Your future self – and your photographs – will thank you for taking these extra steps to maintain a pristine lens care system.