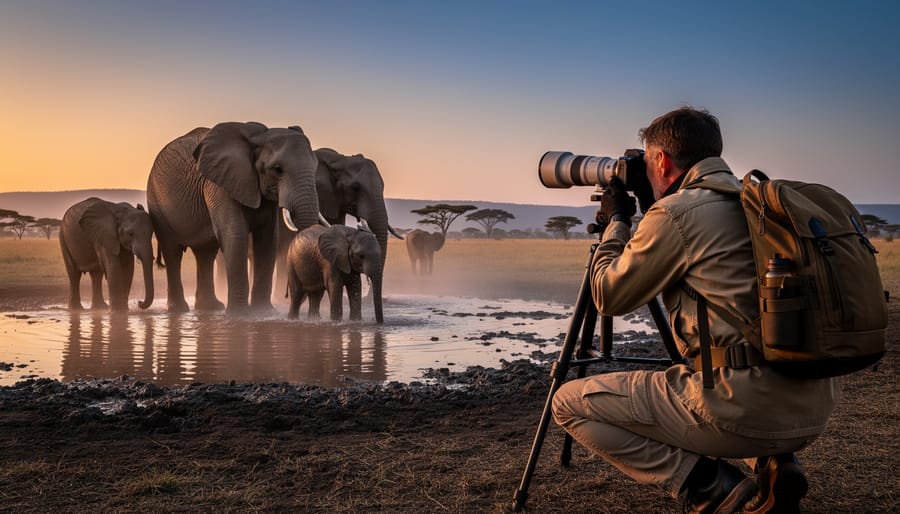
A herd of elephants gathers at a watering hole at dusk, their silhouettes reflected in the golden light. The photographer captures the moment, but this isn’t just about creating a beautiful image. This photograph will document habitat loss, support a conservation nonprofit’s fundraising campaign, and ultimately help protect this threatened population. This is conservation photography, where technical skill meets purposeful storytelling to drive environmental change.
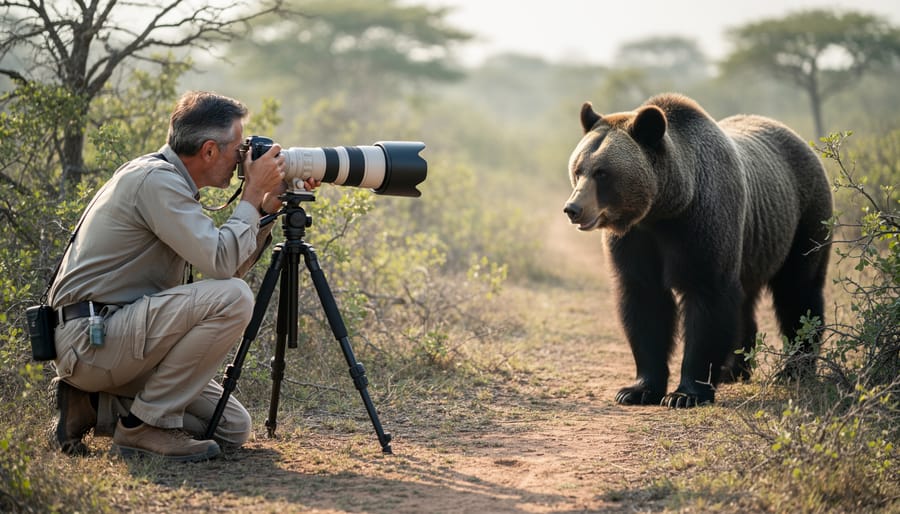
Conservation photography differs fundamentally from wildlife photography. While both require mastery of long lenses, low-light techniques, and animal behavior knowledge, conservation work demands context. You’re not just photographing a polar bear; you’re documenting shrinking sea ice and the climate crisis it represents. You’re creating visual evidence that scientists, policymakers, and the public need to understand urgent environmental challenges.
The practice traces back to pioneers who understood that images could spark action. When photographs of clearcut forests or polluted rivers reach the right audiences, they catalyze legislation, shift public opinion, and secure funding for protection efforts. Today’s conservation photographers work alongside research teams, collaborate with environmental organizations, and produce bodies of work focused on specific conservation issues rather than isolated beautiful moments.
Whether you’re already photographing nature or considering this path, conservation photography offers a way to transform your creative passion into tangible environmental impact. The technical skills you develop serve a mission larger than the frame itself.
What Makes Conservation Photography Different From Wildlife Photography
The Three Pillars of Conservation Photography
Conservation photography stands on three foundational pillars that transform ordinary wildlife images into powerful tools for environmental change. Understanding these elements will help you create work that resonates beyond aesthetic appeal.
The first pillar is scientific documentation. Your images need to accurately represent reality—showing species in their natural habitats, capturing behavioral patterns, and recording environmental conditions. This means photographing that bird without manipulating its surroundings or waiting for natural light rather than forcing unnatural poses. Scientists and conservation organizations rely on these truthful representations to study populations, track habitat changes, and support policy decisions. Think of yourself as a visual researcher, where your metadata noting location, date, and species becomes as valuable as the image itself.
The second pillar is emotional storytelling. Facts alone rarely inspire action—people connect through stories that make them feel something. This is where documentary storytelling techniques become essential. A photo of a plastic-choked seabird creates urgency that statistics cannot match. Your goal is crafting narratives that help viewers understand what’s at stake. Consider Cristina Mittermeier’s image of the starving polar bear—it communicated climate change impacts more effectively than countless reports.
The third pillar is advocacy. Conservation photography exists to drive change. Your work should inform campaigns, influence decision-makers, or educate communities. This means thinking beyond gallery walls to how images might appear in legislative presentations, educational materials, or fundraising campaigns. Partner with conservation groups, submit work to environmental publications, or build online platforms that reach target audiences.
When these three pillars work together—accurate documentation wrapped in compelling narrative and directed toward meaningful action—your photography becomes a genuine conservation tool rather than just beautiful imagery.
Real Impact: When a Photograph Changed Policy
Conservation photography has a proven track record of creating tangible change, and understanding these success stories can inspire your own work while illustrating what’s possible when powerful imagery meets the right moment.
Perhaps the most famous example is Sebastião Salgado’s “Genesis” project, but an even more direct policy impact came from Joel Sartore’s Photo Ark. His portrait-style images of endangered species, particularly the northern white rhinoceros, have been used in congressional testimonies and helped secure increased funding for species preservation programs. The emotional connection people felt seeing these animals photographed against simple backgrounds, making eye contact with viewers, translated into measurable policy support. Several zoos and conservation organizations reported significant donation increases after featuring his work, demonstrating how photography can open wallets as effectively as hearts.
Another compelling case involves photographer Daniel Beltrá’s aerial documentation of the 2010 Deepwater Horizon oil spill. His haunting images of oil-stained Gulf waters were instrumental in shaping the legal case against BP and influenced the RESTORE Act, which directed billions in penalty payments toward Gulf Coast restoration. The photographs provided undeniable visual evidence of environmental damage that technical reports couldn’t convey as effectively to policymakers and the public.
Closer to grassroots impact, photographer Ami Vitale’s work documenting Kenya’s community-based conservation efforts helped shift international conservation funding models. Her images showing local communities actively protecting wildlife challenged the outdated narrative that conservation required excluding people from their lands. This storytelling approach influenced how major conservation organizations allocate resources, proving that conservation photography isn’t just about documenting problems but showcasing solutions that inspire replicable action.
These examples share a common thread: photographers who understood their audience, maintained long-term commitment to their subjects, and partnered with organizations positioned to act on their visual evidence.
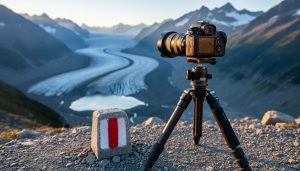
Essential Gear for Conservation Photography Work
Camera Bodies That Can Handle Extreme Conditions
When you’re documenting wildlife in remote rainforests, arctic tundras, or dusty savannas, your camera needs to be as tough as you are. Conservation photography often means spending hours in rain, heat, humidity, or freezing temperatures—conditions that would leave most consumer cameras struggling.
The most critical feature to look for is comprehensive weather sealing. Professional-grade bodies like the Canon EOS R5 or Nikon Z8 offer extensive gasket protection around every button, dial, and port. I’ve personally watched photographers work through monsoon rains with these cameras, and they just keep firing. Sony’s A1 and A7R V also deliver excellent sealing, though some photographers prefer the more substantial grip of Canon or Nikon when wearing gloves in cold conditions.
Battery life becomes crucial when you’re days away from electrical outlets. Mirrorless cameras have improved dramatically, but consider bodies with larger batteries or dual battery slots. The Nikon Z9, for instance, can shoot thousands of frames on a single charge—a real advantage during extended field sessions. Always pack multiple spare batteries and consider solar charging solutions for truly remote expeditions.
Durability matters more than megapixels when a camera gets knocked against rocks or takes an unexpected dunking. Magnesium alloy construction provides the best protection without excessive weight. The shutter mechanism should be rated for hundreds of thousands of actuations—conservation projects often require extensive documentation.
Temperature tolerance is another practical consideration. Look for cameras rated to function in both extreme cold and heat, as these specifications directly translate to reliability when documenting endangered species in harsh climates where getting the shot matters most.
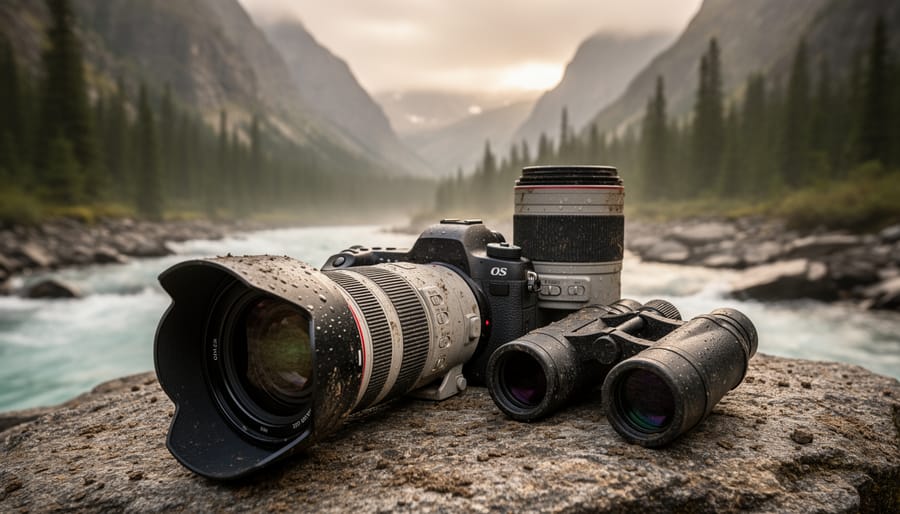
Lenses for Documenting Both the Macro and the Landscape
Conservation photography demands versatility in your lens kit because environmental stories unfold at every scale. One moment you’re capturing sweeping vistas of threatened ecosystems, the next you’re documenting a rare frog species no bigger than your thumbnail. Understanding which focal lengths serve specific storytelling purposes will elevate your conservation work from simple documentation to compelling narrative.
Wide-angle lenses (16-35mm) are essential for establishing context. They excel at showing how wildlife habitats connect to larger landscapes, revealing the scope of deforestation, or demonstrating human impact on natural areas. These lenses also shine when you need to work in tight spaces, like documenting coral restoration underwater or capturing intimate scenes inside wildlife rehabilitation centers. Strong landscape photography composition skills become crucial here, as you’re setting the stage for your conservation story.
For many field photographers, a 24-70mm or 24-105mm zoom serves as the workhorse lens. This range handles everything from environmental portraits of conservation workers to medium-distance wildlife observations. It’s practical for unpredictable fieldwork where you can’t always choose your shooting distance.
Telephoto lenses (100-400mm or longer) let you document sensitive species without causing disturbance, which is paramount in conservation ethics. They’re indispensable for behavioral documentation and capturing compelling wildlife portraits that create emotional connections with viewers.
Don’t overlook macro photography capabilities either. A dedicated macro lens or extension tubes reveal the smaller conservation stories—endangered insects, botanical details, or environmental indicators like lichen that signal ecosystem health. These intimate perspectives often resonate powerfully with audiences.
Support Gear That Makes or Breaks Field Success
When you’re spending weeks in remote wilderness areas, your support gear becomes just as critical as your camera body. I learned this the hard way during a rainforest assignment when a flimsy tripod collapsed under my telephoto lens, potentially costing me irreplaceable shots of a rare frog species.
A sturdy carbon fiber tripod offers the best strength-to-weight ratio for field work. Look for models that can handle at least twice your heaviest lens setup while still being light enough to carry during long hikes. Ball heads provide quick adjustments when wildlife doesn’t wait for precise geared movements.
Camera traps expand your reach dramatically, capturing nocturnal species and shy animals that avoid human presence. Modern trail cameras with cellular connectivity let you monitor remote locations without disturbing habitats through frequent visits.
Weatherproof cases are non-negotiable. Pelican-style hard cases protect gear during transport, while soft wraps and rain covers handle unexpected weather during shoots. I always pack silica gel packets to combat humidity in tropical environments.
Power management can make or break extended expeditions. Carry multiple batteries, portable solar panels for recharging, and consider battery grips that double your shooting capacity. Always bring backup memory cards and store them separately from your main gear in case of theft or equipment failure.
Technical Skills Every Conservation Photographer Needs
Shooting for Scientific Documentation vs. Emotional Impact
Conservation photographers face a unique challenge: their images must serve dual masters. On one hand, scientists need accurate documentation that can inform research, track species populations, and monitor habitat changes. On the other hand, the general public responds to emotionally resonant images that inspire action and support for conservation causes.
The scientific documentation side requires methodical precision. Include clear scale references in your frames—a researcher examining a photograph of a rare frog species needs to understand its actual size. Shoot with even, diffused lighting that reveals identifying features like markings, coloration, and anatomical details. Set your aperture to f/8 or f/11 for sufficient depth of field, ensuring both the subject and relevant habitat elements remain sharp. Capture the broader context too: wide shots showing the ecosystem, water quality, vegetation types, and surrounding land use all contribute valuable data for conservation planning.
For emotional impact, shift your approach toward storytelling. Get eye-level with your subjects to create intimate connections. Use wider apertures like f/2.8 or f/4 to isolate subjects against softly blurred backgrounds, drawing viewers into the moment. Golden hour lighting adds warmth and drama that resonates emotionally. Compose with the rule of thirds and leading lines to guide the viewer’s eye naturally through the frame.
The most effective conservation photographers master both approaches. Shoot the same subject multiple ways: capture your scientifically rigorous documentation shots first, with proper lighting and scale references. Then experiment with dramatic angles, selective focus, and creative compositions that evoke feeling. A single assignment might yield images for peer-reviewed journals alongside compelling visuals for fundraising campaigns. This dual approach maximizes your impact, providing researchers with the evidence they need while giving conservation organizations the emotional ammunition to mobilize public support and funding.
Working With Challenging Light in Natural Habitats
Conservation photography often means working in environments that seem designed to frustrate photographers. Dense rainforest canopies create deep shadows with occasional shafts of harsh light, midday sun bleaches out coastal landscapes, and underwater scenes present a whole different challenge. But here’s the thing: these difficult conditions are exactly where conservation stories happen, and learning to work with challenging light makes your images more authentic and impactful.
In forests, embrace the diffused light rather than fighting it. The soft, even illumination under a canopy actually works beautifully for documenting understory plants and forest floor ecosystems. When those dramatic light shafts appear, position yourself to use them as natural spotlights on your subject, but watch your exposures carefully. Expose for the highlights and lift shadows in post-processing rather than blowing out those bright areas completely.
Harsh midday sun gets a bad reputation, but in conservation work, you can’t always wait for golden hour. Use fill flash at low power to soften shadows on nearby subjects without creating that obviously artificial look. A simple reflector can also bounce light into shadowed areas when photographing smaller subjects like insects or plants.
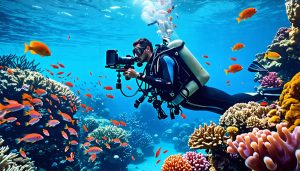
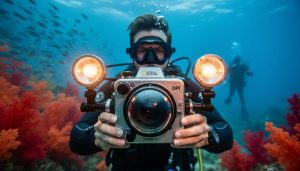
Underwater photography requires specialized skills, but start with understanding color loss at depth. Reds disappear first, so external strobes or video lights become essential beyond shallow waters. Practice in controlled conditions before tackling challenging marine conservation subjects.
The key principle across all scenarios: work within your environment’s natural rhythms. Patience often solves what equipment cannot, and authentic lighting tells more honest conservation stories than perfect studio conditions ever could.
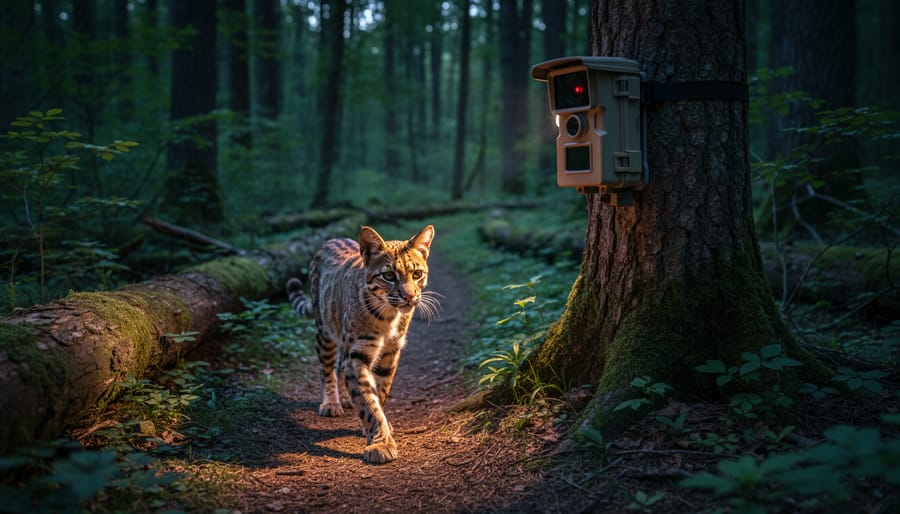
Camera Trap Photography and Remote Documentation
Camera traps have revolutionized how we document elusive wildlife, offering a window into animal behavior without human presence disrupting natural patterns. These autonomous systems are essential tools for conservation photographers working with sensitive species that would otherwise remain invisible to our cameras.
Setting up an effective camera trap starts with location scouting. Look for natural corridors where animals travel, such as game trails, water sources, or natural bottlenecks in terrain. Evidence like tracks, scat, or rub marks confirms active areas. Position your camera at knee to chest height, angling slightly downward to capture ground-dwelling subjects while minimizing sky exposure that can confuse metering systems.
For camera settings, prioritize reliability over artistic perfection. Use apertures between f/5.6 and f/8 to maximize depth of field, ensuring sharp images whether an animal is two feet or ten feet from your lens. Set your shutter speed to at least 1/250 second to freeze motion, and don’t be afraid to push ISO to 1600 or higher since a sharp, slightly noisy image beats a blurry one every time. Many photographers recommend using flash or infrared illumination for nighttime captures, though infrared produces monochrome images while avoiding potentially startling visible light.
Modern camera traps range from purpose-built trail cameras costing a few hundred dollars to modified DSLRs in weatherproof housings. Trail cameras offer simplicity and exceptional battery life, while DSLR setups provide superior image quality when monitoring high-priority species. Whichever system you choose, test thoroughly before deployment and always have backup batteries and memory cards ready for extended field sessions.
The Ethics Code Every Conservation Photographer Must Follow
Wildlife Welfare Always Comes First
Conservation photography requires a fundamental commitment: the wellbeing of wildlife always trumps getting the shot. This principle, central to ethical photography practices, means understanding safe distances, recognizing stress signals, and knowing when to walk away.
Different species require different approach distances. While some birds tolerate human presence within 30 feet, nesting animals or those with young need significantly more space. A good rule: if your subject changes behavior because of you, you’re too close. Watch for stress indicators like excessive grooming, ear pinning in mammals, repeated alarm calls, or abandoning feeding. These signs mean immediate retreat.
Baiting and call playback present serious ethical dilemmas. While baiting predators might yield dramatic images, it alters natural hunting patterns and can create dangerous human-wildlife associations. Similarly, using recorded calls during breeding season can exhaust birds responding to phantom territorial threats, potentially affecting nesting success.
Consider this real scenario: you spot an eagle’s nest with perfect lighting. The ethical response involves researching species-specific buffer zones, consulting local guidelines, and potentially foregoing the image entirely during sensitive periods. One photographer friend discovered a den site but waited until the following year when young had dispersed before photographing the location.
Remember, no photograph justifies causing stress, habitat abandonment, or behavioral disruption. Your role as a conservation photographer includes being an advocate for responsible wildlife observation, setting examples that inspire others to prioritize animal welfare over image acquisition.
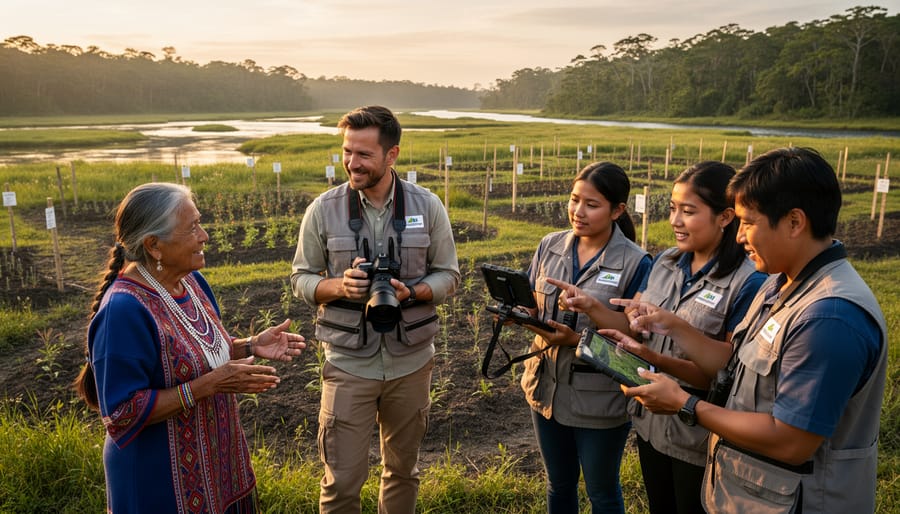
Working Respectfully With Indigenous Communities and Local Conservation Groups
Conservation photography becomes truly meaningful when it’s grounded in genuine partnerships with the communities who call these ecosystems home. Before you even raise your camera, remember that Indigenous peoples and local communities have been stewarding these lands for generations—they’re not just subjects in your story, they are the story.
Start by seeking explicit permission before photographing on Indigenous lands or in culturally significant areas. This isn’t just about legal requirements; it’s about respect. Connect with community leaders, explain your project’s goals, and genuinely listen to their concerns and priorities. What you think needs documenting might differ from what the community wants to share with the world.
Cultural sensitivity goes beyond avoiding sacred sites. It means understanding local protocols, compensating people fairly for their time and knowledge, and representing communities accurately without perpetuating stereotypes. A stunning image of an Indigenous hunter might feed into romanticized narratives if you don’t provide proper context about contemporary conservation challenges and solutions.
The most ethical conservation photography creates tangible benefits for local communities. This might mean sharing image licensing revenue, providing copies of photos for their own advocacy work, or amplifying their voices through your platforms. Consider partnering with local conservation groups who understand the nuances of their region—they can guide you to stories that need telling while ensuring your presence supports rather than disrupts ongoing efforts.
When your photography elevates local voices instead of overshadowing them, you create work that’s both more authentic and more effective at driving conservation outcomes.
How to Start Your Own Conservation Photography Projects
Finding Local Biodiversity Stories in Your Own Backyard
You don’t need to travel to the Amazon rainforest or African savannas to practice conservation photography. Some of the most impactful stories are happening right in your community, and starting locally offers distinct advantages: you can revisit sites regularly to document change over time, build relationships with conservation groups, and develop deep knowledge of specific issues.
Begin by researching environmental challenges in your region. Contact local nature centers, land trusts, wildlife rehabilitation facilities, and conservation nonprofits to learn about their current projects. Many organizations welcome photographers who can document their restoration work, monitor species recovery, or create images for educational materials and fundraising campaigns. These partnerships provide access to protected areas, expert knowledge, and meaningful context for your images.
Look for stories that connect emotionally with viewers. A vanishing wetland being restored by volunteers, a threatened species making a comeback in a nearby park, or the impact of urban development on local wildlife corridors all make compelling subjects. Even common species can illustrate larger conservation themes when photographed thoughtfully.
When identifying projects, consider long-term potential. Documentation over months or years creates powerful before-and-after narratives that single visits cannot achieve. Ask organizations what visual stories would benefit their advocacy work, then propose specific photography projects with defined goals and deliverables.
Local conservation photography builds your skills, creates tangible impact in your community, and establishes the foundation for larger projects. The creek behind your neighborhood might not seem exotic, but if it tells an authentic conservation story, your images can inspire real change.
Building Relationships With Conservation Organizations
Building meaningful partnerships with conservation organizations can transform your photography from beautiful imagery into powerful tools for change. The key is approaching these relationships as collaborations rather than one-sided transactions.
Start by researching organizations whose missions align with your photographic interests and values. NGOs like the World Wildlife Fund, regional land trusts, or smaller grassroots conservation groups are often seeking compelling visual content but lack photography budgets. Before reaching out, familiarize yourself with their current campaigns and understand their specific needs.
When pitching a project, be specific and realistic. Instead of saying “I want to photograph wildlife,” propose something concrete: “I’d like to document the habitat restoration work at Smith Creek over six months to help with your fundraising efforts.” Include a brief portfolio of relevant work and explain what the organization gains—whether it’s social media content, images for grant applications, or exhibition materials.
Research institutions and wildlife agencies often need documentation for scientific papers, public outreach, or monitoring programs. These partnerships might not be glamorous, but they provide valuable field access and lend scientific credibility to your work.
Be prepared to work pro bono initially while building trust and demonstrating value. However, established photographers should negotiate fair compensation or clear usage agreements. The most successful partnerships are truly reciprocal: you gain access, purpose, and portfolio material while organizations receive professional imagery that furthers their conservation mission. Always maintain open communication about expectations, deliverables, and image rights to ensure both parties benefit from the collaboration.
Turning Your Images Into Conservation Action
Creating powerful conservation images is just the beginning—the real impact happens when your work reaches the right audiences and inspires action. Let’s explore how to amplify your conservation message effectively.
Social media platforms have become powerful tools for conservation photographers. Take Cristina Mittermeier, who built a massive following by sharing compelling ocean conservation stories on Instagram, pairing striking images with educational captions that explain why these ecosystems matter. The key is consistency and authenticity—post regularly, engage with your audience, and always connect your images to specific conservation issues or solutions.
Partnering with conservation organizations multiplies your impact significantly. These groups need visual content for fundraising campaigns, annual reports, and awareness initiatives. Approach nonprofits whose missions align with your work and offer your images for specific projects. For example, photographer Joel Sartore’s Photo Ark project partnered with National Geographic and multiple zoos, creating a distribution network that reached millions while documenting endangered species.
Traditional media outlets still hold considerable influence. Build a portfolio website showcasing your best conservation work, then pitch story ideas to magazines, newspapers, and online publications. Include the conservation angle prominently—editors want stories that matter to their readers.
Consider creating educational materials for schools or community centers. Many educators actively seek high-quality images to make environmental lessons more engaging. Some photographers also organize local exhibitions in libraries, coffee shops, or community spaces, sparking conversations about conservation issues in accessible venues.
Remember, successful distribution isn’t about being everywhere—it’s about being strategic. Focus on channels where your target audience already engages with environmental content, and always include clear calls to action that guide viewers toward meaningful involvement.
The camera you hold represents more than a tool for capturing beautiful images—it’s an instrument of change with genuine power to influence conservation outcomes. Throughout history, single photographs have catalyzed policy changes, redirected funding toward endangered species, and transformed public apathy into passionate advocacy. That same potential exists in every image you create, regardless of whether you’re shooting with professional equipment or a smartphone, whether you’ve been photographing for decades or picked up a camera last month.
Conservation photography isn’t reserved for those who travel to exotic locations or have credentials from major publications. Local biodiversity needs champions too. The endangered salamander population in your neighborhood creek, the last remaining prairie remnant in your county, the migratory birds passing through urban parks—these subjects deserve documentation and advocacy just as much as elephants and rainforests. Your proximity to these subjects and understanding of local ecosystems actually gives you advantages that visiting photographers lack.
Start today. Choose one species or habitat that resonates with you. Learn its story, understand the threats it faces, and document it thoughtfully. Share those images with local conservation groups, submit them to community publications, or use them to educate through social media. Partner with scientists who need visual documentation. Attend town meetings where development threatens natural areas and bring your photos as evidence of what’s at stake.
The photographers who’ve made the greatest conservation impact didn’t wait for permission or perfect conditions—they simply began. Your images matter. The species you document, the habitats you reveal, and the connections you forge between viewers and nature create ripples that extend far beyond the frame, building momentum toward a future where biodiversity thrives.