Grab your X100VI, flip the exposure compensation dial to zero, set the shutter speed dial to ‘A’ (for Aperture Priority), and rotate the aperture ring to f/5.6—you’ve just configured the most forgiving shooting mode for learning this camera. Unlike other compact cameras that hide controls in menus, the X100VI puts physical dials for shutter speed, aperture, and ISO directly at your fingertips, which feels intuitive once you understand what each dial actually does to your images.
The learning curve exists not because this camera is complicated, but because it respects you enough to offer real control. Many beginners panic when they first hold an X100VI, seeing dials instead of a mode wheel with ‘portrait’ or ‘landscape’ icons. That initial intimidation quickly transforms into confidence when you realize understanding camera settings on the X100VI means simply looking at the top of your camera rather than diving through digital menus.
This guide cuts through the overwhelm by focusing exclusively on the X100VI’s specific interface and controls. You’ll learn exactly which dials to adjust for different shooting situations, why the camera’s hybrid viewfinder gives you a distinct advantage, and how to avoid the three most common mistakes that cause blurry or poorly exposed photos. By the end, you’ll stop fighting against the manual controls and start appreciating why photographers consider this camera’s tactile approach revolutionary for both learning photography and capturing exceptional images quickly.
Understanding Your X100VI’s Core Controls
The Command Dial System Explained
The X100VI features two command dials that become your primary tools for adjusting settings quickly. Think of them as your camera’s steering wheel—once you understand how they work, everything else falls into place more naturally.
The front command dial sits just below the shutter button, where your index finger rests. The rear command dial is positioned near your thumb on the back of the camera. In Program mode, the front dial shifts the program (changing the aperture and shutter speed combination while maintaining the same exposure), while the rear dial adjusts exposure compensation. Switch to Aperture Priority mode, and the front dial controls your aperture value while the rear still handles exposure compensation.
Here’s where things get practical: when you’re shooting street photography in Aperture Priority, you might set f/5.6 using the front dial for sharp subjects with pleasantly blurred backgrounds. If you notice your images are consistently too bright, rotate the rear dial counterclockwise to dial in negative exposure compensation.
In Manual mode, the front dial controls shutter speed and the rear adjusts aperture. This arrangement feels intuitive after a few shooting sessions—your index finger handles how motion appears (frozen or blurred), while your thumb manages depth of field.
During playback, these dials become navigation tools. The rear dial jumps between images, and the front dial zooms in to check critical focus. Many photographers find it helpful to spend an afternoon practicing with both dials in different shooting modes. This muscle memory development transforms what initially feels awkward into second nature, letting you respond to fleeting moments without taking your eye from the viewfinder.
Quick Menu vs. Full Menu: When to Use Each
The X100VI offers two menu systems, and understanding when to use each will save you considerable frustration. Think of the Quick Menu (accessed by pressing the Q button) as your speed dial for frequently adjusted settings—it’s your go-to when you’re actively shooting and need to make rapid changes without diving into deep menu structures.
The Quick Menu displays about twelve customizable settings on a single screen, allowing you to adjust ISO, white balance, film simulation, and other commonly tweaked parameters in seconds. This is perfect when you’re moving between different lighting conditions during a wedding reception or switching from landscape to portrait work. You can see all your options at a glance without scrolling through multiple menu pages.
The Full Menu system, accessed by pressing the MENU/OK button, is where you handle initial camera setup and infrequently changed settings. This is where you’ll configure autofocus parameters, customize button functions, set your image quality preferences, and adjust system settings like date and time. While more comprehensive, it’s not designed for quick access during active shooting.
Here’s a practical approach: spend thirty minutes with the Full Menu when you first get your X100VI, configuring your camera to match your shooting style. Customize your Quick Menu to include the settings you anticipate changing most often. From that point forward, you’ll primarily live in the Quick Menu during shoots, only returning to the Full Menu when you need to fundamentally change how your camera operates or update specific technical configurations.
The Exposure Triangle on the X100VI
Aperture: Working with f/2 to f/16
The X100VI features a tactile aperture ring on the lens barrel that ranges from f/2 to f/16, giving you direct control over depth of field and exposure. Unlike cameras where aperture is buried in menus, this physical control makes it intuitive to understand the relationship between your settings and the final image.
At f/2, the lens’s widest aperture, you’ll achieve that beautiful background blur (bokeh) that makes portraits pop and isolates your subject from distracting backgrounds. This setting excels for street portraits, food photography, and any situation where you want to draw attention to a specific element. Keep in mind that at f/2, your depth of field is quite shallow—sometimes just a few inches—so precise focusing becomes critical. If you’re photographing a person’s face, focus on their nearest eye.
Moving to f/4 or f/5.6 provides a sweet spot for general photography. You’ll still get pleasing background separation, but with more forgiveness in focus. These apertures are ideal for environmental portraits where you want some context of the surroundings, or street photography where you need a bit more depth to keep multiple elements sharp.
At f/8 and beyond, you’re entering the realm of maximum sharpness and extended depth of field. Landscape photography, group shots, and street scenes where you want everything from foreground to background in focus benefit from these settings. The X100VI’s 23mm equivalent focal length at f/8 gives you tremendous depth of field, making it excellent for documentary-style work where you’re capturing entire scenes.
One practical tip: in bright sunlight, you might hit your camera’s maximum shutter speed even at f/16. That’s when the built-in neutral density filter becomes essential, allowing you to maintain wider apertures for creative control.

Shutter Speed: From Motion Blur to Freezing Action
The X100VI’s mechanical shutter speed dial sits prominently on the top plate, offering tactile control that digital cameras often lack. This dedicated dial ranges from 4 seconds to 1/4000th of a second in manual mode, plus an “A” position for aperture priority shooting. Understanding which speeds to choose transforms your images from disappointing blurs to decisive moments frozen in time.
For everyday street photography, 1/250th of a second serves as your reliable baseline. This speed handily freezes walking pedestrians and casual movement while remaining fast enough to compensate for minor camera shake when holding your camera properly. When light permits, bump up to 1/500th or 1/1000th for energetic scenes like cyclists weaving through traffic or children playing.
The reciprocal rule offers helpful guidance here: your minimum shutter speed should match your focal length. Since the X100VI has a 35mm equivalent lens, aim for at least 1/60th of a second to avoid camera shake in your handheld shots. Anything slower requires exceptional technique or a stable surface.
Conversely, intentional motion blur creates compelling storytelling opportunities. Try 1/30th or 1/15th while panning alongside moving subjects—the background streaks while your subject stays relatively sharp, conveying speed and energy. For silky water effects or light trails after sunset, you’ll need the extended shutter speeds beyond what the dial offers, which means switching to the camera’s electronic shutter or bulb mode.
The X100VI also features an electronic shutter reaching 1/180,000th of a second, perfect for shooting wide open in brilliant sunlight without overexposing. This silent option proves invaluable during ceremonies, performances, or candid moments where the mechanical shutter’s click would disturb your subjects.
ISO: Balancing Image Quality and Light Sensitivity
ISO controls your camera’s sensitivity to light, and the X100VI’s fifth-generation sensor handles it remarkably well. Think of ISO as your safety net when lighting gets challenging—it amplifies the available light, but like turning up the volume on a quiet recording, it can introduce noise (graininess) as you push higher.
The X100VI performs beautifully up to ISO 3200, producing clean files you’ll feel confident sharing straight from camera. Between ISO 3200 and 6400, you’ll notice subtle texture in shadows, but images remain highly usable for most purposes. Push beyond ISO 6400, and noise becomes more apparent, though the camera’s processing keeps detail remarkably intact even at ISO 12800 for emergency situations.
For Auto ISO, I recommend setting your maximum to ISO 6400 with a minimum shutter speed of 1/125 second for general shooting. This prevents blurry images from camera shake while keeping noise manageable. If you’re shooting static subjects on a tripod, lower your maximum to ISO 3200 for optimal quality.
Here’s a practical starting point for manual ISO selection: bright daylight works perfectly at ISO 200. Indoor spaces with good window light call for ISO 800-1600. Dimly lit restaurants or evening streets typically need ISO 3200-6400. Late-night or concert photography might push you to ISO 12800, which remains surprisingly serviceable on this camera.
Remember, a slightly noisy sharp image always beats a perfectly clean blurry one. Don’t be afraid to raise ISO when needed—the X100VI gives you plenty of headroom to work with.
Shooting Modes That Won’t Confuse You
Program Mode (P): Smarter Than Auto
Program mode is your gateway to moving beyond auto mode on the X100VI without feeling overwhelmed. Unlike Auto, which makes every decision for you, Program (P) mode handles the technical heavy lifting while giving you access to crucial creative controls like ISO, exposure compensation, and film simulations.
Here’s what makes P mode brilliant: the camera selects both aperture and shutter speed based on the scene, but you can override these choices instantly using Program Shift. Simply rotate the rear command dial after half-pressing the shutter, and you’ll cycle through equivalent exposures. For example, if the camera chooses f/4 at 1/500s, you might shift to f/2.8 at 1/1000s for better subject isolation, or f/5.6 at 1/250s for more depth of field—the exposure stays identical, but the creative result changes dramatically.
This flexibility means you can react quickly to changing situations. Photographing street scenes? Shift toward faster shutter speeds to freeze motion. Shooting portraits? Favor wider apertures for beautiful background blur. Program mode teaches you how aperture and shutter speed interact without the pressure of getting both settings right simultaneously.
Aperture Priority (A): Your Go-To Mode
Aperture Priority mode is where the X100VI truly shines for everyday shooting. This semi-automatic mode lets you control depth of field through the aperture ring while the camera intelligently handles shutter speed, giving you creative control without the pressure of managing every exposure variable.
The X100VI’s tactile aperture ring makes this mode especially intuitive. Simply rotate the ring on the lens barrel to adjust your f-stop, watching the background blur change in real-time through the viewfinder. Want that dreamy portrait with soft backgrounds? Dial to f/2.0. Need a street scene sharp from foreground to infinity? Spin it to f/8 or f/11. The physical feedback makes these adjustments second nature.
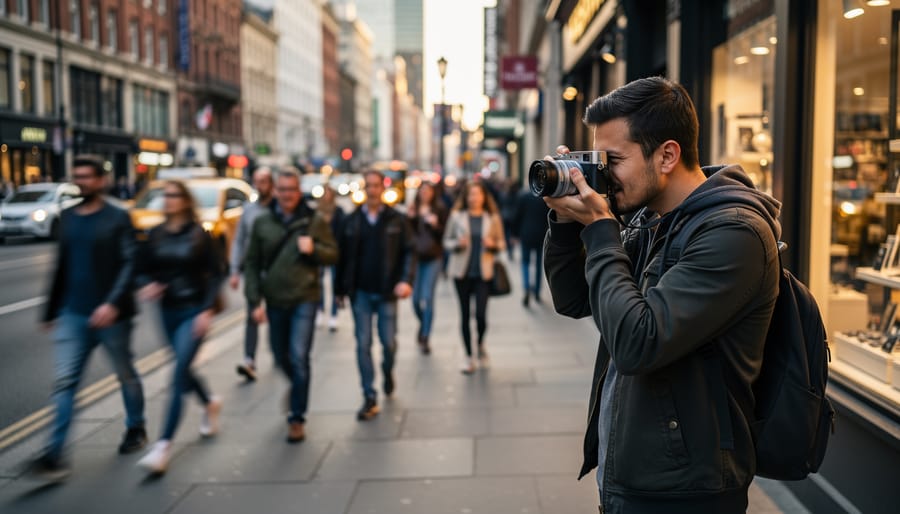
In practice, Aperture Priority handles about 90 percent of shooting situations beautifully. Walking through a city market, you can quickly shift from f/2.8 for isolating a vendor’s face to f/5.6 for capturing the bustling scene context. The camera compensates for changing light conditions automatically, letting you focus on composition and decisive moments rather than constantly checking exposure meters. For beginners, this balance between creative input and technical assistance builds confidence while developing your photographic eye.
Shutter Priority (S) and Manual (M): When You Need Them
While Aperture Priority handles most situations beautifully, there are specific moments when Shutter Priority (S) or Manual (M) become your best friends on the X100VI.
Shutter Priority shines when motion is your priority. Photographing your dog running through the park? Set your shutter speed to 1/500s or faster to freeze the action. The camera handles the aperture, but you control whether motion blurs or stops completely. It’s equally valuable for intentional blur—drop to 1/30s while panning with a cyclist, and you’ll capture that professional motion-streaked background. Sports, wildlife, and active kids are perfect Shutter Priority scenarios.
Manual mode initially feels intimidating, but it’s essential in challenging lighting conditions. Shooting a concert where stage lights constantly change? Manual mode prevents your exposure from jumping around with every lighting shift. Similarly, when using studio strobes or shooting long exposures at night, Manual gives you complete consistency across multiple frames.
Here’s a practical tip: use Manual mode when your lighting won’t change between shots. Setting up for a sunset portrait session? Lock in your settings in Manual, and your exposure stays consistent as you compose different shots. The X100VI’s exposure preview in the electronic viewfinder shows exactly what you’ll capture, removing the guesswork entirely. Start with these specific scenarios rather than forcing yourself into Manual for everyday shooting.
Focus Settings for Sharp Photos Every Time
AF Modes: Single, Continuous, and Manual
The X100VI offers three autofocus modes, and understanding when to use each one will dramatically improve your hit rate in different shooting situations.
AF-S (Single Autofocus) is your go-to mode for stationary subjects. When you half-press the shutter button, the camera locks focus and holds it until you take the shot. This mode shines for portraits, still life, and landscape photography. Imagine you’re photographing someone at a café—they’re sitting relatively still, so AF-S will nail the focus on their eyes and keep it locked while you recompose if needed. The X100VI’s excellent face and eye detection works beautifully in this mode, making portrait work especially reliable.
AF-C (Continuous Autofocus) constantly adjusts focus as long as you keep the shutter button half-pressed. Use this when your subject is moving toward or away from you. Street photographers will appreciate AF-C when tracking someone walking down the sidewalk, and it’s essential for capturing kids or pets in motion. The X100VI’s tracking capabilities handle moderate movement well, though it’s not a sports camera—think walking pace rather than sprinting athletes.
MF (Manual Focus) gives you complete control through the camera’s focus ring. While it might seem intimidating, manual focus is incredibly useful in low light where autofocus hunts, or when shooting through windows and fences where the camera might grab the wrong element. The X100VI’s focus peaking and magnification features make manual focusing surprisingly straightforward. Many street photographers prefer manual focus with zone focusing techniques, pre-setting their focus distance for faster reaction times in spontaneous moments.
Focus Area Settings Made Simple
The X100VI offers three primary focus area modes, and understanding when to use each one will dramatically improve your shooting experience. Think of these as tools in your creative toolkit—each excels in different situations.
Single Point AF is your precision tool. The camera focuses exactly where you place that small box in the frame, giving you complete control. This mode shines when you’re shooting portraits and want tack-sharp eyes, or when photographing stationary subjects like architecture or still life. For beginners, I recommend starting here. It’s straightforward, predictable, and helps you develop compositional awareness as you deliberately choose your focus point. Simply use the rear command dial or touchscreen to position the focus point where you need it.
Zone AF divides your frame into multiple zones, and the camera intelligently selects focus points within your chosen area. This mode offers a sweet spot between control and flexibility. It’s particularly useful for street photography where subjects move unpredictably, or when photographing your kids playing in the backyard. The camera tracks movement within the zone while you concentrate on timing and composition. You maintain some creative control without obsessing over a single point.
Wide/Tracking mode lets the camera analyze the entire frame and make focus decisions automatically. When you half-press the shutter on a subject, the X100VI recognizes it and tracks movement across the frame. This mode works brilliantly for fast-moving subjects like pets or sports, though it can sometimes focus on unintended elements in busy scenes.
My beginner recommendation? Start with Single Point for the first week. Once you’re comfortable, experiment with Zone for everyday shooting—it handles about 80% of typical scenarios beautifully while keeping you engaged in the creative process.
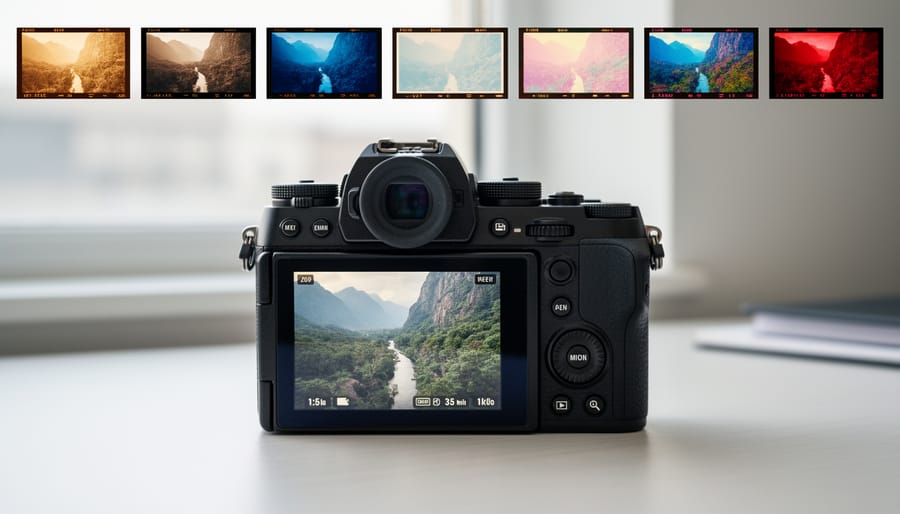
Film Simulations: The X100VI’s Secret Weapon
Starting with the Essential Simulations
With eighteen film simulations at your disposal, the X100VI can feel overwhelming at first. The good news is that you only need to master three simulations initially to cover most everyday shooting situations.
Start with Provia, also known as Standard. This is Fujifilm’s most neutral simulation, delivering accurate colors and balanced contrast without dramatic stylization. Think of Provia as your reliable baseline—it’s excellent for travel photography, street scenes, and situations where you want natural-looking results straight out of camera. When you’re unsure which simulation to choose, Provia is your safe bet.
Classic Chrome should be your second go-to option. This simulation offers muted colors and lifted shadows, creating that coveted “film look” without being overly stylized. It excels in harsh midday light where other simulations might produce overly saturated colors. Portrait photographers particularly appreciate how Classic Chrome renders skin tones with subtle, flattering characteristics. Try it when shooting urban environments, lifestyle portraits, or moody architectural work.
Finally, explore Classic Neg for vibrant yet refined colors. This simulation adds pop to your images while maintaining sophisticated color transitions—imagine the richness of professional color negative film. Classic Neg shines during golden hour, at events where you want energetic colors, or when photographing subjects with interesting color relationships like street art or market scenes.
These three simulations form a solid foundation. Spend a week shooting primarily with each one to understand their characteristics before exploring the X100VI’s more specialized options like Acros or Eterna.
Customizing Your Film Simulation Recipes
The X100VI’s film simulations are beautiful straight out of the camera, but small tweaks can make them uniquely yours. Think of these adjustments as seasoning—a little goes a long way, and you can always reset to defaults if something doesn’t work.
Start with Highlight and Shadow tones, found in your camera’s menu under Film Simulation settings. These control the brightest and darkest areas of your image. For example, if you’re shooting a backlit portrait with Classic Neg, try setting Highlight to -1 or -2 to preserve detail in bright skies, and Shadow to +1 to gently lift darker areas without losing the moody character. These adjustments are forgiving and immediately noticeable.
Color adjustments deserve equal attention. The Color Chrome Effect adds depth to saturated colors like reds and blues—try the “Weak” setting first when photographing flowers or street scenes with colorful signage. For a more subdued look, reduce Color at -1 or -2, which works beautifully with Acros or Classic Chrome for minimalist compositions.
White Balance Shift lets you warm up or cool down your images slightly. A +2 red shift can add warmth to portraits shot with Provia, while a +1 blue shift enhances the coolness of Acros.
Experiment with one adjustment at a time, take a few test shots, and review them on the LCD. Save combinations you love as custom presets for quick access later.
Essential Custom Settings for Beginners
Setting Up Auto ISO Intelligently
Auto ISO takes the guesswork out of exposure by automatically adjusting sensitivity based on available light, but it works best when you set intelligent boundaries. On the X100VI, press the MENU/OK button and navigate to ISO AUTO SETTINGS to configure three essential parameters.
Start by setting your Maximum ISO to 6400. The X100VI handles noise exceptionally well at this level, producing clean files suitable for most uses. If you’re primarily shooting in good light, 3200 works as a conservative ceiling. For low-light events or street photography at night, don’t hesitate to push it to 12800.
The Minimum Shutter Speed deserves careful consideration. Set it to AUTO, and the camera intelligently adjusts based on your focal length—preventing camera shake while avoiding unnecessarily high ISOs. For the X100VI’s 23mm lens, this typically means around 1/30s when stationary. If you’re photographing moving subjects like children or pets, override this to 1/250s minimum to freeze action.
Finally, set your Default ISO (the starting sensitivity) to 160 or 320. The camera begins here and only increases when light drops.
This configuration maintains image quality while letting you focus on composition and decisive moments rather than constantly adjusting exposure settings—exactly what makes the X100VI such an effective street and documentary camera.
Customizing Buttons and Function Menus
The X100VI gives you remarkable flexibility in customizing its physical controls, which means you can build a camera setup that feels intuitive rather than confusing. Think of this as creating shortcuts to your most-used settings, similar to how you organize apps on your phone.
Start simple with the Fn button assignments. I recommend setting Fn1 to ISO (you’ll adjust this frequently), Fn2 to Film Simulation (for quick creative changes), and Fn3 to Auto Focus Mode. These three settings represent your most common shooting adjustments. The rear command dial works beautifully for exposure compensation, which you can leave at its default assignment.
For the Quick Menu (accessed by pressing Q), populate it with settings like White Balance, Dynamic Range, and Grain Effect. This menu becomes your second-tier controls for settings you adjust less frequently but still want quick access to.
A real-world tip: resist the urge to customize everything immediately. Live with the default settings for a week, notice which adjustments frustrate you, then customize those specific buttons. This approach prevents the overwhelming “too many choices” problem that plagues new users who customize prematurely. Your button layout should emerge naturally from your shooting habits, not from what someone else considers essential.
Image Quality and File Format Basics
The X100VI offers two primary image quality options: JPEG and RAW. Think of JPEGs as finished photographs straight from the camera—they’re processed, compressed, and ready to share immediately. RAW files, by contrast, are like digital negatives containing all the sensor data before processing, giving you maximum flexibility when editing later.
For beginners, I recommend starting with JPEG + RAW. Yes, this uses more memory card space, but here’s why it’s worth it: JPEGs let you see beautiful results instantly using Fujifilm’s renowned film simulations, while having RAW files gives you insurance. If you later decide to learn editing software like Lightroom, those RAW files will be waiting.
If storage concerns you or you primarily share photos directly from camera to phone, stick with JPEG Fine mode. The X100VI produces exceptional JPEGs that often need minimal editing. Only shoot RAW-only if you’re committed to editing every image—otherwise, you’ll miss experiencing Fujifilm’s gorgeous color science that makes this camera special.
Common Beginner Mistakes and How to Avoid Them
Every X100VI owner has been there—that moment when you review your shots and wonder why things went wrong. Let’s walk through the most common stumbling blocks and get you back on track.
The most frequent issue is underexposed images, especially when shooting indoors or during golden hour. The X100VI’s beautiful electronic viewfinder can be misleading because it automatically brightens to help you compose, but your final image might turn out significantly darker. Check your exposure compensation dial (that’s the dial on the top right with the +/- markings). Many beginners accidentally knock it to -1 or -2 without realizing. Before each shooting session, glance at this dial and reset it to 0 unless you intentionally want to adjust exposure.
Another trap is the dreaded accidental mode switch. The X100VI places several controls within easy reach, which is wonderful for experienced shooters but can lead to unexpected changes. The front command dial switches your shutter speed, while the aperture ring sits right on the lens. If you suddenly can’t get a sharp shot despite good light, you’ve likely spun the shutter speed too slow or the aperture to f/16 when you meant f/2. Take a breath, look at your top display, and verify all three exposure settings: shutter speed, aperture, and ISO.
Focus mode confusion ranks high on the beginner frustration list. The X100VI defaults to single-point autofocus, but if your subject moves even slightly, shots go soft. For anything with motion—kids, pets, street scenes—switch to continuous autofocus by pressing the AF button on the back and selecting AF-C. Your keeper rate will immediately improve.
Finally, many newcomers forget to format their memory cards in-camera after importing photos. This prevents file system errors and keeps your camera running smoothly. Navigate to the wrench menu, select Format, and make this a regular habit. These small adjustments transform frustration into confidence, letting you focus on capturing moments rather than troubleshooting technical hiccups.
You’ve made it through the fundamentals of your X100VI, and that’s worth celebrating. Remember, every photographer who picks up this camera—whether they’re a seasoned professional or complete beginner—goes through a learning curve. The difference between those who grow frustrated and those who fall in love with their X100VI comes down to one thing: practice.
Don’t feel pressured to master everything at once. Start with Aperture Priority mode and really understand how aperture affects your images. Spend a week shooting only in that mode. Then move to Shutter Priority and do the same. This methodical approach builds genuine understanding rather than surface-level knowledge.
The beauty of the X100VI is that it rewards experimentation. Take the same scene and shoot it five different ways—different film simulations, various apertures, multiple shutter speeds. Review your results and notice what changes. This hands-on exploration teaches you more than any manual ever could.
As you grow more comfortable, continue developing your essential photography skills by challenging yourself with specific projects. Dedicate a day to street photography, try capturing motion at the park, or photograph a friend in natural light. Each scenario presents new opportunities to apply what you’ve learned.
Your X100VI is ready when you are. Get out there, make mistakes, and shoot thousands of frames. That’s how you truly learn this remarkable camera.