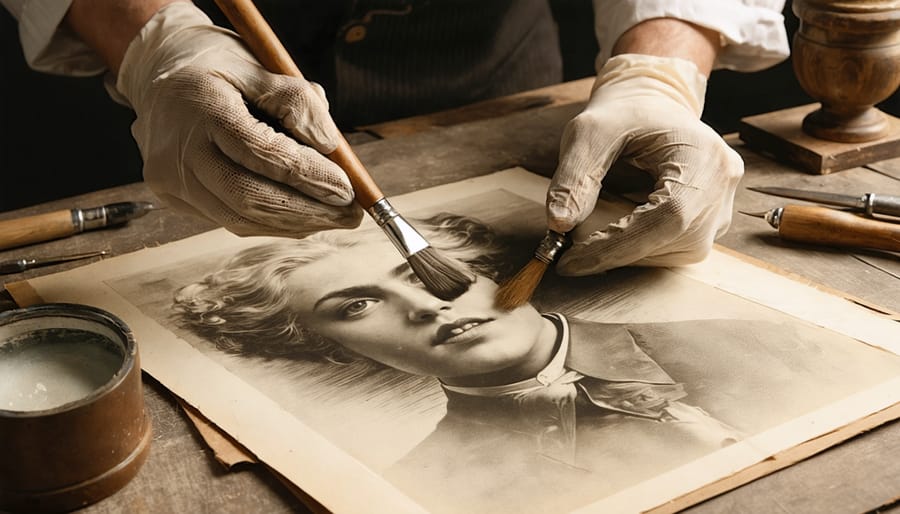
Preserve fragile historical documents by creating a controlled environment with 45-55% relative humidity and temperatures between 65-70°F (18-21°C) before attempting any restoration work. Handle deteriorating papers using clean, powder-free nitrile gloves while working on a clean, flat surface covered with acid-free materials. Apply modern restoration techniques such as deacidification treatments and Japanese tissue repairs to stabilize documents showing signs of acid deterioration or physical damage. Document every step of the restoration process through detailed photography and written records, establishing a comprehensive treatment history that guides future conservation efforts.
Time-worn documents tell irreplaceable stories of our past, and their preservation requires a delicate balance of scientific precision and artistic sensitivity. Whether dealing with centuries-old manuscripts, vintage photographs, or historical correspondence, each piece demands specialized care to halt deterioration while maintaining authenticity. Professional conservators and dedicated enthusiasts alike must understand both traditional methods and emerging technologies to successfully preserve these precious artifacts for future generations.
Understanding Historical Photograph Damage
Physical Damage Assessment
Before undertaking any restoration work, a thorough assessment of physical damage is crucial for preserving family memories captured in old documents. Start by examining the document in good, indirect natural light, preferably on a clean, flat surface covered with acid-free paper.
Look for obvious tears and creases first. Note their location, length, and severity. Tears might be straight or jagged, while creases can range from subtle fold lines to deep breaks in the paper fibers. Pay special attention to corners and edges, as these areas typically show the most wear.
Stains require particular scrutiny. Identify their nature: water damage appears as brown rings or tide marks, while foxing presents as reddish-brown spots caused by metal particles or mold. Food stains, ink marks, and adhesive residue each require different treatment approaches.
Check for structural weaknesses in the paper. Areas that feel thin or brittle need extra care during handling. Look for signs of insect damage, which often appears as small holes or tunnels through the material. UV damage typically manifests as yellowing or fading, particularly in areas that were exposed to light.
Document all findings with detailed notes and gentle pencil marks on a separate sheet. This assessment forms the foundation of your restoration strategy, helping you prioritize treatments and choose appropriate conservation methods.

Chemical Deterioration
Chemical deterioration poses one of the biggest threats to historical photographs, affecting both image quality and long-term preservation. The most common form of chemical damage is silver mirroring, where the silver particles in the emulsion oxidize, creating a bluish-metallic sheen across the image surface. This process typically starts at the edges and gradually spreads inward, significantly impacting the photograph’s contrast and detail.
Acidic environments accelerate the breakdown of photographic materials, causing yellowing and brittleness in paper-based photographs. This is particularly evident in albums where low-quality materials were used, or photos were stored alongside newspaper clippings. The lignin in wood pulp paper products releases acids that gradually destroy photographic emulsions and paper supports.
Light-induced fading, or “photo-oxidation,” is another major concern. Extended exposure to UV light triggers chemical reactions that cause dyes and pigments to break down, resulting in color shifts and loss of image density. Color photographs from the 1960s and 1970s are especially vulnerable, as early color processing techniques were less stable than modern methods.
Residual processing chemicals can also contribute to deterioration. Improper fixing or washing during original development can leave behind chemical compounds that continue to react over time, leading to staining, fading, or complete image loss. Understanding these chemical processes is crucial for both preventing further damage and choosing appropriate restoration techniques.

Essential Tools and Equipment
Digital Tools
Modern document restoration heavily relies on digital tools that complement traditional techniques. A high-quality flatbed scanner with at least 600 DPI resolution serves as the foundation, capable of capturing fine details and subtle tones in old documents. For professional work, consider scanners with built-in transparency adapters for handling negatives and slides.
Essential software includes Adobe Photoshop or GIMP for detailed restoration work. These programs offer powerful tools like clone stamp, healing brush, and content-aware fill that prove invaluable for removing blemishes and reconstructing damaged areas. For color correction and tonal adjustments, specialized tools like SilverFast or VueScan provide precise control over scanning and initial processing.
Digital archiving requires reliable storage solutions. External hard drives with redundancy (RAID systems) protect your work, while cloud storage services offer additional backup security. Consider a color-calibrated monitor for accurate representation of documents during restoration work.
For detailed text restoration, OCR (Optical Character Recognition) software like ABBYY FineReader or Adobe Acrobat Pro can help recover and digitize written content. A graphics tablet with pressure sensitivity enables precise retouching work, especially for intricate repairs requiring a steady hand.
Physical Restoration Supplies
When working with delicate historical documents, having the right supplies is crucial for successful restoration. Start with a clean, well-lit workspace and lint-free cotton or nitrile gloves to prevent oils from your hands damaging the documents. Essential cleaning tools include soft brushes (both natural hair and synthetic), chemical-free erasers, and microspatulas for gentle manipulation.
For cleaning solutions, distilled water is your safest option, as tap water contains minerals that can cause further deterioration. Document cleaning pads and specialized document cleaning solutions are available, but always test them on a small, inconspicuous area first. Keep pH-neutral materials on hand, including archival-quality cleaning cloths and blotting paper.
Your preservation toolkit should include acid-free document sleeves, archival-quality boxes, and museum-grade storage materials. For repairs, Japanese tissue paper and wheat starch paste are preferred over commercial adhesives. A humidity dome or chamber helps control moisture during treatment, while specialized weights and pressing boards ensure documents dry flat.
Don’t forget measurement tools like pH testing strips and a magnifying glass for detailed inspection. Having these supplies ready before starting any restoration project helps ensure safe and effective document handling.
Professional Restoration Techniques
Physical Handling and Cleaning
When working with historical photographs, proper handling is crucial for preventing further deterioration. Always wear clean, lint-free cotton or nitrile gloves to avoid transferring oils and dirt from your hands. Work in a clean, well-ventilated area away from food, drinks, and direct sunlight, as these elements can cause irreversible damage while documenting cultural heritage through photography.
Start by gently removing loose debris using a soft brush or compressed air. Work from the center outward to avoid forcing particles into the photograph’s surface. For stuck-on dirt, use a clean, slightly dampened cotton swab, being extremely careful not to oversaturate the photo. Never use household cleaning products or chemicals without professional guidance, as these can cause permanent damage.
When cleaning the back of photographs, exercise the same level of care as the front. Some historical photos contain important annotations or stamps that could be historically significant. Use a soft eraser to remove pencil marks only if absolutely necessary, and always test in an inconspicuous corner first.
Store cleaned photographs flat in acid-free archival sleeves or boxes. Avoid using rubber bands, paper clips, or adhesive tape, as these can cause physical damage or chemical reactions over time. If you’re working with particularly valuable or delicate photographs, consider consulting a professional conservator who can provide specialized cleaning techniques and preservation advice.
Remember that some damage may be beyond DIY repair, and it’s better to leave severely deteriorated photographs to professionals rather than risk causing additional harm through inexperienced handling.
Digital Restoration Steps
The digital restoration process begins with high-quality scanning of your document. Use a flatbed scanner with at least 600 DPI resolution, though 1200 DPI is recommended for severely damaged documents. Place the document face-down carefully, and consider using a clear mylar sleeve if the item is particularly fragile.
Once scanned, create multiple backup copies of your original scan file before proceeding with any editing. Start your restoration work in Photoshop or similar image editing software by adjusting the basic elements: levels, contrast, and brightness. These foundational adjustments often reveal hidden details in faded areas.
Next, address specific damage types systematically. For tears and creases, use the clone stamp and healing brush tools to sample nearby areas and rebuild damaged sections. When working with text documents, pay special attention to maintaining the original character shapes and spacing. The spot healing brush works particularly well for removing dust spots and small blemishes.
For color correction, use adjustment layers rather than direct adjustments – this preserves your ability to fine-tune later. If dealing with yellowed or aged documents, the curves adjustment layer can help restore white backgrounds while maintaining text legibility. For documents with severe water damage, the dodge and burn tools can help recover lost contrast in affected areas.
Tackle stains using a combination of the clone stamp tool and careful masking. Create a new layer for each major repair, labeling them clearly for organization. When removing large damaged areas, work in small sections and frequently compare your progress to the original to ensure accuracy.
Finally, apply subtle sharpening to enhance text clarity, but be cautious not to create artifacts. Save your work in multiple formats: a layered file for future editing, a high-resolution TIFF for archiving, and a compressed version for sharing. Remember to document your restoration process, noting the techniques and settings used for future reference.
Color Correction and Enhancement
Color correction plays a vital role in breathing new life into aged documents, particularly when dealing with historical photographs where accurate color representation enhances visual storytelling through photographs. The process begins with careful analysis of the document’s original colors, often visible in less damaged areas, which serve as reference points for restoration.
Modern digital tools offer powerful solutions for color enhancement. Start by adjusting the white balance to neutralize any color casts that have developed over time. Yellow or sepia toning, common in older photographs, can be carefully reduced while maintaining the document’s historical character. Use curves and levels adjustments to restore contrast and tonal range, paying special attention to highlight and shadow details.
For faded documents, selective color adjustment helps revive specific hues without affecting others. Work with individual color channels – red, green, and blue – to achieve precise control over color restoration. When dealing with severe color degradation, consider using color reference cards or similar period photographs as guides for authentic restoration.
Remember that the goal isn’t always to make the document look brand new. Sometimes, maintaining a subtle vintage appearance while improving clarity and color accuracy better serves the document’s historical significance. Use adjustment layers when working digitally to ensure non-destructive editing, allowing for fine-tuning without compromising the original scan.
Advanced techniques like channel mixing and selective masking can help address specific color issues in different areas of the document. Always save your work in stages and maintain multiple versions to track your progress and preserve different restoration options.
Preservation Best Practices
Storage Solutions
Proper storage is crucial for preserving restored documents for future generations. The ideal storage environment maintains a consistent temperature between 65-70°F (18-21°C) and relative humidity between 30-40%. Avoid basements, attics, and other areas prone to temperature fluctuations or moisture problems.
Store documents flat in acid-free archival boxes or folders, using acid-free tissue paper as separators between items. For particularly delicate documents, consider using archival-quality polyester sleeves that protect against dust and handling damage while allowing visibility. Never use regular plastic sleeves, rubber bands, or adhesive tape, as these can cause chemical reactions that damage documents over time.
Create a dark storage environment, as exposure to light – especially UV rays – can cause fading and deterioration. If displaying documents, use UV-protective glass or acrylic, and rotate displayed items periodically to minimize light exposure. Consider creating high-quality digital copies as backups, storing them on multiple devices and cloud services for redundancy.
Regular monitoring of storage conditions and periodic gentle cleaning with soft brushes helps ensure long-term preservation. Remember to handle documents with clean, dry hands or wear cotton gloves to prevent oils and dirt transfer.

Digital Archiving
Digital archiving serves as a crucial safeguard for restored documents, ensuring their preservation for future generations. When creating digital archives, maintain at least two backup copies stored in different locations – one on an external hard drive and another in secure cloud storage. Use high-resolution TIFF formats for master copies, as they preserve maximum detail without compression loss, while keeping JPEGs for sharing and quick reference.
Establish a consistent file naming convention that includes the document’s date, subject, and restoration date. For example: “1920_SmithWedding_restored_2024.” Organize files in a hierarchical folder structure by year, collection, or family name to facilitate easy retrieval.
Regular maintenance is essential for preserving historical narratives. Check your digital archives annually for file corruption and migrate them to new storage media every 5-7 years to prevent technological obsolescence. Document all restoration work performed, including techniques used and software settings, creating a detailed restoration history that future conservators can reference.
Remember to use metadata tags to include relevant information about the document’s origin, condition, and restoration process, making it easier to search and catalog your digital archive.
Common Mistakes to Avoid
When restoring old documents, even well-intentioned efforts can lead to irreversible damage. One of the most common mistakes is rushing into the restoration process without proper assessment or planning. Take time to document the item’s condition and research appropriate techniques before beginning any work.
Avoid using adhesive tape or modern glues to repair tears, as these materials can cause permanent staining and deterioration over time. Similarly, standard office supplies like rubber bands or metal paper clips should never be used on historical documents, as they can leave lasting damage and rust marks.
A critical error many make is attempting to flatten documents through direct heat application or ironing. This can severely damage paper fibers and potentially destroy ink or other media. Instead, use proper humidity control and gentle pressure methods for document flattening.
Never attempt to clean documents with household cleaning products or water without proper expertise. These can cause immediate damage or trigger long-term deterioration processes. Additionally, avoid storing restored documents in standard plastic sleeves, as many contain harmful chemicals that can accelerate degradation.
Digital restoration mistakes include over-processing, which can make images look artificial, and working directly on original files without creating backups. Always maintain copies of your original scans and document each step of your restoration process.
Remember that some damage is part of the document’s history. Avoid attempting to make items look “brand new,” as this can diminish their historical value and authenticity. When in doubt, consult a professional conservator, especially for valuable or historically significant documents.
Old document restoration is a delicate balance of art and science, requiring patience, skill, and a deep respect for historical materials. Throughout this guide, we’ve explored the essential techniques and considerations for preserving and restoring valuable documents for future generations. Remember that proper assessment of damage, careful selection of restoration methods, and appropriate handling techniques are crucial for successful outcomes.
Whether you’re working with family heirlooms or professional archives, always prioritize the document’s integrity and historical value. Start with the least invasive methods first, and don’t hesitate to consult professionals for particularly valuable or severely damaged items. Keep your workspace clean, use appropriate archival materials, and maintain consistent environmental conditions during and after restoration.
The field of document restoration continues to evolve with new technologies and techniques, but the fundamental principles remain unchanged: preserve, protect, and respect the original material. By following proper restoration practices and staying informed about best practices, you can help ensure these precious historical documents survive for generations to come.
Remember, successful restoration isn’t just about fixing damage—it’s about preserving history itself.