Master your gimbal’s balancing before powering it on—spend five minutes ensuring your camera sits level with minimal motor strain, as proper balance extends battery life and enables smoother footage than any stabilization algorithm can achieve. Start with your gimbal’s follow speed set to medium and pan axis unlocked, allowing natural horizontal movement while restricting aggressive tilts that immediately mark footage as amateur.
Practice the core movements that separate cinematic work from shaky handheld footage: the forward dolly with consistent walking speed, the lateral truck maintaining precise subject framing, and the orbiting arc that reveals dimensional depth. These dynamic camera movement techniques require muscle memory—your gimbal responds to micro-adjustments in your grip and body positioning, not grand gestures.
Position your body as the primary stabilizer by keeping elbows tucked, knees slightly bent, and weight centered over your feet. The gimbal handles rotational stabilization, but you control vertical bounce and walking rhythm. Master the ninja walk: heel-to-toe steps with bent knees that absorb ground impact, transforming your body into a human steadicam rig.
Configure your gimbal’s motor strength to match your camera’s weight—too weak creates lag during pans, too strong produces robotic, overcorrected movements. Test each axis independently, adjusting stiffness until movements feel responsive yet organic. Professional gimbal work isn’t about eliminating all motion; it’s about controlling which movements reach your footage and which your stabilizer absorbs.
What Makes Gimbal Videography Different From Regular Stabilization
Gimbal videography represents a fundamental shift in how we approach camera stabilization. While traditional methods like optical image stabilization (OIS) or in-body stabilization (IBIS) work by compensating for small movements within the camera or lens itself, gimbals operate on an entirely different principle—they physically counteract movement across three axes of motion.
Think of it this way: optical stabilization is like trying to keep your coffee from spilling by tilting the cup as you walk, while a gimbal is like carrying that cup on a gyroscopically balanced tray that absorbs every bump in your stride. The difference in results is equally dramatic.
A gimbal uses brushless motors and sophisticated sensors to maintain your camera’s orientation in space, regardless of how you move. The three axes—pan (horizontal rotation), tilt (vertical rotation), and roll (side-to-side rotation)—are each independently stabilized by motors that respond hundreds of times per second. When you step down from a curb while filming, the gimbal’s motors detect that downward jolt and instantly counteract it, keeping your camera perfectly level and smooth.
This creates what cinematographers call “floating” footage—that ethereal, dreamlike quality where the camera glides through space as if divorced from the operator’s body. You’ve seen this effect in countless films and commercials: the camera weaving through a crowded restaurant, following a subject down stairs, or sweeping around a product reveal. These shots simply aren’t possible with optical stabilization alone, which can handle minor vibrations but falls apart with larger movements.
The physics advantage is clear: while optical stabilization might correct for 2-3 degrees of camera shake, a gimbal can maintain perfect stability through movements spanning 360 degrees. It’s also working with the entire camera system, not just internal lens elements, which means even dramatic operator movements—running, jumping, or rapid direction changes—can translate into silky-smooth footage. This is why gimbals have become essential tools for anyone serious about producing cinematic content.

The Three Movement Techniques That Define Cinematic Gimbal Work
The Walk and Glide (Your Foundation Move)
The walk-and-glide is your bread-and-butter gimbal movement, and mastering it separates floating, cinematic footage from shaky amateur clips. Think of yourself as a human Steadicam: bend your knees slightly, keep your core engaged, and walk heel-to-toe rather than your usual stride. This technique absorbs the natural bounce in your step before it reaches the gimbal.
Your weight distribution matters enormously here. Imagine balancing a cup of coffee on your head—you naturally smooth out your movements. Apply this same principle by keeping your upper body still while your legs do the shock-absorbing work. Take smaller steps than usual, almost shuffling, which gives you better control over your pace and direction.
The most common beginner mistake? Walking at normal speed with a normal gait. This creates that telltale bobbing effect that screams “amateur hour.” Another pitfall is gripping the gimbal too tightly, which transmits hand tremors directly to your footage. Hold it firmly but relaxed, like you’re carrying a fragile object.
Practice walking backward, sideways, and in arcs around your subject. Start on smooth surfaces before attempting grass or uneven terrain. With enough repetition, this unnatural walking style becomes second nature, and your footage will have that coveted floating quality.

Dynamic Push-Ins and Pull-Outs
Push-ins and pull-outs are among the most cinematic movements you can achieve with a gimbal, creating dramatic reveals or emotional emphasis that draws viewers into your story. The key to mastering these moves lies in maintaining consistent speed and rock-steady balance throughout the motion.
Start by positioning yourself about 6-10 feet from your subject, with the gimbal held at a comfortable height. Before moving, take a moment to find your center of gravity and engage your core muscles. This stability foundation makes all the difference. As you move forward or backward, lead with your legs rather than leaning your upper body, keeping your torso as steady as possible. Think of yourself as a human dolly, gliding smoothly rather than walking normally.
Speed control separates amateur footage from professional results. Practice moving at different speeds to match the emotion of your scene. Slow push-ins build tension and intimacy, while faster movements inject energy and urgency. A useful technique is to count silently in your head, maintaining rhythm with each step.
For pull-outs, the challenge intensifies since you’re moving blind. Practice your path beforehand, or have someone guide you. Always check behind you for obstacles. As you gain confidence, try combining push-ins with slight lateral movements or height changes to add complexity and visual interest to your shots.
The Parallax Effect and Orbiting Shots
One of the most cinematic techniques you can master with a gimbal is the orbiting shot, where you walk in a circular arc around your subject while keeping them centered in frame. This movement creates what’s known as the parallax effect—where foreground and background elements move at different speeds relative to each other, adding tremendous depth and dimension to your footage.
To execute a proper orbit, start by positioning yourself at arm’s length from your subject and identifying your path before you begin recording. Walk slowly in a smooth arc, using small sidesteps rather than crossing your feet, which can introduce unwanted bounce. The key is maintaining a consistent distance from your subject throughout the movement. Think of yourself as tethered to your subject by an invisible rope that never changes length.
Keep your gimbal at a consistent height and resist the temptation to pan the camera manually—let your body rotation do the work. Your torso should act as the rotating base while your arms remain relatively still, maintaining that crucial operator-to-subject distance. Practice moving in both clockwise and counterclockwise directions, as each creates a different emotional feel in the final footage.
For tighter orbits around small subjects like products or food, consider using the gimbal’s follow mode, which allows more precise control. For wider orbits around people or vehicles, you’ll want more space to work with—at least a 10-foot diameter gives you room to create that beautiful parallax separation between your subject and the background.
Choosing the Right Gimbal for Your Videography Style
Handheld vs. Two-Handed vs. Body-Mounted Systems
Choosing the right gimbal configuration dramatically impacts your shooting experience and the footage you can capture. Let’s break down the three main types and when each shines.
Handheld gimbals are the most popular choice for general videography work. These single-handed stabilizers, like the DJI RS series or Zhiyun Crane models, excel at run-and-gun shooting where mobility matters. I’ve used them extensively for wedding videography, where you need to move quickly between ceremony moments, and for real estate walkthroughs where navigating tight spaces is essential. The downside? Your arm will fatigue after 20-30 minutes of continuous shooting, especially with heavier camera setups.
Two-handed gimbals offer superior stability and endurance for longer shoots. By distributing weight across both arms, you can comfortably shoot for hours. They’re perfect for narrative filmmaking where you need repeatable, precise movements or when working with heavier cinema cameras. Think of them as the workhorse for planned productions rather than spontaneous content creation. The tradeoff is reduced maneuverability in confined spaces.
Body-mounted systems, such as the Ready Rig or Easyrig, suspend the gimbal’s weight from your torso using a vest and spring arm. This configuration is game-changing for all-day shoots like documentary work or event coverage. I’ve seen wedding videographers switch to body-mounted rigs and immediately extend their shooting capacity from a few hours to entire twelve-hour days without fatigue. However, they’re bulky, expensive, and impractical for travel or casual shooting scenarios.
Payload Capacity: Matching Your Camera Setup
Before you invest in a gimbal, you need to understand payload capacity—the maximum weight it can safely handle. Start by calculating your total rig weight: camera body, lens, follow focus, monitor, microphone, and any other accessories. Be thorough here; even small items like lens caps or cable clips add up.
Here’s the crucial part: don’t max out your gimbal’s capacity. Aim for 70-80% of the stated payload limit to maintain smooth performance and extend motor life. This headroom allows the motors to work efficiently without straining, especially during rapid movements or when operating in windy conditions.
Larger gimbals offer impressive capacity for cinema cameras and heavy lenses but come with trade-offs. They’re bulkier to transport, require more setup time, and can fatigue operators during long shoots. Smaller gimbals are beautifully portable and quick to deploy, perfect for travel or run-and-gun scenarios, but they limit your camera choices.
Consider your typical shooting scenarios. If you’re primarily using a mirrorless camera with compact lenses, a mid-range gimbal provides the sweet spot between capability and convenience. Wedding videographers, for instance, often prefer lighter setups that won’t wear them down during eight-hour events, while commercial productions might prioritize capacity for their specific equipment needs.
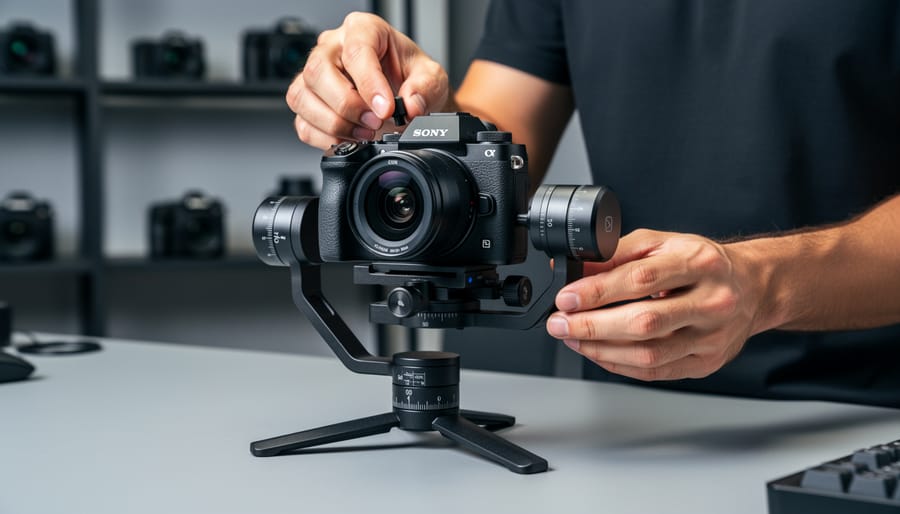
Balancing Your Gimbal: The Make-or-Break Setup Step
Before you even think about capturing silky-smooth footage, you need to properly balance your gimbal. Skip this step or rush through it, and you’ll end up with shaky footage, drained batteries, and motors that sound like they’re struggling to stay alive. Balancing isn’t just a suggestion—it’s the foundation of successful gimbal videography.
Think of balancing like tuning a guitar before a performance. The process ensures each axis of your gimbal can hold your camera steady without the motors working overtime. When properly balanced, your camera should stay in position even when the gimbal is powered off. This allows the motors to focus on stabilization rather than simply supporting weight, resulting in smoother footage and significantly extended battery life.
Start with the horizontal tilt axis. Mount your camera and adjust the baseplate forward or backward until the camera stays level when you gently release it. The lens shouldn’t tip up or down. Next, tackle the roll axis by sliding the camera left or right on the mounting plate until it stays upright without assistance. Finally, adjust the pan axis by repositioning the entire camera assembly forward or backward on the gimbal arm.
Here’s a real-world tip that saves countless videographers time: balance your gimbal with all accessories attached. That means lens hood, follow focus, microphone, and any other gear you’ll actually use during the shoot. Adding these items after balancing throws everything off and forces you to start over.
Common balance issues are easy to spot and fix. If your gimbal drifts in one direction when powered on, that axis needs rebalancing. Motors making whining or grinding sounds indicate they’re fighting against imbalanced weight. Battery draining within an hour? Almost certainly a balance problem.
One troubleshooting trick: use the balancing markers or indicators many gimbals include on their adjustment arms. These help you return to previous positions if you accidentally over-adjust. And remember, fine-tuning is normal. Don’t expect perfection on your first attempt—balance is something you refine through practice.
Take fifteen minutes to balance properly before each shoot, especially if you’ve switched lenses or cameras. Those fifteen minutes prevent hours of frustration and deliver the professional results you’re aiming for.
Settings and Modes That Transform Your Footage
Follow Modes Explained: Pan Follow, Lock, and Full Follow
Modern gimbals offer several follow modes that dramatically change how your camera responds to movement, and understanding these options is key to achieving the look you want.
Pan Follow mode, sometimes called “following mode,” is your go-to for most everyday shooting. In this mode, the gimbal follows your horizontal movements (left and right) while keeping the tilt axis locked. This means you can spin around while walking and the horizon stays perfectly level. It’s ideal for tracking subjects as they move across your frame or creating smooth panning shots without the wobble of handheld footage. Think of those product showcase videos where the camera circles an object—that’s typically pan follow at work.
Lock mode freezes all axes, turning your gimbal into a steadicam-style stabilizer. Your camera points in one fixed direction regardless of how you move. This mode shines when you want to walk toward or away from a subject while keeping them centered, or when shooting from a moving vehicle. The stationary framing creates a cinematic, purposeful feel that works beautifully for establishing shots.
Full Follow mode unlocks all axes, allowing the camera to follow every movement you make. While this might sound like the most versatile option, it actually requires the most control and practice. Use it sparingly for dynamic action sequences or when you need complete freedom to track fast-moving subjects in multiple directions simultaneously.
Dialing In Your Motor Settings
Your gimbal’s motor settings are like the suspension on a car—they determine how your movements translate to the final footage. Getting these dialed in correctly makes the difference between robotic, jittery shots and smooth, professional results.
Most gimbals offer adjustable motor stiffness (or strength) and smoothness (sometimes called follow speed). Motor stiffness controls how aggressively the motors resist movement and return to position. For fast-paced action sequences or sports, you’ll want higher stiffness—around 70-80 percent—so the gimbal responds quickly to your movements and keeps your subject locked in frame. This creates a more responsive, dynamic feel.
For slow, cinematic movements like revealing a landscape or following a bride down the aisle, drop your stiffness to 30-40 percent and increase smoothness. This creates elegant, floating movements that feel intentional rather than reactive. The gimbal will lag slightly behind your hand movements, naturally smoothing out any micro-jitters.
A practical starting point: set stiffness to 50 percent and smoothness to 60 percent, then adjust based on your shooting scenario. Always test your settings before critical shots. Many gimbals allow you to save custom profiles, so create presets for different situations—you’ll thank yourself later when switching between documentary interviews and concert coverage.
Real-World Gimbal Videography Scenarios
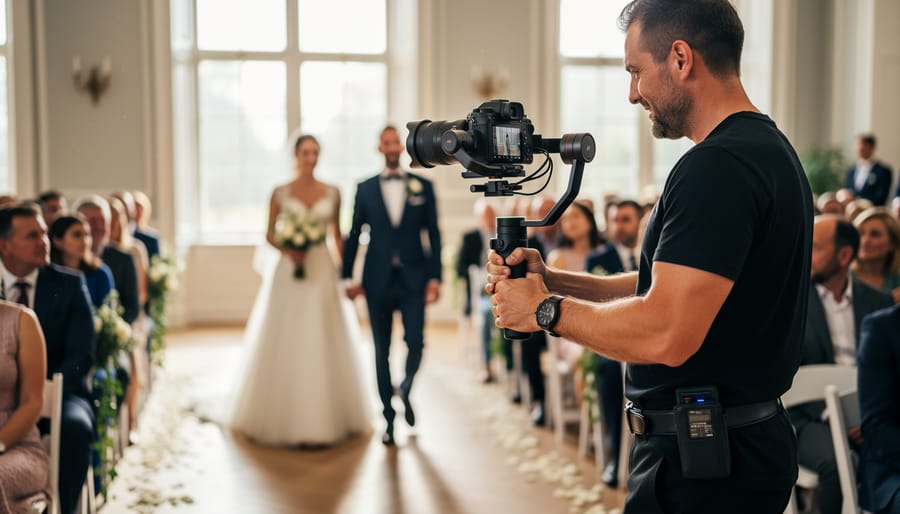
Wedding and Event Videography
Wedding and event videography presents unique challenges that make gimbals indispensable tools for capturing memorable moments. You’ll often be shooting for eight to twelve hours straight, moving between ceremony spaces, reception halls, and outdoor settings, all while maintaining smooth, cinematic footage.
The real test comes during quick transitions. One moment you’re documenting the bride’s entrance, and seconds later you need to capture guests’ reactions from across the room. A gimbal lets you pivot smoothly between these moments without jarring cuts or shaky handheld footage. Practice walking backwards while filming processionals, as this creates that professional gliding effect clients expect.
Emotional moments demand both technical skill and sensitivity. During speeches or first dances, use gentle push-ins or slow orbits to add cinematic depth without being intrusive. Keep your movements subtle; overly dramatic gimbal work can distract from the emotion you’re trying to capture.
Consider pairing your gimbal work with cinematic lighting techniques to elevate ambient venue conditions. Battery management becomes critical during long events, so always carry multiple charged batteries and know when to switch to tripod coverage to conserve power for key moments.
Documentary and Travel Work
Documentary and travel videography demands a different approach to gimbal work than controlled studio environments. The run-and-gun nature of these shoots means you’ll rarely have time for elaborate setups or multiple takes. Instead, focus on quick gimbal balancing techniques that become second nature, allowing you to respond to spontaneous moments as they unfold.
Weight matters significantly during extended travel shoots. A lighter gimbal setup reduces arm fatigue when you’re filming throughout a full day of exploration. Consider your camera and lens combinations carefully, opting for compact options when possible. Many documentary filmmakers switch to crop-sensor cameras specifically for gimbal work to maintain maneuverability without sacrificing image quality.
Environmental challenges will test your skills. Rain, dust, extreme temperatures, and crowded locations all complicate gimbal operation. Keep your movements deliberate but natural, using the gimbal’s stabilization to your advantage while navigating through markets, festivals, or unpredictable terrain. Practice one-handed operation techniques for situations where you need a free hand to steady yourself or interact with subjects. Building physical stamina through regular use prepares you for those marathon shooting days when compelling stories simply refuse to wait for convenient timing.
Commercial and Narrative Productions
In commercial and narrative productions, gimbal work becomes a collaborative dance between operator, director, and talent. Your job shifts from capturing spontaneous moments to executing precisely planned shots that serve the story.
Start by attending blocking rehearsals whenever possible. Watch how actors move through the space and identify potential obstacles in your path. Mark your starting and ending positions with tape, noting any critical moments where focus or framing must be exact. During a recent corporate shoot, we walked through a hallway sequence five times before rolling, ensuring the gimbal move synchronized perfectly with the subject’s pace and dialogue delivery.
Communication is essential. Establish clear signals with your director for when to start moving and when to hold position. If working with talent, brief them on your movements so they understand where you’ll be in relation to them. Professional actors appreciate operators who move predictably.
Technical preparation matters equally. Pre-program gimbal settings for different shot types and save custom profiles. This allows quick transitions between, say, a smooth following shot and a locked-off interview angle. Keep your movements intentional and motivated by story needs rather than showing off capability.
Remember that your gimbal footage is just the foundation. Pair smooth camera moves with professional color grading in post-production to achieve that truly cinematic look clients expect.
The Mistakes That Give Away Amateur Gimbal Work
Even experienced videographers fall into predictable traps when they first start working with gimbals. The most obvious mistake is what I call “movement for movement’s sake”—constantly gliding, orbiting, and tracking simply because the gimbal makes it possible. Your audience doesn’t need to see a slow push-in on every single shot. When every clip features dramatic camera movement, nothing feels dramatic anymore. The solution is straightforward: treat gimbal movements like seasoning in cooking. Use them deliberately when they enhance the story or reveal something important about your subject.
Another telltale sign of amateur work is inconsistent pacing. I’ve seen countless reels where the operator walks at wildly different speeds throughout a sequence, creating jerky, unpredictable motion that pulls viewers out of the moment. Practice walking at a consistent tempo, and remember that slower is almost always better. Your natural walking speed is typically too fast for cinematic footage. Try moving at about half your normal pace, focusing on smooth heel-to-toe steps that minimize vertical bounce.
Poor framing during movement is equally problematic. Many beginners concentrate so intensely on the gimbal’s controls that they forget basic composition principles. Your subject drifts to frame edges, headroom constantly shifts, or you lose important contextual elements. The fix requires practice: learn to operate your gimbal while maintaining compositional awareness. Start with simpler movements until proper framing becomes second nature.
Finally, there’s the mistake of trying to fix everything in camera. While smooth gimbal operation is essential, remember that your post-production workflow plays an equally important role. Minor bumps can be stabilized, pacing can be adjusted with speed ramping, and cuts can hide transitions between movements. Don’t let perfectionism on set paralyze your shooting. Capture good footage first, then refine it later.
Mastering gimbal videography isn’t about collecting every transition and movement technique you can find online. It’s about understanding that the gimbal is simply a tool, one designed to serve the story you’re telling rather than become the story itself. When used thoughtfully, a gimbal dramatically elevates your production value by delivering smooth, intentional camera movement that keeps viewers immersed in your content without distraction.
Before you attempt elaborate orbit shots or complex parallax movements, invest time in perfecting the fundamentals. Practice your walking technique until it becomes second nature. Master basic pans and tilts with consistent speed and purpose. Learn to read your environment and anticipate how your subject will move through the frame. These basics form the foundation that separates professional-looking footage from amateur work that screams “look what my gimbal can do.”
Remember that every movement should have motivation. Ask yourself why the camera is moving in each shot. If the answer is simply “because I can,” reconsider your approach. The most effective gimbal work often involves restraint, knowing when a static shot better serves the moment than movement.
Take your gimbal out regularly, experiment with different scenarios, and review your footage critically. With consistent practice and a story-first mindset, you’ll develop the muscle memory and creative judgment that transforms gimbal videography from a technical exercise into an art form that genuinely enhances your visual storytelling.