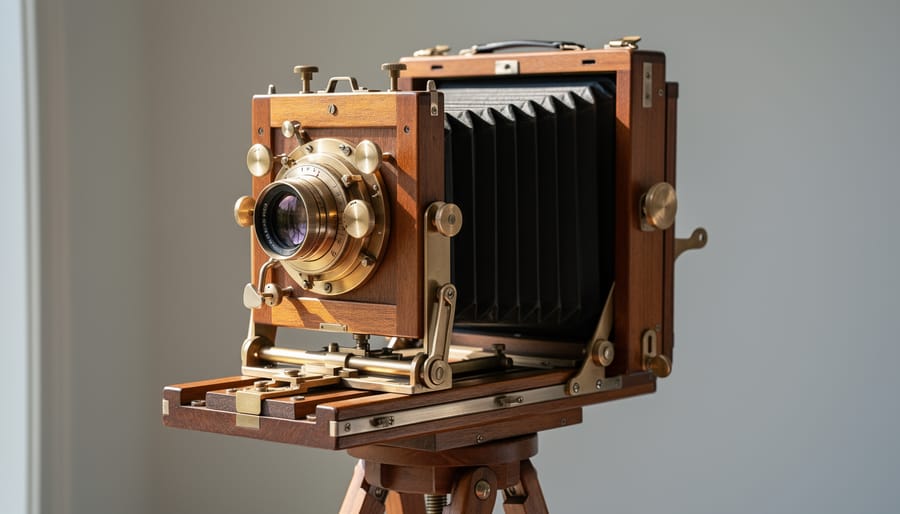
Stand before a large format camera for the first time, and you’ll understand why legendary photographers like Ansel Adams refused to work with anything else. These cathedral-sized instruments—some with bellows extending two feet or more—transform photography from point-and-shoot simplicity into a deliberate, almost meditative craft where every decision matters.
Large format cameras use individual sheets of film, typically 4×5 or 8×10 inches, instead of rolls. This means loading each exposure separately under a dark cloth, composing your image upside-down on a ground glass screen, and making precise adjustments to focus, perspective, and depth of field that simply aren’t possible with smaller formats. The resulting negatives are enormous compared to 35mm film—a single 4×5 sheet offers roughly 13 times more surface area than a 35mm frame, delivering unparalleled detail, tonal range, and enlargement potential that digital sensors still struggle to match.
The learning curve is steep, admittedly. You’ll fumble with film holders in changing bags, miscalculate bellows extension for close-up work, and occasionally forget to remove the dark slide before pressing the shutter. But these challenges forge better photographers. When each sheet of film costs several dollars and requires deliberate setup, you learn to pre-visualize, to see light differently, to make every exposure count.
Whether you’re drawn to large format for landscape photography’s sweeping detail, architectural work requiring perspective control, or portraits with creamy bokeh that seems to wrap around your subject, mastering sheet film techniques opens creative possibilities that faster, more convenient formats simply cannot deliver. The question isn’t whether large format is worth the effort—it’s whether you’re ready for photography that demands your absolute best.
What Makes Large Format Film Cameras Different
The Film Size Advantage
The fundamental advantage of large format cameras lies in the sheer size of the film. While 35mm film measures just 24x36mm, common large format sizes like 4×5 inches give you a negative that’s roughly 13 times larger in surface area. That’s not just a number on paper—it translates directly to what you see in your final image.
Think of it this way: when you enlarge a 35mm negative to make an 8×10 print, you’re magnifying it significantly. A 4×5 negative needs far less magnification for the same print size, which means less grain, sharper details, and smoother tonal transitions. It’s similar to the difference between zooming into a low-resolution digital photo versus starting with a high-resolution file—more information means better quality.
The tonal range is where large format really shines. Those bigger negatives can capture incredibly subtle gradations between highlights and shadows. In practice, this means you’ll see delicate details in both the bright sky and dark foreground of a landscape shot. Portrait photographers particularly appreciate how skin tones render with a three-dimensional quality that’s difficult to achieve with smaller formats.
Resolution is another clear winner. An 8×10 large format negative can resolve details that would require a digital camera with well over 100 megapixels to match. Even 4×5 negatives routinely outresolve most medium format digital systems when printed large. This isn’t just theoretical—photographers regularly make gallery-quality prints several feet wide from large format negatives while maintaining exceptional sharpness and detail throughout the image.
Camera Movements That Change Everything
What truly sets large format cameras apart from their 35mm and medium format cousins are the movements—mechanical adjustments that give you almost architectural control over your image. These aren’t just bells and whistles; they fundamentally change how you approach composition and perspective.
Let’s break down the four main movements. Tilt allows you to angle the lens or film plane up or down, which is invaluable for controlling your plane of focus. Think of photographing a tabletop scene—by tilting the lens forward, you can achieve sharpness from foreground to background even at wide apertures, thanks to the Scheimpflug principle. This means you can work with faster shutter speeds in lower light while maintaining extensive depth of field.
Shift moves the lens parallel to the film plane, either horizontally or vertically. This is your secret weapon for correcting perspective distortion. When photographing buildings, shifting upward lets you capture the entire structure without tilting the camera, keeping vertical lines perfectly parallel instead of converging toward the sky.
Swing rotates the lens or film plane side to side, similar to tilt but on a horizontal axis. It’s particularly useful for product photography or when shooting subjects at an angle.
Rise and fall simply move the lens up or down while staying parallel to the film—perfect for fine-tuning composition without changing your camera position.
These movements work together, often simultaneously, giving you precise control that’s genuinely impossible with fixed-plane cameras. Master them, and you’ll wonder how you ever managed without such creative freedom.
Types of Large Format Cameras You’ll Encounter
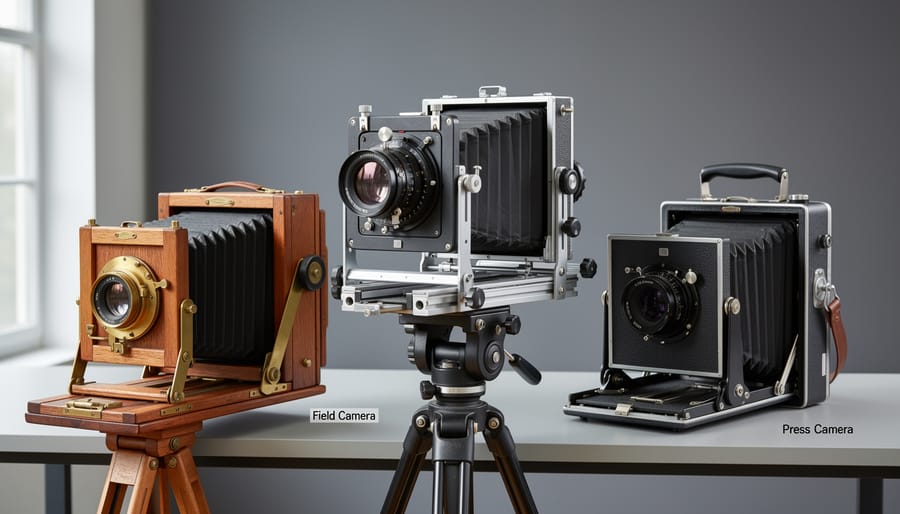
Field Cameras
Field cameras represent the perfect marriage of portability and functionality in the large format world. These ingenious designs fold flat for transport, making them the go-to choice for landscape photographers who need to hike to remote locations without sacrificing image quality.
The construction is elegantly simple: a lens board, ground glass back, and bellows system all collapse into a surprisingly compact package. When you arrive at your shooting location, the camera unfolds and locks into place, giving you all the movements—tilt, shift, swing, and rise/fall—you need for perspective control and focus manipulation.
Popular models like the Wista Field and Toyo 45AX have earned devoted followings among landscape photographers. The Wista, handcrafted from beautiful hardwoods, combines traditional aesthetics with modern precision. Meanwhile, the Toyo offers lightweight construction and excellent build quality at a more accessible price point. For those seeking contemporary options, the Chamonix 45N-2 provides exceptional value with robust movements and quality materials.
What makes field cameras particularly appealing is their versatility. They typically accept 4×5 inch sheet film, though some models accommodate multiple formats with reducing backs. Their moderate weight—usually between 4 and 7 pounds—strikes a practical balance between stability and portability, letting you explore locations where view cameras simply cannot venture.
Monorail Cameras
Monorail cameras represent the ultimate in large format precision, built around a rail system that allows the front and rear standards to move independently with exceptional accuracy. Think of them as the optical benches of the photography world—where function absolutely trumps portability.
These studio giants excel when you need extensive camera movements for architectural work, product photography, or any situation where controlling perspective and depth of field with surgical precision matters most. The monorail design allows movements that often exceed what field cameras can achieve, particularly in shift and tilt applications. You’ll find yourself reaching for a monorail when shooting tabletop products that require precise focus stacking or when creating those impossibly sharp architectural images where every line stays perfectly parallel.
The trade-off is significant weight and bulk. Most monorails don’t fold flat like field cameras, making them impractical for location work unless you have serious assistance and transportation. They’re also slower to set up and typically require a sturdy studio tripod to handle their heft.
That said, if your photography centers around controlled environments—studios, commercial spaces, or locations where you can work methodically—the monorail’s unmatched precision and repeatability make the bulk worthwhile. They’re investments in capability rather than convenience.
Press and Technical Cameras
Press and technical cameras represent a different approach to large format photography, prioritizing speed and versatility over the ground glass focusing of view cameras. These rangefinder-style cameras combine large format image quality with the ability to shoot handheld, making them popular among photojournalists and documentary photographers from the 1930s through 1960s.
The most recognizable models include the Graflex Speed Graphic and Crown Graphic, often seen in classic press photographer images. Unlike view cameras, these use a coupled rangefinder for focusing, allowing photographers to compose and shoot quickly without needing a dark cloth or tripod. Many also feature a fold-out ground glass back for critical focusing when time permits.
Technical cameras like the Linhof Technika series take this concept further, offering limited movements typically found on view cameras while maintaining portability. These cameras accept interchangeable lenses and often include both rangefinder and ground glass focusing options.
The practical advantage is clear: you can capture candid moments, street scenes, or fast-moving subjects that would be impossible with a traditional view camera. While you sacrifice some movements and flexibility, you gain the freedom to work more spontaneously while still shooting on sheet film, making them an excellent choice for photographers who want large format quality without being tethered to a tripod.
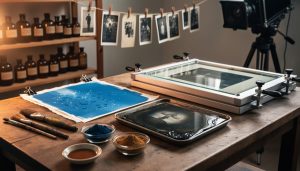
Understanding Sheet Film: Your Canvas
Film Types and Emulsions
When you’re stepping into large format photography, choosing the right film is just as important as mastering your camera technique. The good news is that despite the digital revolution, several manufacturers still produce quality sheet film for dedicated practitioners.
Black and white films remain the most popular choice among large format shooters, and for good reason. They’re more forgiving to work with, easier to develop at home, and offer stunning tonal range. Ilford’s HP5 Plus and FP4 Plus are workhorses that deliver consistent results, with ISO ratings of 400 and 125 respectively. Kodak’s Tri-X 320 offers that classic grain structure many photographers love, while Fomapan provides budget-friendly options for those shooting high volumes.
Color negative films like Kodak Portra and Ektar give you incredible flexibility in both scanning and traditional color printing. Portra excels at skin tones and offers excellent exposure latitude, meaning it’s forgiving if your metering isn’t perfect. Ektar delivers vivid saturation ideal for landscapes and architecture.
Color transparency film, or slide film, is trickier to expose correctly but rewards precision with unmatched color accuracy. Fujichrome Velvia 50 remains legendary for landscape work, though it demands near-perfect exposure.
Film speed matters differently in large format than 35mm. Most shooters gravitate toward slower films between ISO 50 and 400 because you’re typically working on a tripod anyway, and slower films generally provide finer grain and sharper detail. Remember, each sheet costs significantly more than a 35mm frame, so choosing film that matches your subject and lighting conditions is a practical consideration worth careful thought.
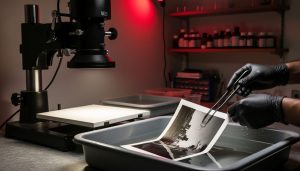
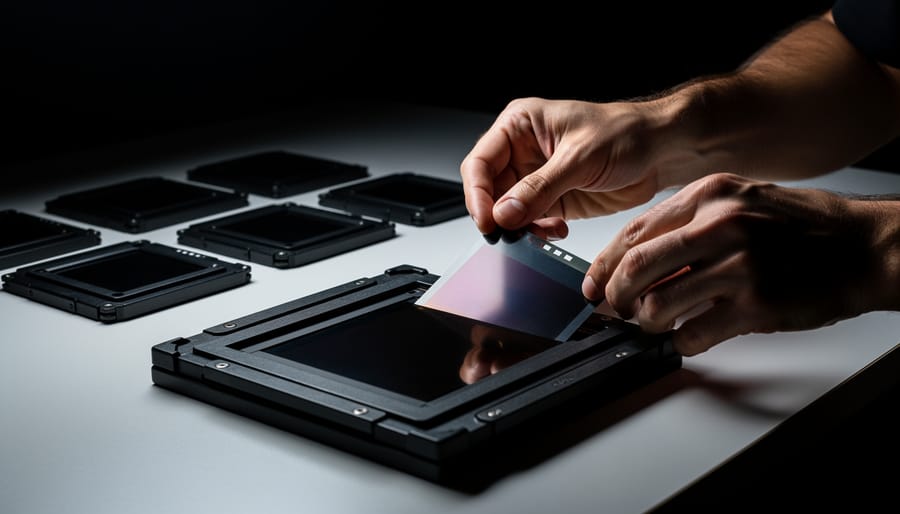
Loading Film Holders in Total Darkness
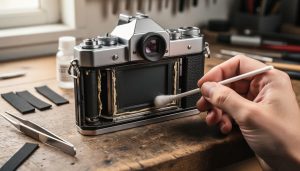
Loading film holders in complete darkness might sound intimidating at first, but with practice and a systematic approach, it becomes second nature. The process requires patience and methodical habits, but mastering it is essential to avoiding costly mistakes that can ruin entire sheets of precious film.
Before you begin, preparation is everything. During daylight, organize your workspace by feel. Place your film box, empty film holders, and a waste container in consistent positions. Many photographers use a changing bag for loading, though setting up a darkroom provides more comfortable working conditions for this task. Either way, practice the entire sequence with expired film or dummy sheets several times before attempting it with fresh film.
When you’re ready to load, ensure complete darkness. Even the smallest light leak can fog your film. Open your film box carefully, noting which side faces up, as this indicates the emulsion direction. Film holders have a ridge or notch on one side indicating which direction the dark slide should face when loaded.
Here’s the critical part: hold each sheet by its edges only, never touching the emulsion surface. Slide it smoothly into the film holder channel until it seats completely against the back. A common mistake is forcing the film, which can scratch the emulsion or bend the sheet. If resistance occurs, remove the sheet and try again rather than pushing harder.
Insert the dark slide with the silver or white side facing outward, indicating the holder is loaded. Always double-check this orientation before storing your holders. Mark each loaded holder immediately to avoid confusion later about which ones contain exposed versus unexposed film. This simple habit prevents the heartbreaking mistake of double-exposing or accidentally developing blank sheets.
The Large Format Shooting Process
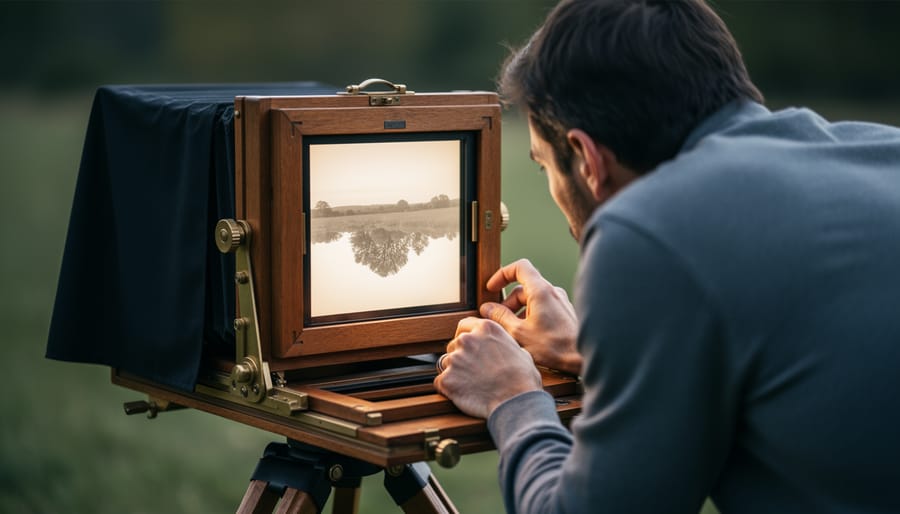
Setting Up and Composing
Composing with a large format camera requires a significant mental adjustment if you’re coming from 35mm or digital photography. When you look at the ground glass—the frosted glass screen at the back of the camera—you’ll immediately notice two things: the image is upside down and reversed left to right. This happens because the lens projects the scene directly onto the viewing surface without any prism to correct the orientation.
At first, this inverted image can feel disorienting, but most photographers adapt within a few shooting sessions. Some find it actually helps with composition by forcing them to see shapes, lines, and tonal relationships rather than getting distracted by subject matter. A useful tip is to start by examining the corners and edges of the frame, working your way inward to check for unwanted elements.
The ground glass also serves as your focusing screen. After setting up your composition, you’ll use the camera’s focusing knobs to move the rear standard back and forth until your subject appears sharp on the glass. Because you’re working with a relatively dim image, especially when stopped down, many photographers use a dark cloth draped over their head and the camera back. This blocks ambient light and makes the image easier to see.
For critical focus, consider investing in a loupe—a magnifying glass specifically designed for examining the ground glass. Place it directly on the viewing surface and examine the finest details of your subject. This becomes essential when working with wide apertures or when depth of field is limited.
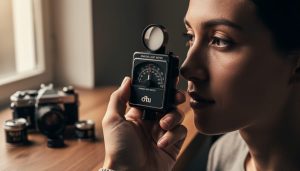
Metering and Exposure Considerations
Large format photography demands a fundamentally different approach to exposure than smaller formats. While general metering techniques still apply, you’ll encounter unique challenges that can trip up even experienced photographers.
First, there’s the bellows extension factor. When you focus closely, the bellows extends significantly beyond its normal length. This increases the distance between the lens and film, effectively reducing the amount of light reaching the sheet. For extensions beyond the focal length, you’ll need to compensate with additional exposure. A simple rule: if you double the bellows length, you need approximately two stops more exposure. Many large format photographers use a bellows factor calculator or the formula (bellows extension divided by focal length, squared) to determine the correction needed.
Reciprocity failure presents another consideration. When exposures extend beyond one second, film becomes less sensitive to light than the meter indicates. Each film stock has its own reciprocity characteristics, so consult the manufacturer’s data sheet. For example, a metered 10-second exposure might actually require 20-30 seconds depending on your film choice.
Consider using a handheld spot meter for precise zone system work, or take incident readings at the subject position. Because large format photography is inherently slow and deliberate, you have time to carefully evaluate your exposure decisions. Bracket important shots when possible, and keep detailed notes about your exposure calculations until these adjustments become second nature.
Making the Exposure
With your composition finalized and focus locked in, you’re ready for the moment of truth. Insert the film holder into the camera’s spring back, ensuring it seats firmly. You’ll hear or feel a satisfying click when it’s properly positioned. Here’s where that methodical pace becomes your best friend—rushing this stage is where mistakes happen.
Pull the dark slide smoothly from the film holder. Most holders have a notched side indicating exposed film and a smooth side for unexposed sheets, so pulling from the correct end matters. Some photographers hang the dark slide from their neck or place it in a dedicated pocket to avoid setting it down in dirt or losing track of it entirely.
Now comes the actual exposure. Gently press the shutter release or use a cable release to minimize vibration. With many large format shutters, you’ll hear a distinctive mechanical click—quieter than you might expect for such substantial cameras. After the exposure, immediately reinsert the dark slide before removing the film holder. This simple habit prevents accidentally double-exposing your precious sheet of film.
The deliberate nature of this process isn’t a limitation; it’s a feature. Each careful step creates space for intention, transforming technical procedure into a meditative practice that consistently yields better photographs than hurried shooting ever could.
Essential Techniques for Sheet Film Success
The Zone System in Practice
When Ansel Adams developed the Zone System in the 1930s and 40s, he created what would become the perfect marriage between exposure theory and large format photography. The system divides the tonal range of a photograph into eleven zones, from pure black (Zone 0) to pure white (Zone X), with middle gray sitting at Zone V. What makes this technique especially powerful with sheet film is the ability to expose and develop each negative individually based on the specific scene you’ve captured.
Here’s how it works in practice: imagine you’re photographing a shadowy forest scene with deep blacks and a bright sky peeking through the canopy. Using a spot meter, you measure the darkest area where you still want detail and the brightest highlight. If the range between them exceeds the film’s capability, you can adjust your development time for that single sheet to compress or expand the tonal range. This is where large format truly shines compared to roll film, where you’re stuck with one development approach for an entire roll of 36 exposures.
Developing your own film becomes essential for implementing the Zone System effectively. You might give one negative normal development (N), another reduced development (N-1) to control contrast, or increased development (N+1) to boost a flat scene. This level of control allows you to pre-visualize your final print and expose accordingly, knowing you can fine-tune the contrast during development.
Managing Your Sheet Film Workflow
When you’re shooting sheet film, staying organized isn’t just helpful—it’s essential. Unlike roll film where you have frame numbers to reference, sheet film requires a systematic approach to avoid the heartbreak of mixing up exposures or losing track of your settings.
Start with a reliable numbering system for your film holders. Many photographers use small labels or tape on the holder edges, numbered sequentially. When you load holders in the darkroom, note these numbers in a dedicated shooting journal along with the film type and ISO. This simple step prevents you from accidentally shooting on the same sheet twice.
In the field, develop a consistent routine for tracking exposed versus unexposed film. The traditional method involves keeping the dark slide’s white side facing out for unexposed film and black side out for exposed sheets. However, double-check this system before you start shooting, as some holders vary. Consider it a mental checklist every time you remove or replace a dark slide.
Your shooting notes should be comprehensive. Record the holder number, scene description, lens used, aperture, shutter speed, any filters applied, and lighting conditions. Many photographers keep a small notebook dedicated to each shooting session. These details become invaluable later, whether you’re sending sheets to a lab or diving into hands-on darkroom processes yourself.
Create a transportation system that keeps exposed and unexposed holders separate. Some photographers use different cases or mark them with colored tape. The goal is making it impossible to grab the wrong holder in the excitement of shooting. Remember, one moment of confusion can cost you irreplaceable images or waste precious film on double exposures.
Common Challenges (And How to Overcome Them)
The Cost Factor
Let’s be honest: large format photography isn’t a bargain-basement hobby. A single sheet of 4×5 film typically costs between $2 and $4, depending on the emulsion you choose. When you factor in processing costs of $3-5 per sheet at a professional lab, you’re looking at roughly $6-9 every time you press the shutter. Shoot a box of 25 sheets, and you’ve spent upwards of $200 before making a single print.
Equipment costs vary wildly. You can find a functional used 4×5 field camera for $300-500, while premium models like a Linhof or Arca-Swiss can exceed $3,000. Don’t forget the necessary accessories: film holders run $30-50 each, and you’ll want at least six to start. A decent large format lens might cost anywhere from $200 for a vintage option to $1,500 for modern glass.
However, smart strategies can make large format surprisingly accessible. Buying film in bulk quantities reduces per-sheet costs significantly. Learning to develop your own black-and-white film drops processing costs to under $1 per sheet. Many photographers start with more affordable cameras like the Intrepid or vintage Speed Graphics, which deliver excellent results without breaking the bank.
The key is shooting intentionally. Unlike digital photography’s spray-and-pray approach, large format teaches deliberate composition. When each exposure carries real cost, you naturally become more thoughtful. Many practitioners find they shoot 10-15 sheets during a session that might have generated hundreds of digital frames, ultimately spending less than they did on camera gear upgrades in their digital days.
The Learning Curve
Expect to make mistakes—lots of them—and that’s perfectly normal. Large format photography has a steep learning curve because every step requires deliberate action. You’ll load a sheet holder backwards at least once, forget to remove the dark slide before exposing, or accidentally double-expose a sheet. These errors sting when each frame costs several dollars, but they’re valuable teachers.
Start by practicing every mechanical step without film. Load empty holders repeatedly until your fingers know the process in the dark. Set up your camera indoors where you can take your time learning movements without wasting money. Many photographers spend weeks just understanding how tilt, swing, and shift affect their compositions before committing anything to film.
When you’re ready to shoot, begin with inexpensive black and white film like Fomapan or Arista EDU. These emulsions are forgiving and cost a fraction of premium films. Shoot simple, stationary subjects—architecture, still lifes, landscapes—before attempting portraits or moving subjects. Keep detailed notes for every exposure: f-stop, shutter speed, movements used, and lighting conditions. This metadata becomes invaluable when reviewing your contact sheets.
Consider joining a large format photography community online or locally. Experienced shooters freely share techniques that can save you from common pitfalls. Some even offer mentorship or darkroom access. Additionally, maintaining vintage cameras properly ensures your equipment performs reliably, eliminating technical failures from your learning equation. Budget both time and money generously—mastery develops through patient, consistent practice rather than rushed experimentation.
Stepping into large format photography requires patience, practice, and a willingness to slow down, but the rewards are genuinely transformative. Yes, the learning curve is steep. You’ll fumble with dark slides, accidentally expose sheets, and maybe even load film backwards once or twice. These mistakes are part of the journey, not reasons to give up. Each session under the dark cloth teaches you something new about light, composition, and your own creative vision.
The beauty of large format lies not just in the technical excellence of the images, but in what the process does to you as a photographer. When every exposure costs money and demands careful consideration, you become more thoughtful. You study your scene longer, wait for better light, and make deliberate choices instead of spraying and praying. This mindfulness often translates into more meaningful photographs, the kind that resonate because they were truly seen, not just captured.
If you’re considering taking your first steps into large format, start simple. Rent or borrow a camera for a weekend. Shoot a few sheets of black and white film in controlled conditions. Don’t worry about creating masterpieces immediately. Focus on understanding the mechanics, experiencing the workflow, and discovering whether this meditative approach speaks to you.
The photographers who stick with large format rarely regret the investment of time and effort. They speak of a deeper connection to their work, a satisfaction that digital workflows sometimes lack. In our hurried world, the deliberate pace of large format photography offers something increasingly rare: the space to think, observe, and create with true intention.