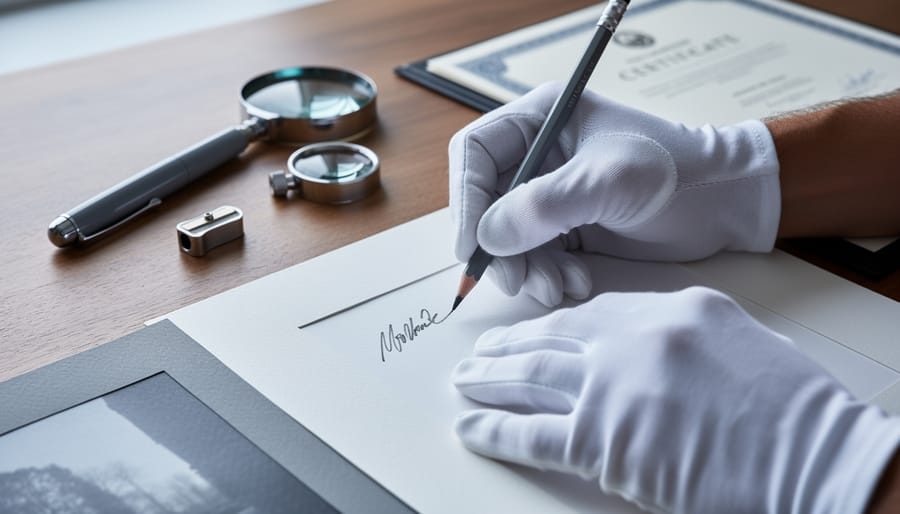
Sign your prints in soft graphite pencil (2B or 4B) on the white border below the image, placing your signature on the right side, the edition number on the left (formatted as “1/50” for example), and an optional title in the center. This traditional layout has remained standard across galleries and collectors for decades because it creates a clear, unobtrusive documentation system that doesn’t distract from the artwork itself.
Use archival-quality materials exclusively—acid-free pencils or archival ink pens—because regular ballpoint pens will fade and deteriorate over time, potentially damaging both your reputation and the print’s value. Test your signing tool on scrap paper from the same batch to ensure it won’t bleed or smudge before committing to the actual print.
Understand that signing transforms a reproduction into a limited edition with tangible market value. When you sign and number a print as “15/50,” you’re making a legally binding promise to collectors that only 50 prints of this image will ever exist in this particular size and substrate combination. Breaking this promise—even years later—can destroy your credibility in the fine art photography market.
Create a master registry documenting every signed print you sell, including the buyer’s name, date of sale, edition number, print specifications, and certificate of authenticity details. This registry protects both you and your collectors, allowing verification of provenance and helping prevent forgeries as your work gains recognition.
What Print Signing Actually Means (And Why It Exists)
The Artist’s Mark: More Than Just a Name
When you place your signature on a print, you’re doing something far more significant than simply writing your name. Think of it as your personal seal of approval—a declaration that says, “Yes, this meets my standards, and I’m proud to put my name on it.”
At its core, a signature serves as authentication. It confirms that you, the artist, have reviewed this specific print and deemed it worthy of your portfolio. This matters tremendously in an age where unauthorized reproductions are just a few clicks away. Your signature tells collectors they’re holding an original, artist-approved work, not a random internet download someone printed at their local copy shop.
But there’s more to it than preventing fraud. Your signature also creates a direct connection between you and the buyer. It’s a tangible reminder that a real person with artistic vision created what they’re holding. Some photographers even consider their signature style—the flourish, the placement, the tool they use—as an extension of their artistic brand.
Here’s where things get practical: signatures directly impact value. Consider two identical prints from the same edition—one signed, one unsigned. Industry data consistently shows signed prints command 20-50% higher prices at auction and in galleries. In 2019, an unsigned Ansel Adams print sold for $4,000, while a signed version from the same series fetched $6,800. That signature represented a 70% price increase—not because the image was better, but because Adams himself verified its authenticity and quality.
This authentication protects both you and your collectors, establishing provenance that can be traced for decades.
Limited Editions vs. Open Editions
Understanding the difference between limited and open editions is fundamental to signing and selling your photographic prints professionally. Limited editions restrict the total number of prints you’ll produce from a single image, typically ranging from as few as 5 to several hundred. Each print is numbered (for example, “5/25” meaning the fifth print in an edition of 25) and signed by the photographer. Once the edition sells out, no more prints are made from that file at that size, creating scarcity and potentially increasing value over time.
Open editions, by contrast, have no production limit. You can print and sell as many copies as the market demands. These prints are typically signed but not numbered, and they generally command lower prices than limited editions.
Your signing approach differs slightly between formats. For limited editions, you’ll include the edition number alongside your signature, plus the title and date. Open editions require only your signature and perhaps the title. The absence of numbering immediately signals to collectors that more prints are available.
When should you limit an edition? Consider it when you’re established enough that collectors seek your work, when creating gallery-quality prints on archival materials, or when producing larger, premium sizes. Fine art photographers often reserve their best work for limited editions while keeping smaller sizes or less critical images open.
Starting photographers often benefit from keeping editions open initially. This maintains flexibility as you build your reputation and understand market demand. You can always transition specific images to limited editions later as your career progresses and collector interest grows.

Where and How to Sign Your Prints
Choosing the Right Location
Where you sign your print might seem like a small detail, but location matters more than you’d think. The placement affects both the visual impact of your work and how collectors perceive its professionalism.
The bottom right corner remains the most traditional choice, and for good reason. This position follows the natural reading flow in Western cultures, where eyes tend to finish scanning at the lower right. Your signature here feels complete without competing for attention with the image itself. Most collectors expect to find signatures in this spot, making it the safest choice when you’re unsure. The downside? It’s become so conventional that some photographers feel it lacks originality.
Bottom center placement offers a balanced, formal alternative. This symmetric positioning works particularly well for centered compositions or images with strong horizontal elements. However, centered signatures can draw more attention to themselves, which isn’t always desirable if you want viewers focusing on your photograph rather than your autograph.
Signing on the verso, or back of the print, appeals to photographers who prefer keeping the front entirely clean. This approach maintains the image’s visual integrity without any distractions. You’ll typically add more detailed information here: your full signature, title, edition number, and printing date. The trade-off is that collectors can’t see your signature when the print is displayed, which some view as less prestigious. Many photographers split the difference by adding edition numbers on the front margin and detailed information on the back, combining visibility with comprehensive documentation.
Tools and Materials That Won’t Ruin Your Work
The wrong pen can haunt you for decades—literally. I’ve seen beautiful prints ruined by signatures that faded to nothing or bled across the paper like a slow-motion disaster. The right tools matter more than you might think, especially when someone’s paying good money for your work.
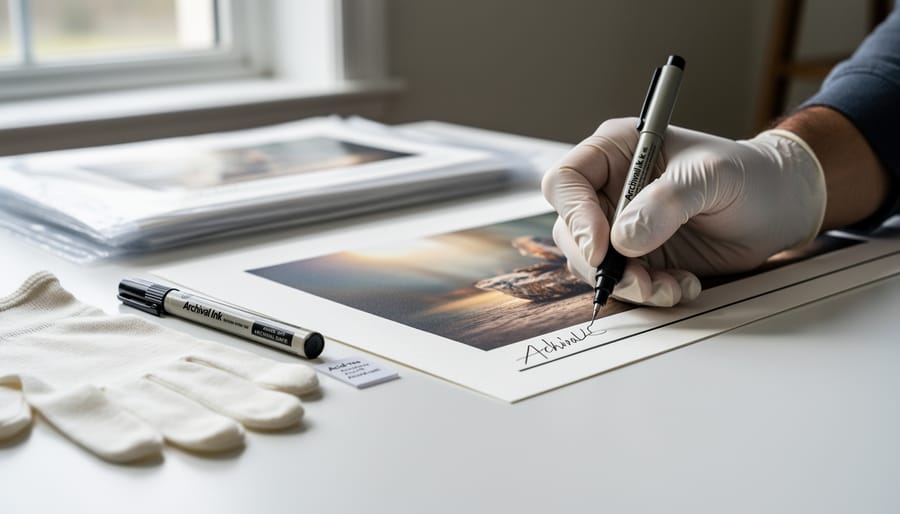
For matte papers like cotton rag, graphite pencils are your safest bet. A 2B or 4B pencil gives you a soft, archival signature that won’t damage the paper surface. Staedtler Mars Lumograph or Derwent graphic pencils are reliable choices. They’re designed for longevity and won’t smudge once applied. The key is using gentle pressure—you’re signing, not engraving.
Glossy and semi-gloss papers require different tools entirely. Regular pens will either bead up or refuse to dry properly. Archival ink pens specifically formulated for photo papers work best here. The Pigma Micron line handles glossy surfaces well, as does the Uni-ball Signo Broad. Both use pigment-based, fade-resistant inks that actually bond with coated papers. For baryta papers, which have that beautiful semi-gloss finish, test both pencils and pens—some baryta surfaces accept graphite beautifully, while others need ink.
Here’s the practical advice nobody tells you: always test your signing tools on sample prints first. Keep scraps from your print runs specifically for this purpose. Sign them, let them sit for a week, then check for bleeding, fading, or smudging. Try the “thumb test”—rub your thumb across the signature firmly. If it smears, you’ll have problems when shipping your prints.
Store your signing tools separately from regular supplies. A dedicated archival pen that gets capped immediately after use will last years. Replace them before they start skipping—inconsistent signatures look unprofessional. Your signature is part of the artwork now, so treat your tools accordingly.
What Information to Include Beyond Your Name
Your signature alone tells only part of the story. Professional prints require additional information that establishes authenticity, scarcity, and provenance. Think of this metadata as your print’s passport—it proves where it came from and where it fits in your body of work.
Edition numbers are the most critical piece of information. The standard format is a fraction, like 5/25, where the first number indicates this specific print’s position and the second shows the total edition size. So 5/25 means you’re looking at the fifth print in a twenty-five print edition. Write the edition number on the lower left side of your print, opposite your signature. This placement has become industry standard, making it easy for collectors and galleries to quickly identify prints.
Artist proofs deserve special notation. Mark these as A/P (Artist Proof) or E/A (Épreuve d’Artiste in French) followed by a number if you’re keeping multiple, like A/P 2/3. These are prints you reserve for your personal use, portfolio, or gifts. Traditionally, artist proofs represent about ten percent of your edition size, so a 25-print edition might include two or three A/Ps.
Printer’s proofs, marked P/P, acknowledge the technical collaboration with a master printer. These are less common for photographers working independently but matter when partnering with fine art print studios.
Consider adding the print date and image title below your signature. The date confirms when the print was made, which matters for insurance and authentication. Some photographers include the year the photograph was taken if significantly different from the print date, using notation like “Photographed 2018, Printed 2024.”
The Editioning Process: Planning Before You Sign
Deciding on Edition Size
Choosing the right edition size isn’t just about picking a number that sounds good. It’s a strategic decision that reflects where you are in your career and how you want to position your work in the market.
For emerging photographers, smaller editions might seem like the safest bet. After all, scarcity equals value, right? Not always. If you’re just starting out, a tiny edition of 5 prints might create artificial scarcity without the demand to back it up. You could end up limiting your earning potential before you’ve even built an audience. Many successful photographers who were starting out chose editions of 25 to 50 prints, giving themselves room to grow while still maintaining collectibility.
Consider what your image represents. Is this a signature piece that defines your artistic vision, or is it part of a broader series? Magnum photographers like Steve McCurry have released some of their most iconic images in larger editions (100 or more) because the demand justified it, while keeping rare or experimental work in smaller runs of 10 to 25.
Your pricing strategy matters too. Larger editions allow you to price more accessibly, building a collector base that might return for limited pieces later. Conversely, if you’re established and can command premium prices, smaller editions of 7 to 15 prints make sense.
Career stage plays a crucial role. Established photographers can justify edition sizes of 3 to 10 for their museum-quality work because their reputation guarantees sales. Meanwhile, mid-career photographers often work with editions of 15 to 30, balancing exclusivity with market reality.
The sweet spot for most working photographers sits between 20 and 50 prints, offering enough flexibility to build momentum without flooding the market.
Tracking Your Editions (Don’t Lose Count)
Keeping accurate records of your edition is non-negotiable. Once you’ve printed and sold edition 3/25, you can’t accidentally create another 3/25 later. This isn’t just about professional integrity—it’s about the value and trust you’ve established with collectors.
The simplest approach is a dedicated spreadsheet. Create columns for edition number, date printed, date sold, buyer information (if applicable), and location (if unsold prints are in archival storage). Update it immediately after printing or selling—memory is unreliable, especially when you’re managing your workflow across multiple images.
For those who prefer dedicated tools, software like Artwork Archive, ArtBinder, or even photography-specific business platforms can track editions alongside inventory and sales. Traditional paper ledgers work too, provided you’re disciplined about maintaining them and keeping backups.
What if you make a mistake? Honesty is essential. If you accidentally create duplicate edition numbers, destroy one print immediately and document the error. If a print is damaged or you’re dissatisfied with quality, mark it as destroyed in your records. Some photographers physically mark rejected prints with an X or punch a hole through the signature area before disposal.
Consider photographing each signed print with its edition number visible—this creates a visual archive proving which prints actually exist. Store your records in multiple places: cloud backup, physical copies, and perhaps with a trusted colleague or family member. Your reputation depends on accuracy.
Variable Editions and Modern Approaches
Today’s photographers are rewriting traditional editioning rules to match modern realities. You might create separate edition runs for different print sizes—say, an edition of 25 for 16×20 prints and another edition of 10 for 40×60 prints. This acknowledges that larger prints require more investment and typically command higher prices.
Some artists also maintain distinct editions for different printing methods. A photograph might exist as a limited edition of silver gelatin prints and a separate edition of archival inkjet prints, each numbered independently. This approach recognizes that different processes create fundamentally different artworks, even from the same negative or digital file.
This flexibility can feel uncomfortable if you’re drawn to traditional practices, but it reflects practical business needs. The key is transparency—always clearly document which edition a print belongs to, including size and method on your certificates of authenticity. Collectors appreciate knowing exactly what they’re purchasing and how exclusive it is.
There’s no single “right” approach here. Some photographers stick firmly to one edition across all variables, while others embrace flexible systems. Choose what aligns with your artistic philosophy and market, then stay consistent and honest about your practices.
Certificates of Authenticity: Your Print’s Paper Trail
What Makes a Certificate Actually Useful
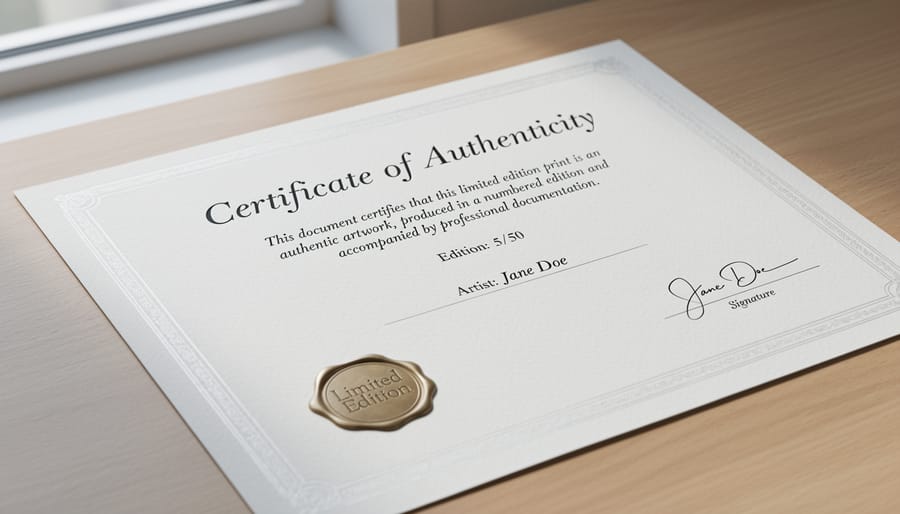
A certificate of authenticity transforms from paperwork into a valuable document when it contains the right information. Think of it as your print’s permanent record—collectors and galleries have specific expectations about what should be included.
Start with your complete details: full name, contact information, and website if you have one. This establishes provenance and allows future owners to verify authenticity. Next, include comprehensive image information—the photograph’s title, the year it was captured, and a brief description if relevant. This contextualizes the work within your broader body of photography.
Edition details are absolutely critical. State the edition number clearly, such as “Print 5 of 25” or “Artist Proof 2 of 5.” If it’s an open edition, explicitly note that fact. This transparency builds trust with buyers who need to understand what they’re purchasing.
The technical specifications matter more than many photographers realize. Document the printing specifications including paper type, dimensions, printing method (inkjet, silver gelatin, etc.), and whether you printed it yourself or used a professional lab. Serious collectors care about these details because they affect longevity and value.
Your signature and the date of signing complete the certificate. Some photographers add their printed name beneath the signature for legibility. Consider having the certificate signed simultaneously with the print to ensure consistency.
Many photographers keep duplicate records of every certificate issued. This practice protects both you and your collectors, creating an archive that can verify authenticity years later when memories fade and documentation becomes essential.
Creating Professional Certificates
A professional certificate of authenticity doesn’t need to be complicated, but it should look polished and include all relevant information. You have three main approaches: DIY using templates, commissioning a designer, or using specialized printing services.
For the DIY route, you can create certificates in programs like Microsoft Word, Canva, or Adobe InDesign. Keep the design clean and readable—think simple borders, elegant fonts, and plenty of white space. Include your name or studio logo, the print title, edition number, dimensions, paper type, printing method, and your signature. Many photographers also add a small thumbnail of the image itself. You can print these on quality card stock at home or through a local print shop. Aim for something that feels substantial—a flimsy certificate undermines the perceived value of your work.
Professional certificate printing services offer pre-designed templates with security features like watermarks, embossing, or holographic elements. These can be worthwhile if you’re selling higher-priced work where authentication is crucial.
Here’s a practical tip that will save you headaches down the road: maintain a digital registry of every print you create. A simple spreadsheet tracking edition numbers, buyer information, sale dates, and any special notes creates an invaluable record. Some photographers use specialized software or even blockchain-based systems for tracking provenance, though a well-maintained spreadsheet works perfectly fine for most situations.
Store certificates flat in protective sleeves or folders, and consider photographing each completed certificate before sending prints to collectors. This documentation protects both you and your buyers if questions about authenticity arise later.
Common Mistakes That Devalue Your Prints
The Edition Number Disaster
Even established photographers have stumbled with edition management, and the consequences can be serious. Consider the cautionary tale of a well-known landscape photographer who sold prints marked “1/25” through his gallery, only to later offer what appeared to be identical images with different edition numbers through his website. Collectors quickly noticed, and the resulting backlash damaged relationships with both galleries and buyers.
Another common pitfall involves changing edition rules partway through. One photographer initially created an edition of 50 prints, then decided to split it into separate editions for different sizes. Unfortunately, he’d already sold several prints without clearly documenting which size they were, creating confusion about actual scarcity and value.
Perhaps most damaging are cases where photographers lose track entirely. Without proper record-keeping, some have accidentally created duplicate edition numbers or couldn’t verify which prints had been sold. When a buyer discovers their “3/10” isn’t actually the third print made, trust evaporates instantly.
The lesson? Start with a clear system from day one. Maintain detailed records of every print sold, including edition number, size, paper type, and buyer information. Once you establish edition parameters, stick to them religiously. Your reputation depends on collectors trusting that your signed prints represent exactly what you’ve promised.
Signature Placement Blunders
Even experienced photographers can stumble when it comes to signing their prints. One of the most common mistakes is signing too prominently—your signature shouldn’t compete with the image itself. I’ve seen beautiful landscape prints undermined by signatures so large and dark they become the first thing viewers notice. Remember, your signature should authenticate the work, not dominate it.
Material choice matters more than you might think. Regular ballpoint pens can fade over time or contain acids that damage archival paper. Equally problematic are markers that bleed through certain papers or pencils that smudge easily. Invest in proper archival pens or pencils specifically designed for photographic prints. Testing your signing tool on scrap paper of the same type before touching the actual print can save you heartache.
Consistency across your body of work also matters professionally. If you sign in pencil on some prints and pen on others, or place signatures randomly between bottom left, right, and center, it signals amateur hour to galleries and collectors. Establish your personal standard early—where you’ll sign, what tool you’ll use, and how you’ll format edition numbers—then stick with it. This consistency becomes part of your professional identity and builds trust with buyers who may collect multiple pieces from you over time.
When NOT to Sign or Edition Your Prints
Not every print deserves a signature and edition number, and that’s perfectly okay. Understanding when to skip these formal elements is just as important as knowing how to apply them properly.
Client work and commissioned photography fall into a clear category where signing usually isn’t appropriate. When a family hires you for portraits or a business needs corporate headshots, they’re purchasing the image itself, not a collectible art piece. These prints serve a functional purpose rather than an artistic one. The same logic applies to event photography, wedding albums, and commercial projects where the client owns the usage rights.
Portfolio prints represent another scenario where signatures can feel out of place. These pieces showcase your abilities to potential clients or galleries, focusing attention on your technical skill and creative vision rather than establishing collectibility. Your professional presentation matters tremendously here, but formal signing might actually distract from the work itself.
Practice prints and test runs definitely shouldn’t be signed or numbered. As you experiment with new papers, refine your editing techniques, or calibrate your printer, you’ll create numerous versions of the same image. Signing these would only create confusion about which version represents your final, authoritative print.
Promotional materials like postcards, business handouts, or smaller giveaway prints work better unsigned. These pieces aim to spread awareness of your work widely rather than establish scarcity or value.
Early in your career, consider waiting before committing to limited editions. Your artistic direction may evolve significantly, and permanently limiting certain images could feel restrictive later. There’s no shame in offering open editions or simply selling individual prints without edition numbers until you’ve established a clearer artistic identity and understand which images truly warrant the special treatment that editioning provides.
Signing your prints is more than just putting pen to paper—it’s where authentication meets artistry. Throughout this guide, we’ve explored how your signature serves the practical purpose of verifying authenticity while also making a subtle artistic statement about your work. Whether you choose to sign boldly on the front or discreetly on the back, the key is developing a consistent approach that aligns with your creative vision and professional goals.
Remember that consistency builds trust with collectors. Once you establish your signing method—including placement, tools, and the information you include—stick with it across your editions. This predictability becomes part of your professional brand. Equally important is maintaining detailed records of every signed print, including edition numbers, dates, and collector information. These records protect both you and your buyers, creating a clear provenance trail that enhances value over time.
Now it’s time to take action. Start by practicing your signature on test papers using archival-quality pens. Experiment with different placements until you find what feels right for your work. Then, create a simple spreadsheet or log to track your editions. Your signing practice doesn’t need to be perfect from day one—it just needs to begin. As you grow as an artist, your approach will naturally evolve, but the foundation of consistency and documentation will serve you throughout your career.