Transform your living space into a minimalist photography studio by clearing a single surface—a windowsill, kitchen counter, or bedside table—and photographing one object against a plain backdrop. This immediate exercise reveals the core principle of minimalist photography: less visual information creates more emotional impact.
Your home already contains everything needed for compelling minimalist images. The soft, directional light filtering through bathroom windows at dawn eliminates harsh shadows that distract from your subject. White walls, bed sheets, or even poster board positioned behind simple objects like coffee cups, houseplants, or geometric kitchen utensils establish the clean negative space that defines minimalism. Professional photographers consistently return to these basic household elements because they allow viewers to focus entirely on form, texture, and light rather than competing visual details.
Minimalist photography doesn’t require exotic locations or specialized gear. It demands intentional seeing—the ability to isolate compelling subjects from visual clutter and arrange them thoughtfully within your frame. A single chrome faucet photographed against bathroom tiles demonstrates this principle as effectively as any gallery piece.
The techniques you’ll explore work within whatever space you currently occupy. Whether you’re shooting with a professional camera or smartphone, the fundamental approach remains identical: eliminate distractions, embrace negative space, and let simplicity amplify your subject’s inherent qualities. Your furniture, architecture, and everyday objects become purposeful compositional elements rather than background noise, transforming familiar environments into powerful photographic opportunities that reveal beauty in restraint.
What Makes Minimalist Photography Work at Home
Minimalist photography strips away the unnecessary to reveal the essence of your subject. At its core, this approach relies on negative space—the empty areas surrounding your main subject—which gives the eye room to rest and draws attention exactly where you want it. Simple subjects work best: think a single coffee mug, a houseplant silhouette, or even the curve of a staircase railing. Limited color palettes create visual harmony, whether you’re working with monochromatic whites and grays or selecting just two complementary colors. Clean compositions eliminate distractions, letting geometry and form take center stage.
Your home is actually the perfect training ground for mastering minimalist photography principles. Unlike outdoor environments where you can’t control changing light or unexpected elements, your domestic space offers consistency. You can position subjects precisely, adjust lighting deliberately, and return to the same setup multiple times to refine your vision. This controlled environment accelerates learning because you can isolate variables and understand exactly how each change affects your final image.
Everyday household items become compelling subjects when you apply minimalist thinking. A single egg on a white plate demonstrates perfect simplicity. Wooden spoons against a neutral wall create striking vertical lines. The shadow cast by window blinds transforms an ordinary wall into a study in pattern and repetition. Fresh fruit—particularly citrus slices backlit on a lightbox or window—offers both color and geometric beauty. Even mundane objects like scissors, keys, or a folded towel reveal unexpected visual interest when isolated against clean backgrounds.
The key is learning to see potential rather than overlooking the familiar. That white ceramic vase you pass daily becomes sculpture when photographed from below against a plain ceiling. Your minimalist practice at home develops the essential skill of recognizing what to include and, more importantly, what to deliberately exclude from the frame.
Window Light: Your Secret Weapon
Side Lighting for Drama and Depth
Position your subject about 45 to 90 degrees from a window to let light rake across surfaces, creating those sought-after shadows that give minimalist images their visual punch. This technique works beautifully for still life arrangements, plant photography, or even simple household objects like a coffee cup or stacked books.
The key is controlling the light’s intensity and direction. Sheer curtains act as natural diffusers, softening harsh sunlight while preserving shadows. For deeper, more defined shadows that add drama, use direct window light without diffusion. Experiment with the distance between your subject and the window—closer placement creates stronger contrast, while moving things farther away produces gentler gradations.
For camera settings, start with ISO 100 or 200 to minimize noise in your clean compositions. Switch to aperture priority mode and set your aperture between f/4 and f/8 for sharp focus while maintaining some background softness. Since you’re working with natural light that may be lower than you expect, watch your shutter speed. If it drops below 1/60th of a second, increase your ISO gradually rather than risking camera shake.
Meter for the highlights or midtones rather than the shadows—those dark areas add depth and shouldn’t be fully recovered. This exposure approach preserves the high-contrast aesthetic that makes minimalist photography compelling while keeping your whites bright and clean.
Backlighting for Silhouettes and High-Key Shots
Windows are your secret weapon for creating dramatic silhouettes and ethereal high-key minimalist photographs without any special equipment. The key is understanding how to work with rather than against strong backlighting.
For silhouettes, position your subject directly between your camera and a bright window. The stark contrast creates those striking dark outlines against luminous backgrounds that define minimalist aesthetics. Think of a simple houseplant, a coffee mug, or even a person standing in profile. The beauty lies in the recognizable shape reduced to its essential form.
Here’s where many photographers stumble: your camera’s meter will try to expose for the bright window, which is exactly what you want for silhouettes. However, if your subject appears too bright and details start showing, use negative exposure compensation—typically minus 1 to 2 stops. This tells your camera to underexpose, preserving that pure black silhouette.
For high-key shots with that sought-after bright and airy feel, you’ll need the opposite approach. Position your subject near but not directly in front of the window, allowing soft light to wrap around it. Switch to spot metering mode and meter directly off your subject rather than the window. This ensures proper exposure on your main element while the background naturally blows out to clean white.
Try this tomorrow morning: place a white ceramic bowl on your windowsill. Using spot metering on the bowl, shoot at the camera’s suggested exposure, then add positive exposure compensation of plus 1 to 1.5 stops. You’ll achieve that dreamy, minimalist brightness that feels both spacious and serene.
Creating Clean Backgrounds Without a Studio
Walls, Sheets, and Paper: Budget-Friendly Backdrop Solutions
You don’t need to invest in expensive backdrops to create stunning minimalist photographs. Your home already contains everything you need for clean, distraction-free backgrounds.
Plain walls are your best starting point. White walls deliver timeless versatility, but don’t overlook colored walls either. Soft grays, muted beiges, and even gentle pastels can add subtle mood without overwhelming your subject. Before shooting, inspect your wall for scuffs, holes, or visible texture that might distract. A quick touch-up with paint or strategic framing can solve these issues. Textured walls like exposed brick or concrete can work beautifully in minimalist compositions when they complement rather than compete with your subject.
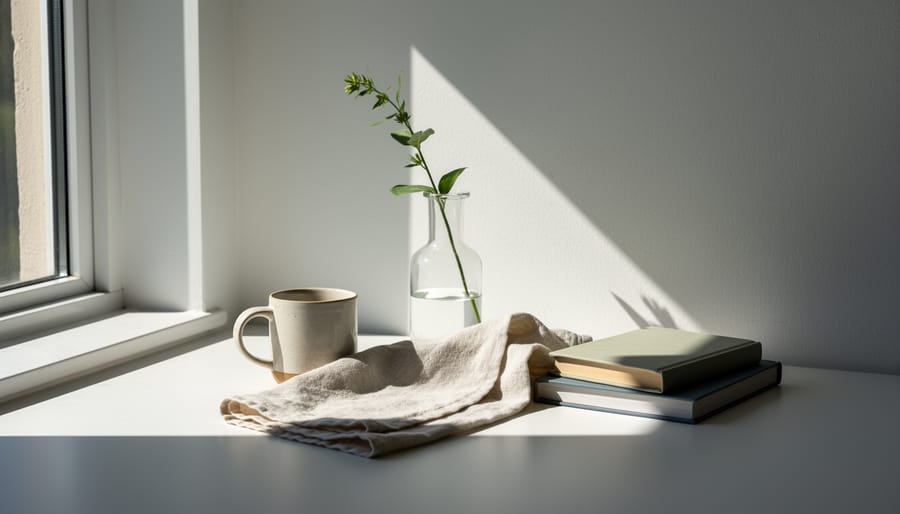
Bed sheets offer portable, affordable alternatives. Choose solid colors in matte fabrics like cotton or linen. Satin and silk create unwanted reflections that complicate lighting. White remains the most versatile choice, but black creates dramatic negative space, while earth tones add warmth. Hang sheets taut using clamps, tape, or a simple tension rod to avoid wrinkles that catch shadows.
Poster boards and foam core panels from craft stores provide rigid, smooth surfaces perfect for smaller subjects like products or still life arrangements. These DIY backdrop solutions cost just a few dollars and store easily.
For color selection, remember that lighter backgrounds reflect more light onto your subject, requiring less artificial lighting. Darker backgrounds absorb light, creating moodier images but demanding stronger light sources. Test how your chosen background color interacts with your subject before committing to a full shoot.
Using Shallow Depth of Field to Simplify Busy Spaces
One of the most effective tricks for creating minimalist images in cluttered spaces is using shallow depth of field to your advantage. By shooting with a wide aperture, you can transform a busy kitchen counter or messy bookshelf into a beautifully simplified backdrop where only your subject remains sharp and defined.
Here’s how it works: when you select a wide aperture like f/1.8, f/2.8, or even f/4, the area of sharp focus becomes quite narrow. Everything in front of and behind your focal point gradually dissolves into a soft, creamy blur called bokeh. That pile of mail on the table or the random household items in the background essentially disappear, leaving only your subject isolated against an unobtrusive wash of color and tone.
For lens selection, prime lenses with wide maximum apertures work beautifully for this technique. A 50mm f/1.8 is affordable and perfect for beginners, while an 85mm f/1.4 offers even shallower depth of field if your budget allows. These focal lengths also provide flattering perspectives for everyday objects and simple still life compositions.
Your focusing strategy matters significantly here. Use single-point autofocus rather than automatic area selection, placing your focus point precisely on the most important part of your subject. For a coffee cup, that might be the rim closest to you. For a plant, focus on the nearest leaves. Get close to your subject while maintaining some distance from the background to maximize the blur effect. The greater the separation between subject and background, the more pronounced the simplification becomes, effectively turning any corner of your home into a minimalist studio.
Everyday Objects as Minimalist Subjects
Kitchen and Dining: Geometry and Repetition
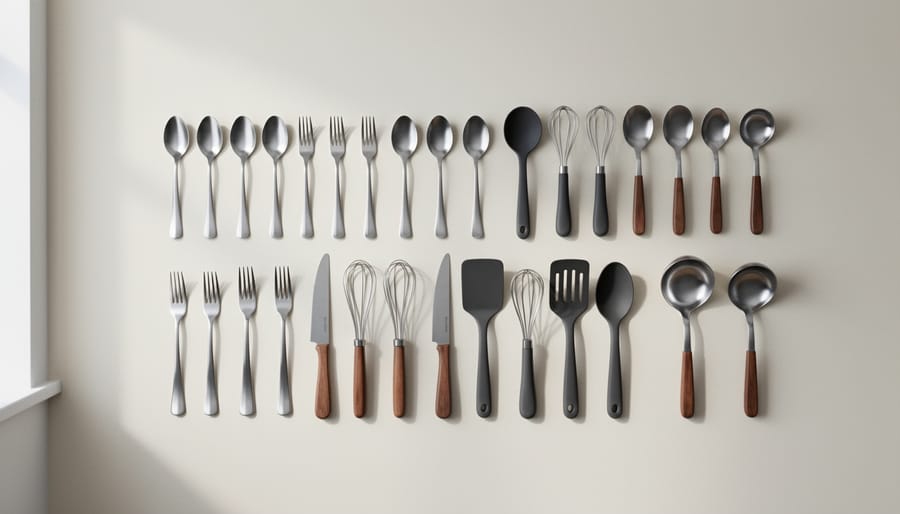
Your kitchen offers an endless supply of minimalist subjects, from the clean lines of flatware to the geometric beauty of dinnerware. The key is seeing these everyday objects with fresh eyes and arranging them thoughtfully to create visual impact.
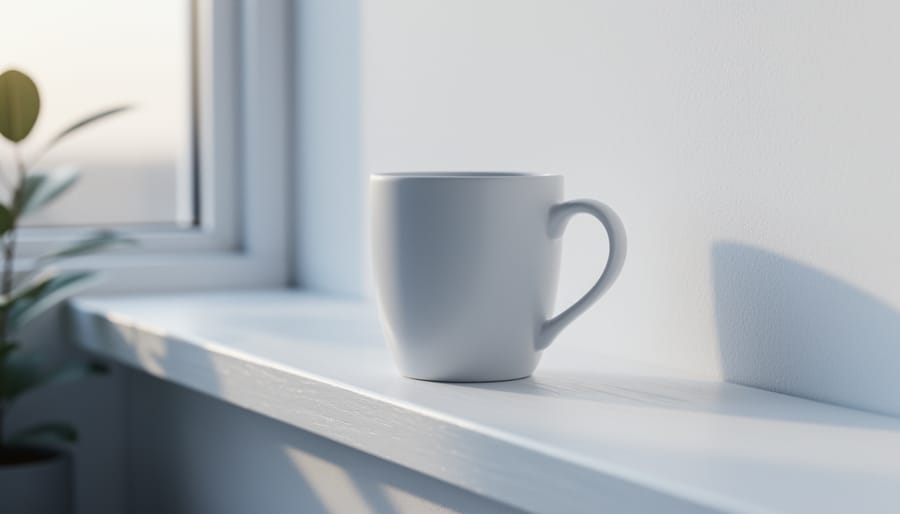
Start with overhead shots, which work beautifully for showcasing symmetry and repetition. Arrange white plates or bowls in a grid pattern against a contrasting surface, leaving equal spacing between each piece. This technique, often called flat lay photography, transforms ordinary dishes into compelling patterns. Try photographing a single coffee cup centered on a plain surface with dramatic natural light casting a long shadow—suddenly, that simple mug becomes a study in form and negative space.
Glassware provides exceptional opportunities for playing with reflections and transparency. Position a clear glass against a window and observe how light passes through it, creating subtle gradations and highlights. You can also experiment with water glasses arranged in a row, photographing them from the side to capture the way light refracts differently through each one.
Utensils are perfect for exploring geometric arrangements. Line up identical forks or spoons in parallel rows, or create radial patterns with knives positioned like clock hands. The repetition of identical objects is a cornerstone of minimalist photography, creating rhythm and visual interest through simplicity alone.
For food photography with a minimalist approach, less is genuinely more. A single orange slice on a white plate, three eggs arranged in a triangle, or uniform pasta shapes scattered across a neutral background can create striking images. The goal is reduction—removing everything that doesn’t contribute to your visual message.
Plants and Natural Elements: Organic Minimalism
Nature provides some of the most compelling minimalist subjects right inside your home. The key is isolating individual elements against clean backgrounds to let their organic beauty shine.
Start with a single houseplant leaf. Position it against a white wall or poster board, using natural window light from the side to create gentle shadows that reveal texture and form. A succulent rosette or monstera leaf makes an excellent subject because of its inherent geometric qualities. Try photographing from directly above to emphasize patterns.
For flowers, resist the temptation to photograph the entire bouquet. Instead, select one bloom and isolate it completely. A simple white backdrop eliminates distractions, while a shallow depth of field (around f/2.8 to f/4) softly blurs any background elements that remain. Early morning light gives flowers a luminous quality that artificial lighting rarely matches.
Branches and twigs offer striking linear compositions. Place a bare branch diagonally across your frame against a neutral background, or experiment with macro photography techniques to capture bark texture and tiny details.
Smooth stones work beautifully for minimalist still life compositions. Arrange two or three stones of varying sizes with intentional spacing, paying attention to negative space. The simplicity creates a meditative quality that defines minimalist photography at its best.

Architecture and Lines: Interior Geometry
Your home is filled with geometric opportunities that become striking minimalist subjects when you shift your perspective. Staircases offer exceptional compositions—shoot from the bottom looking up to capture repeating lines and negative space between railings, or from the top looking down for dramatic perspective. The key is isolating clean lines against simple backgrounds.
Doorways and corners create natural frames within frames. Position yourself to capture a doorway leading into an empty room, using the door frame as a geometric border that draws the eye inward. Corner angles work beautifully when you emphasize the vertical line where two walls meet, especially in rooms with interesting light fall-off that adds dimension without clutter.
Window frames provide ready-made geometric compositions. Shoot parallel to the window for symmetrical grids, or angle your camera at 45 degrees to create dynamic diagonal lines. Early morning or late afternoon light streaming through creates natural contrast between light and shadow.
For architectural details, get close to ceiling moldings, baseboards, or tile patterns. A low angle looking up at where a white wall meets the ceiling creates surprising abstract minimalism. Experiment with unconventional perspectives—lying on the floor or standing on a chair reveals geometry you overlook at eye level. The goal is reducing complex architectural elements to their essential shapes and lines.
Composition Techniques That Elevate Home Minimalism
Mastering Negative Space in Tight Quarters
Small spaces can actually work to your advantage when creating minimalist images. The key is using negative space strategically to draw the eye exactly where you want it to go, transforming cramped quarters into compositions that feel intentional and spacious.
Start by identifying your single point of interest. In a small room, place your subject deliberately using the rule of thirds rather than centering it. Imagine your frame divided into a 3×3 grid, and position your subject where those lines intersect. This creates natural tension and allows the surrounding empty space to breathe, making even a cluttered bedroom feel serene in your final image.
Consider shooting from low or high angles to maximize blank walls or floors as negative space. For example, photograph a single coffee cup on your kitchen table from directly above, letting the table surface fill most of the frame. That empty expanse becomes just as important as the cup itself.
White or neutral walls are your best friends here. Position your subject several feet away from the wall to avoid distracting shadows, and use that blank expanse to create visual breathing room. A simple houseplant against a plain wall suddenly becomes a powerful statement when 70-80 percent of your frame is empty space.
Don’t forget about natural frames within your home. A doorway, window frame, or even the corner where two walls meet can create negative space while adding geometric interest. These architectural elements help guide the viewer’s eye toward your subject without overwhelming the minimalist aesthetic you’re working to achieve.
Color Isolation and Monochromatic Schemes
Color reduction is one of minimalist photography’s most powerful tools, and your home offers countless opportunities to practice this technique. By deliberately limiting your color palette, you create images that feel cohesive, intentional, and visually calm—essential elements of minimalist work.
Start by exploring monochromatic subjects already present in your home. That white coffee mug on a marble countertop, a collection of clear glass bottles on a windowsill, or cream-colored towels draped over a chair all provide ready-made monochromatic scenes. The beauty of this approach is that you’re training your eye to see simplicity in everyday objects. Walk through each room looking specifically for items that share similar hues or exist in neutral territories.
Selective framing offers another effective strategy. Rather than capturing an entire colorful room, isolate a small portion that contains just one or two colors. For instance, if you have a blue ceramic bowl on a wooden table, frame tightly to exclude other distracting elements. This technique transforms ordinary spaces into minimalist compositions without rearranging anything.
Consider black and white conversion as your secret weapon for simplifying complex scenes. When color becomes a distraction rather than an asset, removing it entirely shifts focus to form, texture, and light. Household subjects like window shadows on walls, architectural details, or the interplay between different materials become dramatically more compelling in monochrome. Pay attention to contrast during shooting—high contrast scenes translate beautifully to black and white, creating that striking minimalist aesthetic you’re after.
Camera Settings and Gear for Indoor Minimalist Shots
Good news: you don’t need specialized equipment to create compelling minimalist photographs at home. Most modern cameras, including smartphones, can produce excellent results when paired with thoughtful settings and technique.
For camera settings, start with aperture priority mode (A or Av on your dial) if you’re still building confidence with manual controls. An aperture between f/5.6 and f/8 typically provides sufficient sharpness across your subject while maintaining clean backgrounds. If you’re photographing a single object and want that dreamy, blurred background effect, open up to f/2.8 or wider. The key is intentionality—minimalism thrives on deliberate choices.
Shutter speed becomes crucial when working indoors without a tripod. A general rule: your shutter speed should be at least 1/focal length of your lens. For example, if you’re shooting with a 50mm lens, aim for 1/60th of a second or faster to avoid camera shake blur. When light is scarce and your shutter speed drops too low, don’t be afraid to increase your ISO. Modern cameras handle ISO 1600 or even 3200 remarkably well, and a slight grain is far preferable to a blurry image.
Speaking of lenses, a standard 50mm prime lens is the minimalist photographer’s best friend. It’s sharp, fast (meaning it performs well in low light), and forces you to move around your subject rather than zooming—an excellent discipline for composition. If you only have a kit zoom lens, set it around 35-50mm and resist the temptation to zoom constantly.
Indoor lighting presents the biggest challenge. Natural window light remains your most flattering option—position subjects perpendicular to windows rather than directly in front to avoid harsh shadows. On overcast days, you’ll find beautifully diffused light that eliminates the need for reflectors or fill lights. For evening shoots, a simple LED panel or even a desk lamp can provide sufficient illumination when positioned thoughtfully.
A sturdy tripod isn’t essential, but it opens possibilities for longer exposures and self-timer work, letting you compose precisely without rushing. I’ve created some of my favorite minimalist images using nothing more than my camera propped against a stack of books.
The real secret? Work with what you have, understand your gear’s limitations, and let those constraints fuel creativity rather than frustration.
Post-Processing to Perfect Your Minimalist Vision
Post-processing is where your minimalist vision truly comes together, but the goal here isn’t to pile on effects. Instead, think of editing as refinement—removing distractions and enhancing what already makes your image powerful.
Start by cleaning up your background. Even the most carefully composed shot might have a stray dust particle, a barely-visible cord, or a small blemish on that white wall. Tools like the healing brush or clone stamp in most editing software make quick work of these distractions. I’ve salvaged countless images by spending just two minutes removing elements I didn’t notice during shooting.
For exposure adjustments, minimalist photography often leans toward extremes. High-key images with bright, airy backgrounds create that ethereal feel you see in lifestyle photography. Increase your exposure slightly and lift the shadows to reduce contrast, but watch that you don’t blow out important highlights completely. Low-key work goes the opposite direction—deepen those shadows to create drama while keeping your subject properly exposed. The key is maintaining detail where it matters most.
Negative space deserves special attention during editing. If your background isn’t quite uniform, subtle adjustments to clarity, texture, or even selective color desaturation can help it recede further. This makes your subject stand out without adding busy elements. Sometimes cropping tighter or expanding your canvas slightly can also optimize the balance between subject and space.
When it comes to tools, you don’t need expensive software. Adobe Lightroom remains the industry standard for good reason, offering precise control with an intuitive interface. However, free alternatives like GIMP or mobile apps such as Snapseed provide surprisingly capable editing features. Even your phone’s native photo editor likely has enough adjustment sliders for basic minimalist enhancement.
The golden rule: less is more. If you’re questioning whether you’ve over-processed, you probably have. Minimalist photography should feel effortless and clean, not obviously manipulated. Step away from your edits for a few hours, then return with fresh eyes. Your minimalist vision will reveal itself more clearly with that perspective.
Your home is a treasure trove of minimalist photography opportunities waiting to be discovered. The beauty of this approach is that you don’t need exotic locations or specialized equipment—just a willingness to see everyday spaces through a fresh, simplified lens. Whether it’s morning light streaming through your window, the clean lines of your kitchen counter, or the shadow patterns on your walls, countless compelling images exist within your immediate surroundings.
The key is to start small. Choose just one simple idea from this article today—perhaps photographing a single object against a plain background or capturing the interplay of light and shadow in your living room. Give yourself permission to experiment without pressure. Take multiple shots, adjust your angles, and notice how small changes in perspective can completely transform your composition.
Remember, the constraints of working within your home environment aren’t limitations—they’re creative catalysts. When you can’t rely on dramatic landscapes or exotic subjects, you’re pushed to develop a more refined eye for detail, light, and composition. This discipline makes you a stronger photographer overall. So grab your camera, look around your space with fresh eyes, and discover the minimalist potential that’s been there all along.