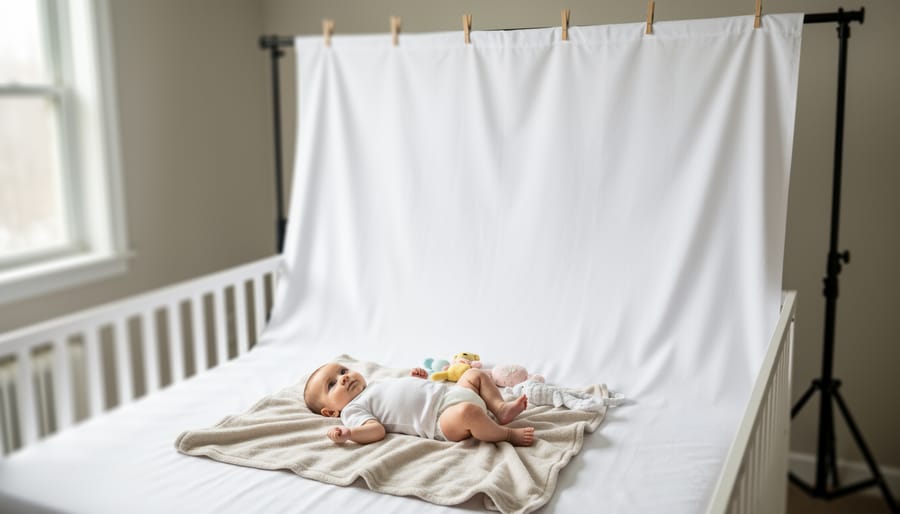
Hang a bedsheet from a curtain rod using binder clips for an instant, wrinkle-free backdrop that photographs beautifully in natural window light. Position your setup perpendicular to a large window, place your baby 3-4 feet away from the fabric to avoid shadows, and you’ll achieve those soft, professional-looking creative baby photos without spending a fortune on equipment.
Secure poster board to a wall with painter’s tape, extending it onto the floor to create a seamless curve that eliminates distracting corners and background lines. This approach works exceptionally well for newborn sessions where you’re photographing from above.
Use a large piece of muslin fabric draped over a foam board leaning against furniture for texture and dimension. The fabric’s natural wrinkles add character rather than looking like mistakes, and you can wash and reuse it indefinitely.
Position any backdrop material taut to minimize wrinkles that become obvious in photos. If wrinkles appear, either embrace them as part of the aesthetic or use a handheld steamer before your session. The key is understanding that professional-looking backdrops don’t require professional equipment, just thoughtful placement of what you already own. Your smartphone or camera will capture stunning images when the backdrop provides clean separation between your baby and the surrounding environment.
Why Backdrops Matter More Than You Think
You might be thinking, “Does a simple backdrop really make that much difference?” The answer is a resounding yes, and once you see the comparison, you’ll never skip this step again.
Think about your typical home environment. There’s probably a stack of laundry waiting to be folded, toys scattered across the floor, or that pile of mail on the counter. These elements aren’t just mildly distracting—they actively compete for attention in your photos. Your baby’s adorable expression gets lost when viewers’ eyes are drawn to the unmade bed in the background or the cluttered bookshelf behind them.
A backdrop does three powerful things simultaneously. First, it eliminates visual noise, creating a clean canvas that prevents distractions. Second, it directs the viewer’s attention exactly where it belongs—on your baby’s tiny fingers, curious eyes, or peaceful sleeping face. Third, it instantly elevates the perceived quality of your photos from casual snapshots to frame-worthy keepsakes.
Consider this real-world scenario: A mother photographed her three-month-old on their living room sofa. The baby was perfectly posed, the lighting was lovely, but the photo included a glimpse of the TV remote, patterned cushions, and part of a window with blinds. She retook the same photo thirty seconds later with a simple cream-colored blanket hung behind the baby. The difference was remarkable. The second image looked professional, timeless, and worthy of birth announcements.
The backdrop didn’t change the baby or the lighting—it simply removed everything that wasn’t essential to the story. That’s the magic you’re after: photos where nothing competes with your subject, where every element serves a purpose, and where the technical quality matches the emotional importance of the moment you’re capturing.
Choosing Your Backdrop Material: What Actually Works
Fabric Backdrops (Muslin, Cotton, and Fleece)
Fabric backdrops offer the perfect combination of affordability and versatility for baby photography. Let’s explore your best options.
Muslin remains the undisputed champion for infant photos, and for good reason. This loosely-woven cotton fabric creates a soft, dreamy texture that photographs beautifully without competing with your baby’s features. Professional photographers favor muslin because it diffuses light naturally and forgives minor wrinkles, which actually add visual interest rather than looking sloppy. You can find muslin backdrops ranging from $15 for basic options to $50 for seamless, studio-quality versions. The fabric’s breathability also makes it safe for babies who might end up face-down during tummy time shots.
Cotton backdrops provide a smoother, more uniform appearance than muslin. They’re ideal when you want a cleaner look without visible texture. Cotton washes exceptionally well, bouncing back from spit-up incidents and diaper mishaps without losing color or shape. This durability makes cotton an excellent investment for parents planning multiple photo sessions.
Fleece deserves special mention for winter-themed shoots. It adds cozy texture and keeps babies comfortable during longer sessions, though it can pill over time with repeated washing. Choose lighter colors in fleece, as darker shades sometimes create unexpected shadows in photos.
All three fabrics are machine-washable, though air-drying prevents shrinkage and maintains texture integrity better than tumble drying.
Paper Backdrops and When to Skip Them
Seamless paper backdrops are the gold standard in professional studios for good reason. They create that clean, polished look without distracting textures or wrinkles, and they come in every color imaginable. However, before you invest in a roll of seamless paper for baby photos, consider the practical challenges.
Paper tears easily, which becomes problematic when working with babies who kick, scratch, or grab at surfaces. One enthusiastic leg thrust can leave you with an unsightly rip right in the middle of your shot. More importantly, seamless paper is designed for single-use scenarios. Once creased or dirtied, you typically need to cut away that section and roll out fresh paper. For babies who may spit up, drool, or have diaper incidents during sessions, this quickly becomes expensive.
If you’re shooting regularly or planning multiple sessions, paper simply isn’t cost-effective. A single roll might only give you a few usable sessions before you’ve exhausted it. For occasional formal portraits where you want that crisp, studio-quality appearance, paper can work beautifully. Just position your baby carefully and keep the session brief. For everyday photos and frequent shoots, though, washable fabric options or even simple bedsheets offer much better value and durability.
DIY Solutions That Don’t Look Homemade
You probably already own several materials that can create stunning backdrops without screaming “homemade.” The key lies in presentation and a few strategic tricks.
Bedsheets work beautifully, but choose solid colors in neutral tones like cream, soft gray, or white. Here’s the secret: iron them thoroughly or toss them in the dryer with a damp towel for 10 minutes before your shoot. Stretch the sheet taut and secure it with clamps or heavy-duty clips at multiple points along the top edge. Gravity does the rest. For baby photography, positioning your little one several feet from the backdrop creates natural depth that blurs any minor imperfections.
Fleece blankets are wrinkle-resistant champions. They drape naturally without creases and add subtle texture to images. Look for minky or plush fabrics that photograph with dimension rather than flatness.
Foam boards from craft stores (around $5-7 each) create seamless paper backdrops when positioned vertically. White or black foam core works for clean, professional-looking shots. Stand them behind your setup or lay them flat beneath your subject for that coveted “floating on white” effect seen in newborn photography.
For more creative DIY backdrop ideas, consider canvas drop cloths from hardware stores. They’re affordable, naturally textured, and surprisingly photography-friendly when steamed to remove warehouse wrinkles. The neutral canvas tone complements any baby outfit while maintaining focus on your subject.
Specialty Options: Faux Fur, Wood Floors, and Textured Surfaces
Dimensional backdrops create visual interest that flat fabrics simply can’t match. Faux fur, in particular, photographs beautifully for baby shots because it adds softness and depth without overwhelming tiny subjects. Choose shorter pile furs in neutral tones like cream, gray, or soft blush for the most versatile results. The texture catches light naturally, creating subtle shadows that add dimension to your images.
Wood floors or wood-look panels offer a timeless aesthetic that works across seasons. Real hardwood can be heavy and expensive, so consider foam wood-look mats designed for photography. They’re lightweight, easy to clean, and photograph remarkably well. Position your baby perpendicular to the wood grain direction to create leading lines that draw the eye naturally through the frame.
Textured surfaces like knit blankets, cable-knit fabrics, or canvas drop cloths provide visual interest without competing with your subject. The key is choosing textures that photograph well at your typical shooting distance. Test beforehand because some patterns create unwanted moiré effects or become distracting blurs.
Safety is paramount with dimensional backdrops. Always ensure surfaces are stable and secure any loose materials that could pose choking hazards. Faux fur sheds, so inspect it before each shoot and never leave baby unattended. Keep sessions short, watch for overheating on plush materials, and prioritize comfort over the perfect shot.
Setting Up Your Backdrop Without Professional Equipment
The Floor Setup (Easiest for New Parents)
The floor setup is hands-down the easiest way to create stunning backdrops quickly, especially when you’re juggling a wiggly baby and limited time. Simply spread your chosen fabric directly on the floor in a well-lit area near a window. This eliminates the need for stands, clips, or any mounting hardware that might topple over.
To add visual interest and depth to your photos, create a gentle curve where the floor meets the wall. Drape your fabric up the wall about two to three feet, allowing it to naturally bow outward. This sweep eliminates the harsh floor-wall corner and gives your images that professional, infinity background look. The curve also provides subtle dimension that makes your baby photos feel less flat.
The biggest challenge with floor setups is keeping the fabric smooth and taut. Babies are surprisingly effective at bunching material during tummy time. Use painter’s tape or masking tape along all edges to secure the fabric to your floor and baseboards. For extra insurance, place heavy books or small weights at the corners outside your frame. Before each shot, smooth out any wrinkles with your hands, working from the center outward.
The Wall-Mounted Approach
The wall-mounted approach is perfect for parents who want a backdrop that stays put through multiple photo sessions without taking up floor space. Command hooks offer the simplest solution for lightweight fabrics like muslin or cotton. Space two large hooks 4-5 feet apart on your wall, making sure they’re level. For a seamless floor-to-wall transition that professional photographers love, let your fabric drape down the wall and pool generously onto the floor, extending at least 3-4 feet outward. This creates that coveted infinity backdrop effect where there’s no visible line between wall and floor.
Tension rods work beautifully in doorways or between walls, supporting fabrics up to medium weight. Measure your space carefully and choose a rod that extends slightly beyond your width for a secure fit. One mom I know keeps a tension rod permanently installed in her nursery doorway, making it easy to clip up different backdrops for various occasions.
For heavier materials or free-standing setups, consider a simple PVC pipe frame. You’ll need two vertical pipes as stands with a horizontal crossbar. Hardware stores will cut pieces to your specifications, typically 6-7 feet tall works well. Use T-joints to connect pieces and sandbags or weighted bases to prevent tipping. This portable option means you can shoot anywhere in your home with good natural light.
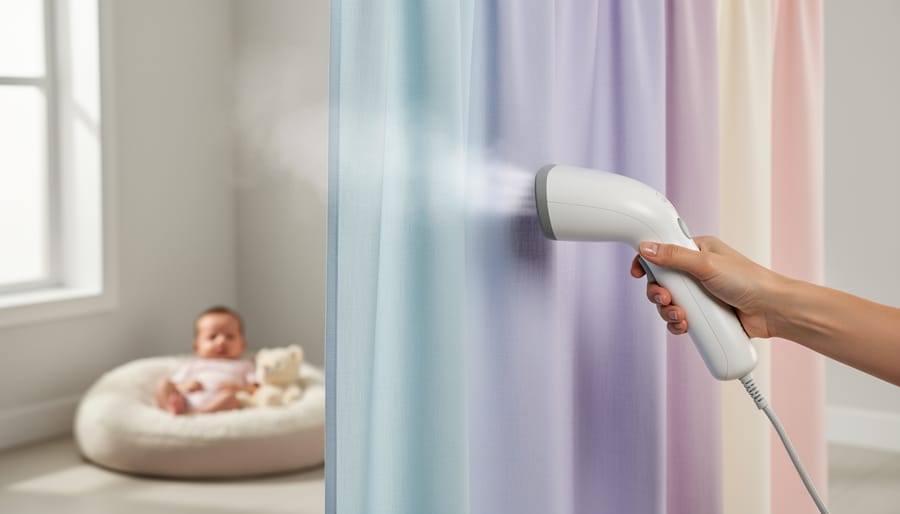
Dealing With Wrinkles and Creases
Nothing ruins a photo faster than a wrinkled backdrop that looks like it spent three weeks crumpled in a box (which, let’s be honest, it probably did). The good news? Most wrinkles are easily fixable with methods you already have at home.
For cotton and muslin backdrops, steaming works beautifully. Hang your backdrop and run a handheld steamer from top to bottom, keeping the nozzle a few inches away from the fabric. If you don’t own a steamer, here’s the professional photographer’s trick: toss the backdrop in the dryer with a damp towel for 10-15 minutes on medium heat. The moisture creates steam that releases wrinkles without direct contact.
Polyester and vinyl backdrops respond well to low-heat ironing, but always place a thin cloth between the iron and backdrop to prevent melting or shine marks. Work in sections on the reverse side when possible.
Paper backdrops present a different challenge since you can’t iron or steam them. Your best bet is prevention: store them rolled rather than folded, and unroll them 24 hours before your shoot to let gravity do its work.
For stubborn creases in fabric backdrops, lightly mist with water from a spray bottle and let them hang overnight. The weight of the damp fabric naturally pulls wrinkles out. Whatever method you choose, test on a small corner first, especially with delicate materials.
Color and Pattern Strategy for Baby Photos
Neutral Backdrops: Your Safest Bet
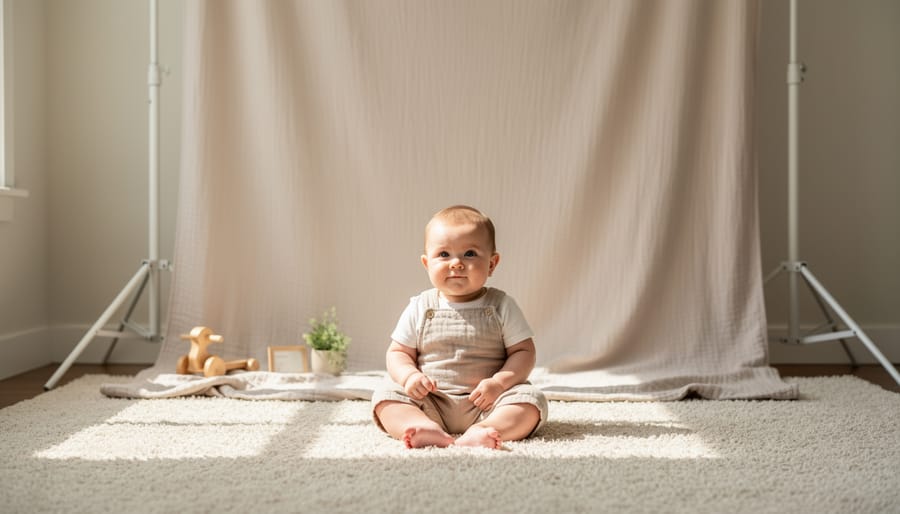
When you’re photographing your baby, neutral backdrops are genuinely your best friend. Think whites, soft creams, gentle grays, and warm tans. These colors work like magic because they create a timeless quality that won’t look dated when you’re flipping through these photos ten years from now.
Here’s the practical truth: babies are already the stars of the show with their expressive faces, tiny features, and adorable outfits. A neutral backdrop simply steps back and lets your little one shine without visual competition. That bold patterned sheet might seem fun today, but it can quickly distract from those precious details you want to remember—those tiny fingers, that milk-drunk smile, those brand-new eyelashes.
Neutral backgrounds also give you incredible flexibility. You can photograph your baby in a bright yellow onesie one day and a pastel pink dress the next, and both images will look cohesive in your collection. Professional photographers rely on neutrals for exactly this reason—they’re universally flattering and work with any skin tone, lighting condition, or outfit choice.
If you’re worried about neutral seeming boring, remember that texture adds visual interest without adding distraction. A cream muslin blanket or a chunky knit throw in soft gray creates depth while maintaining that clean, focused aesthetic that makes baby photos truly timeless.
When to Use Bold Colors and Patterns
While neutral backdrops work beautifully for everyday photos, there are moments when bold colors and playful patterns truly shine. These bolder choices help tell a story and create images that immediately communicate the occasion or mood you’re capturing.
Holiday photos are perfect opportunities to embrace colorful backdrops. A rich red fabric or holiday-themed pattern instantly signals Christmas photos, while pastel florals scream Easter morning. For Halloween, an orange or black backdrop with subtle patterns creates festive energy without overwhelming your little one’s adorable costume. The key is letting the backdrop support the theme rather than compete with your subject.
Birthday shoots benefit tremendously from vibrant choices. That first birthday smash cake session? A cheerful polka dot or striped backdrop in coordinating colors makes the celebration feel special in photos you’ll treasure forever. For milestone moments like starting school or losing that first tooth, a colorful backdrop adds excitement and marks the occasion as significant.
Seasonal shoots outside traditional holidays also work wonderfully with patterns. Spring photos pop against floral prints, while autumn family portraits gain warmth from rust or mustard-colored backdrops. Even simple geometric patterns can add visual interest to summer beach-themed indoor sessions.
The guideline here is intentionality. Bold choices should enhance your story, not distract from it. If you’re documenting a specific moment or celebration, a patterned or colorful backdrop reinforces that narrative. For casual everyday photos, save these dramatic options and stick with simpler choices that keep the focus on your growing baby.
Lighting Your Backdrop for Professional-Looking Results
Here’s the truth: even the most beautiful backdrop you’ve created can fall flat with poor lighting. The good news? You don’t need expensive studio equipment to make your backdrop shine. Understanding a few basic principles will transform your results dramatically.
Natural window light is your best friend when you’re starting out. Position your backdrop perpendicular to a large window rather than directly in front of it. This creates soft, directional light that adds dimension without harsh shadows. I’ve photographed countless babies this way, and parents are always amazed at how professional their photos look with nothing more than window light and a simple muslin backdrop. The key is timing: shoot during mid-morning or mid-afternoon when the light is bright but not directly overhead.
If you’re shooting in the evening or your space lacks good natural light, one basic continuous LED light or speedlight can work wonders. Many photographers achieve stunning results with using just one light positioned at a 45-degree angle to their subject. Place the light source slightly above eye level and off to one side to create gentle modeling that brings your subject away from the background.
Watch for three common lighting pitfalls: shadows cast onto your backdrop from your subject, hotspots where light hits too directly, and uneven illumination across the backdrop’s surface. To minimize shadows, increase the distance between your subject and the backdrop. For hotspots, diffuse your light source with a white sheet or purchase an inexpensive softbox. Uneven tones often result from lighting that’s too close to the backdrop, so pull your light back and angle it more toward your subject.
Advanced techniques like portrait lighting techniques including rim lighting or multiple light setups can elevate your work further, but mastering these basics first will serve you well for years to come.
Common Backdrop Mistakes That Ruin Otherwise Great Photos
Even experienced parents fall into the same backdrop traps that can sabotage an otherwise adorable photo session. The good news? These mistakes are easy to fix once you know what to look for.
The most common culprit is wrinkled fabric. Those creases cast shadows that draw attention away from your baby and create distracting lines across your images. If you’re working with muslin or cotton, iron it thoroughly before your shoot, or hang it with steam from your shower running for 15 minutes. For stubborn wrinkles during a session, a handheld steamer becomes your best friend. I learned this the hard way after shooting my nephew’s six-month photos only to discover every single image featured a prominent diagonal crease right behind his head.
Busy patterns present another frequent problem. That adorable floral sheet might look perfect in your nursery, but on camera, it competes with your baby for attention. Your eye literally doesn’t know where to focus. Stick with solid colors or very subtle textures, especially when you’re starting out. Think of your backdrop as the supporting actor, not the star.
Poor lighting creates the third major issue. Positioning your backdrop too close to a wall without adequate space for light can result in harsh shadows that make your setup look flat and amateur. Leave at least two feet between your backdrop and the wall, and use natural window light from the side rather than directly behind you.
Finally, many parents choose backdrops that clash with their baby’s skin tone. A bright white backdrop can wash out fair-skinned babies, while very dark colors may not provide enough contrast. Soft neutrals like cream, gray, or pale blue work beautifully across different skin tones and create that timeless look you’ll treasure for years.
Budget Breakdown: What You Actually Need to Spend
Let’s be realistic about what you’ll actually spend on a backdrop for your baby photos, because I’ve seen parents drop serious money on elaborate setups they use exactly twice.
For the under $20 category, you have surprisingly solid options. A flat twin-size bed sheet from your linen closet costs nothing and works beautifully for newborns—just make sure it’s wrinkle-free. If you’re buying new, a seamless paper roll from craft stores runs about $8-12 and gives you that clean studio look without texture distractions. A foam core board ($5 at dollar stores) creates a perfect small-scale setup for those adorable detail shots of tiny hands and feet. The downside? Paper tears easily, and foam boards show wear quickly if you’re planning weekly photo sessions.
The $20-50 sweet spot offers the best value for most parents. Muslin backdrops ($25-35) are my top recommendation because they’re durable, washable, and forgiving—wrinkles actually add texture that looks intentional. Collapsible pop-up backgrounds ($30-45) are worth considering if storage space is tight in your home. You’ll also find quality fabric yardage at this price point—buy 2-3 yards of cotton canvas or linen, and you’ve got a versatile backdrop that grows with your baby.
Beyond $50, you’re looking at professional-grade options like hand-painted canvas backdrops or premium vinyl rolls. These make sense if you’re photographing multiple children over the years or developing a serious photography hobby. A quality vinyl backdrop ($60-80) wipes clean and lasts for years, which justifies the cost if you calculate price-per-use.
The honest truth? Most parents get exceptional results spending $30 or less. Save your budget for good natural lighting instead.
You don’t need a Pinterest-worthy setup to capture beautiful photos of your baby. Start with what you already have—a blank wall, a bedsheet, or even a clean floor near a window. The most captivating baby photos aren’t remembered for their flawless backdrops; they’re cherished for those fleeting expressions, tiny yawns, and genuine smiles that you’ll never get back.
Give yourself permission to experiment without pressure. Try hanging that neutral blanket you already own, test different lighting throughout the day, and take plenty of shots. You’ll quickly discover what works in your space and with your baby’s temperament. Remember, a simple, slightly wrinkled backdrop with your baby’s delighted giggle beats a perfectly ironed studio setup with a fussy infant every time.
Here’s your immediate next step: grab a solid-colored sheet from your linen closet, find the brightest natural light in your home, and take five photos right now. You’ll be amazed at what you can create with just these basics.