Nothing ruins a potentially spectacular photograph faster than soft, out-of-focus subjects. That split-second moment you captured—your child’s first steps, a hummingbird hovering at a flower, a landscape bathed in golden hour light—becomes unusable because your camera focused on the wrong element or missed focus entirely. Understanding how your camera’s autofocus system works transforms these frustrating missed shots into consistently sharp images that showcase your creative vision.
Modern autofocus systems contain sophisticated technology that can track moving subjects, detect eyes and faces, and adjust focus in milliseconds. Yet many photographers never move beyond the default settings, leaving their camera’s full potential untapped. The difference between someone who occasionally gets sharp photos and someone who consistently nails focus lies not in expensive gear, but in understanding when to use single-point versus zone focusing, how to leverage continuous autofocus for moving subjects, and why sometimes manual focus delivers better results than any automated system.
This guide breaks down everything from how phase-detection and contrast-detection systems actually work to practical scenarios where specific AF modes excel. Whether you’re struggling with backlit portraits that focus on the background, sports shots that miss the critical moment, or low-light situations where your camera hunts endlessly for focus, you’ll discover concrete techniques to master one of photography’s most essential fundamentals.
The Science Behind Sharp Photos
What ‘In Focus’ Really Means
When we say an image is “in focus,” we’re really talking about which parts of your scene appear sharp and well-defined. At a technical level, focus is about where light rays converge precisely on your camera’s sensor. When everything aligns correctly, you get that crisp, detailed rendering we all want.
Here’s the key concept: your camera doesn’t focus on everything at once. Instead, it focuses on a specific distance from the lens, creating what photographers call the plane of focus—an imaginary slice through your scene where sharpness peaks. Everything at that exact distance appears sharpest, while objects closer or farther away gradually become softer and less defined.
Think of it like this: if you focus on someone’s eyes in a portrait, their eyes sit right on that plane of focus and appear razor-sharp. Their ears might be slightly softer, and the background behind them progressively blurs. This variation in sharpness across the frame isn’t a mistake—it’s how optical physics works.
The practical takeaway? Understanding that focus creates a zone of acceptable sharpness rather than making everything equally sharp helps you make better decisions about where to place your focus point and how to use it creatively in your compositions.

Why Some Cameras Focus Better Than Others
Not all cameras focus equally well, and understanding why helps you choose the right gear and work within your equipment’s capabilities. Three main factors determine focusing performance: sensor size, lens quality, and the sophistication of the autofocus system itself.
Sensor size plays a surprisingly significant role. Full-frame sensors typically offer better low-light autofocus performance compared to smaller sensors because each photodiode receives more light. This means your camera can confidently lock focus in dimmer environments like indoor events or twilight landscapes. Crop-sensor cameras have improved dramatically, but physics still favors larger sensors when light gets scarce.
The connection between lens quality affects focusing speed and accuracy is substantial. Premium lenses feature faster, quieter autofocus motors and better optical designs that help your camera’s system work more efficiently. A professional-grade lens on an entry-level body will often focus faster than a budget lens on a flagship camera. The lens aperture matters too—wider maximum apertures give the autofocus system more light to work with and enable more precise focus, especially with phase-detection systems.
The autofocus system itself varies tremendously between camera models. Entry-level cameras might have 9-45 focus points, while professional bodies boast hundreds or even thousands of selectable points covering most of the frame. Modern mirrorless cameras with on-sensor phase detection can focus almost anywhere in the frame, offering flexibility that older systems simply cannot match. Some cameras also feature dedicated processors for autofocus calculations, dramatically improving tracking performance for moving subjects.
Manual Focus: The Foundation Every Photographer Should Know
When to Ditch Autofocus Completely
While autofocus technology has become remarkably sophisticated, there are specific situations where taking manual control isn’t just helpful—it’s absolutely necessary. Understanding these scenarios will save you from frustration and missed shots.
Macro photography is perhaps the most common situation where manual focus reigns supreme. When you’re shooting extreme close-ups of insects, flowers, or product details, your depth of field might be measured in millimeters. Autofocus systems simply can’t determine which precise point you want sharp within such a narrow plane. You need the control to place focus exactly where you envision it, often making minute adjustments while slightly shifting your camera position.
Low-light environments frequently cause autofocus to hunt endlessly, searching for contrast to lock onto. Concert venues, nighttime cityscapes, or dimly lit interiors can leave your camera pulsing back and forth without ever achieving focus. Switching to manual lets you set focus based on a known distance or by using live view magnification to confirm sharpness.
Video work demands smooth, intentional focus transitions. Autofocus can create distracting pulsing or suddenly shift to unintended subjects during a take. Professional videographers rely on manual focus with follow-focus systems to create those beautiful rack-focus effects you see in films.
Shooting through obstacles like windows, fences, or foliage presents another challenge. Your autofocus will almost always grab onto the foreground obstruction rather than your intended subject beyond it. Manual focus lets you look past these barriers entirely.
Finally, repetitive subject patterns—think venetian blinds, chain-link fences, or wallpaper—confuse autofocus systems because there’s too much contrast information without a clear priority. Manual focus cuts through this confusion instantly.
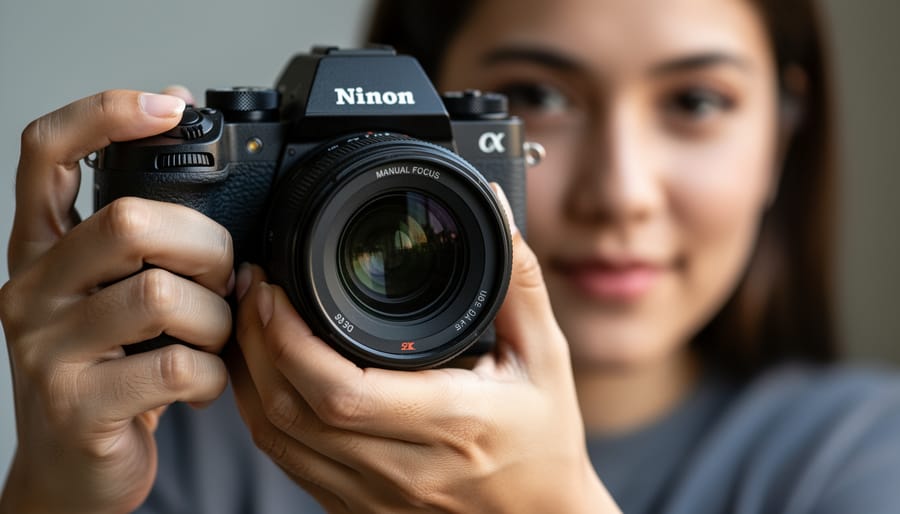
Mastering Your Focus Ring
Manual focusing might seem old-fashioned, but it’s an essential skill that gives you complete creative control. Even in our autofocus-dominated world, situations like low light, macro work, or shooting through glass require confident manual focus techniques.
Start by switching your lens to manual focus mode using the switch on the lens barrel. Your viewfinder will still show focus confirmation indicators—those helpful dots or highlights that light up when something’s sharp—but you’re in the driver’s seat now.
Live view is your secret weapon for precision. When you engage live view on your camera’s LCD screen, you can magnify the image 5x or 10x to see exactly what’s sharp. This technique is invaluable for landscape photographers working on tripods or anyone shooting critical product work. Simply navigate to the area you want sharp, press the magnification button, and fine-tune your focus ring until everything looks crisp.
For handheld shooting, developing muscle memory makes all the difference. Practice the “rock and roll” technique: set your focus to approximately the right distance, then gently rock your body forward and backward while watching through the viewfinder. When your subject snaps into focus, release the shutter. This works beautifully for portraits and wildlife when combined with holding your camera steadily.
Remember, your focus ring has mechanical feedback—learn to feel the resistance and understand how much rotation moves focus from near to far. With practice, you’ll instinctively know where to set it.
Autofocus Systems Demystified
Phase-Detect vs. Contrast-Detect: What Actually Matters
Your camera likely uses one of two autofocus technologies, and understanding the difference can help you predict how your camera will behave in different shooting situations.
Contrast-detect autofocus works like squinting to read fine print. Your camera analyzes the contrast between adjacent pixels on the sensor, hunting back and forth until it finds the sharpest possible image. Think of it as your camera saying “sharper… sharper… too far… back a bit… perfect!” This system is incredibly accurate because it’s reading directly from the imaging sensor itself. However, that hunting process takes time, making contrast-detect slower, especially in low light or with distant subjects.
Phase-detect autofocus takes a different approach. Dedicated sensors (either on a separate autofocus module or embedded in the imaging sensor) split incoming light and compare the two images. If they don’t align, the system instantly knows which direction to focus and by how much. No hunting required. It’s like having a rangefinder that tells you exactly where to aim rather than trying different distances until something looks right.
In practical terms, phase-detect excels at tracking moving subjects. Wildlife photographers, sports shooters, and anyone photographing active children benefit enormously from its speed and decisiveness. Contrast-detect shines for stationary subjects where precision matters most, like macro photography or product shots, though modern hybrid systems are blurring these distinctions.
Many current cameras use hybrid systems that combine both technologies, employing phase-detect for quick initial acquisition and contrast-detect for final fine-tuning. This gives you the best of both worlds: speed when you need it and accuracy when precision counts. Understanding which system your camera prioritizes helps you anticipate its behavior and choose appropriate focus modes for your subject.
Understanding AF Points and Coverage Areas
When you look through your camera’s viewfinder or at the live view screen, you’ll notice several small squares, rectangles, or dots scattered across the frame. These are your autofocus points, and understanding how they work can dramatically improve your ability to capture sharp images exactly where you want them.
Think of AF points as individual focus sensors that your camera uses to determine what’s sharp. Entry-level cameras might have 9 to 11 points, while advanced models can feature over 100, sometimes covering nearly the entire frame. More points generally mean more flexibility in composition, since you can place focus precisely without constantly recomposing your shot.
Here’s where it gets interesting: not all AF points are created equal. Many cameras feature cross-type sensors at certain points, typically in the center. While standard AF points detect contrast in one direction (either horizontal or vertical lines), cross-type sensors read both directions simultaneously. This makes them significantly more accurate and faster, especially in challenging lighting or with low-contrast subjects. If you’re photographing something critical, positioning a cross-type point on your subject gives you the best chance of nailing focus.
Coverage area matters more than you might think. A camera with points clustered in the center forces you to focus-and-recompose when shooting off-center subjects, which can introduce focus errors, particularly at wide apertures. Modern cameras with edge-to-edge coverage let you compose freely while maintaining focus accuracy, making them invaluable for action photography or creative compositions where your subject isn’t centered.
Choosing the Right Autofocus Mode for Every Situation
Single-Shot AF: For Stationary Subjects
Single-shot autofocus (AF-S on Nikon, One-Shot AF on Canon) is your go-to mode when photographing subjects that aren’t moving. Think portraits, landscapes, architecture, still life setups, or macro photography. When you half-press the shutter button, the camera locks focus and holds it until you either take the shot or release the button. This lock gives you control and consistency, which is exactly what you need for stationary subjects.
Here’s where the focus-and-recompose technique becomes invaluable. Say you’re shooting a portrait and want your subject’s eye sharp, but it’s not covered by any of your active focus points. Simply position your center focus point over the eye, half-press to lock focus, then recompose your frame while keeping that half-press engaged. Once you’ve got your composition right, press fully to capture the shot.
One caveat with focus-and-recompose: it works best at moderate distances and smaller apertures. At very close distances or when shooting wide open at f/1.4 or f/1.8, even slight movements after locking focus can shift your focal plane enough to miss critical sharpness. In these situations, consider using a focus point that’s already positioned where you need sharpness, rather than relying on the recompose method.
Continuous AF: Tracking Moving Subjects
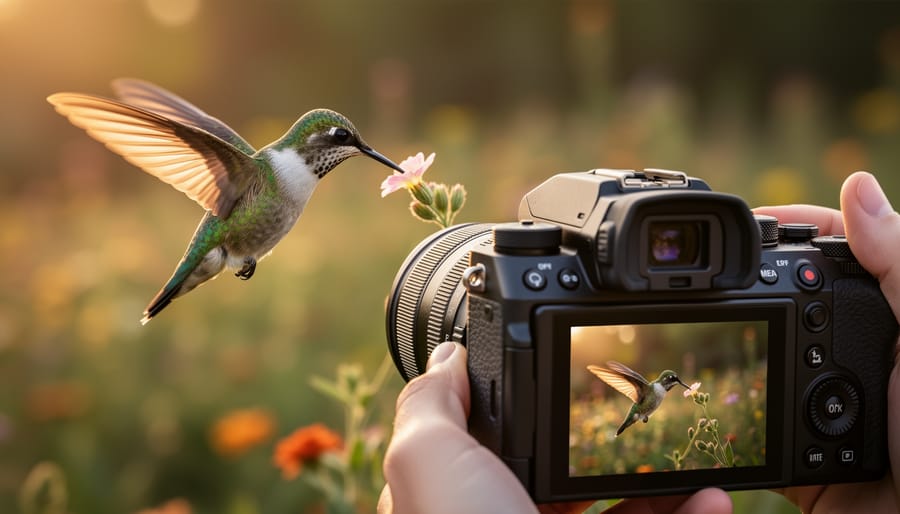
When your subject refuses to stay still, Continuous Autofocus (AI Servo on Canon, AF-C on Nikon and Sony) becomes your essential tool. This intelligent focusing mode continuously adjusts focus as your subject moves, making it indispensable for sports, wildlife photography, and capturing energetic kids or pets.
Unlike Single AF that locks focus once and stops, Continuous AF employs predictive focusing algorithms. Your camera doesn’t just track where your subject is right now—it calculates where it will be the moment the shutter fires. Modern cameras analyze the subject’s speed, direction, and acceleration, adjusting focus dozens of times per second to keep pace.
Here’s how to maximize your success: First, select an appropriate AF area mode. For erratically moving subjects, like birds in flight, a wide or zone AF area helps maintain tracking even if the subject temporarily leaves your selected point. For more predictable movement, like a runner approaching you, a smaller cluster of points provides more precise control.
Half-press your shutter button early to give your camera time to lock onto and begin tracking the subject. The longer it tracks before you shoot, the better it predicts movement patterns. Keep your selected AF area on the subject—the camera is smart, but it needs your guidance about what to follow.
Modern cameras also incorporate subject detection (people, animals, vehicles), which dramatically improves tracking reliability by recognizing and following specific subject types even through obstacles or rapid movement changes.
Automatic AF Mode: When It Works (And When It Doesn’t)
Automatic AF mode hands over focusing decisions entirely to your camera, and honestly, modern systems are pretty impressive at making the right call. This mode shines in dynamic, unpredictable situations where you need to shoot fast and can’t fiddle with settings. Think street photography, candid family moments, or travel scenarios where subjects constantly shift between stationary and moving.
Your camera analyzes the scene, detects motion, and switches between single-shot and continuous focusing automatically. It also selects focus points based on what it thinks is your subject, usually prioritizing whatever’s closest or shows the most contrast. For casual shooting, this convenience is hard to beat.
However, automatic mode has clear limitations. It struggles with intentional composition choices where your subject isn’t center-frame or closest to the camera. Portrait photographers often find the camera focusing on a nose instead of eyes. It can get confused by busy backgrounds, low contrast scenes, or when shooting through obstacles like fences or glass. Wildlife and sports photographers rarely trust it because they need precise control over tracking behavior.
The verdict? Automatic AF works beautifully for everyday shooting and situations demanding speed over precision. But once you’re deliberately composing shots or working in challenging conditions, manual mode selection gives you the predictability serious photography requires.
Focus Area Selection: Where to Tell Your Camera to Look
Single Point: Maximum Control
Single-point autofocus gives you the ultimate control over exactly where your camera focuses. Instead of letting the camera choose from multiple focus points, you select one specific point and place it precisely on your subject. This precision is especially valuable when you’re composing intentionally and want your subject positioned off-center for more dynamic compositions.
Here’s a practical example: imagine photographing a portrait where you want your subject positioned on the left third of the frame, following the rule of thirds. With single-point AF, you’d select the focus point that aligns with your subject’s eye, focus, and shoot. The camera won’t get confused by the negative space on the right side of your frame.
To use single-point effectively, access your camera’s focus point selection menu and choose the point closest to where your subject will appear. For stationary subjects like landscapes, portraits, or product photography, this mode delivers consistently sharp results exactly where you intend. The technique requires slightly more attention than automatic selection, but the payoff in compositional control and focusing accuracy makes it worthwhile for deliberate photography.
Zone and Wide Area: For Unpredictable Action
When your subject’s movement becomes less predictable—think wildlife changing direction, a toddler running erratically, or athletes moving across the frame—it’s time to expand your focus area beyond a single point. Zone AF and wide-area AF modes give your camera more freedom to track subjects as they move, balancing your creative control with the flexibility needed for dynamic situations.
Zone AF divides your frame into clustered groups of focus points. Instead of relying on one precise point, the camera monitors several adjacent points within your selected zone, maintaining focus even when the subject shifts slightly within that area. This works brilliantly for birds in flight that might bob up and down, or soccer players weaving through defenders. You’re still choosing the general area where focus should occur, but you’re not locked into a single tiny point that’s easy to lose.
Wide-area AF takes this further, using most or all available focus points simultaneously. Modern cameras employ sophisticated algorithms to identify and prioritize subjects across the entire frame. This proves invaluable when you simply can’t predict where action will happen—imagine photographing a breakdancing performance or multiple children playing tag.
The trade-off? Less precision in exactly what gets prioritized. Your camera might occasionally focus on a foreground element rather than your intended subject. That’s why these modes work best when there’s clear subject separation from the background, or when you’re combining them with subject detection features that help the camera understand what you want sharp.
Modern Autofocus Features That Change Everything
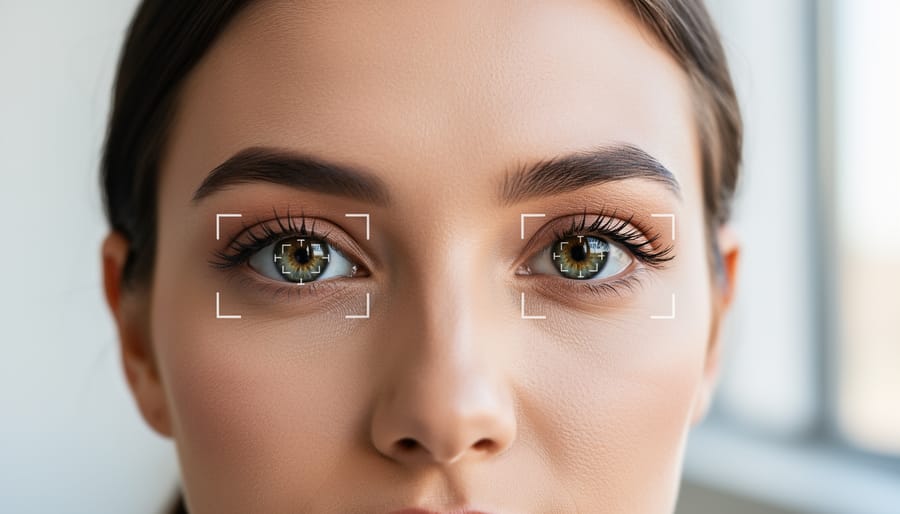
Eye Autofocus: Portrait Photography’s Best Friend
Eye autofocus has revolutionized portrait photography by solving one of the trickiest challenges: keeping your subject’s eyes tack-sharp even when they’re moving. The technology uses sophisticated algorithms and machine learning to detect and track human eyes within your frame, automatically prioritizing them as your focus point.
Here’s how it works: your camera’s processor analyzes the scene, identifies faces, then zeros in on the eyes. Most modern systems can even distinguish between left and right eyes, letting you choose which to prioritize or automatically selecting the nearest one. As your subject moves or turns their head, the system continuously tracks and refocuses—often faster and more accurately than manual selection.
For wedding and portrait photographers, this feature has become indispensable. Imagine photographing a bride walking down the aisle or children playing at a family session. Instead of constantly adjusting focus points while composing, you can concentrate on capturing emotion and timing while your camera handles focus precision.
However, eye AF isn’t perfect. It struggles in low light, can be confused by sunglasses or heavy shadows across the face, and may hunt between multiple subjects in group shots. It also drains battery faster than traditional autofocus. Despite these limitations, once you’ve experienced consistently sharp eyes in your portraits, it’s hard to shoot without it.
Subject Tracking and Recognition
Modern cameras have become remarkably intelligent, going far beyond simple focus tracking. Today’s autofocus systems can actually recognize what you’re photographing and adjust their behavior accordingly.
Animal detection has revolutionized wildlife and pet photography. These systems identify eyes, faces, and bodies of various creatures—from birds to cats to dogs—and prioritize them for focus. If you’ve ever struggled to nail focus on a dog running toward you, animal detection makes it dramatically easier by maintaining lock on the eye even as the subject moves unpredictably.
Vehicle tracking works similarly for motorsports and action photography. The camera recognizes cars, motorcycles, and even bicycles, predicting their movement patterns to maintain sharp focus through rapid direction changes.
Some cameras now offer additional specialized modes like train detection or airplane tracking. While these might seem niche, they demonstrate how intelligent modern autofocus has become at understanding scene context.
The practical benefit is simple: you can concentrate on composition and timing while the camera handles the technical challenge of maintaining focus. These modes work best in continuous autofocus with wide area coverage, allowing the camera’s processor to scan the frame and identify your subject automatically. For photographers shooting fast-moving subjects regularly, these features transform difficult shots into reliably sharp captures.
Troubleshooting Common Focus Problems
When Your Camera Won’t Focus at All
There’s nothing more frustrating than pressing the shutter button and hearing your camera hunt back and forth, refusing to lock focus. When your autofocus system completely fails to cooperate, it’s usually telling you something specific about the shooting conditions.
The most common culprit is insufficient contrast. Autofocus systems detect edges and contrast differences to determine focus, so if you’re pointing at a blank white wall, cloudless blue sky, or uniform surface, your camera simply has nothing to grab onto. The solution is to find an edge or textural detail in your scene—look for where colors meet, patterns exist, or shapes create boundaries. In a pinch, temporarily aim at something with more detail at the same distance, lock focus, then recompose.
Low light situations present similar challenges. When there’s not enough light for your AF sensors to see clearly, they’ll struggle or refuse to engage. Many cameras include an AF-assist beam—that little red or orange light that fires from the front—which can help in darker environments. Alternatively, use a flashlight to temporarily illuminate your subject while focusing, or switch to manual focus and use your camera’s focus magnification feature.
Focus distance problems occur when you’re too close to your subject. Every lens has a minimum focusing distance, and violating it means your AF won’t work. Check your lens specifications or simply back up a bit. Finally, if nothing works, dirty lens contacts or a loose lens mount might prevent communication between lens and body. Remove and reattach your lens, and gently clean the electronic contacts with a microfiber cloth.
Fine-Tuning Autofocus Accuracy
If you’ve ruled out user error and lens issues but still experience consistently soft images with specific lenses, your camera and lens may need autofocus calibration. This process, called AF microadjustment on Canon cameras or AF fine-tune on Nikon, compensates for minor discrepancies between where your camera thinks focus should be and where it actually lands.
Many mid-range and professional cameras include built-in microadjustment features in their menus, allowing you to adjust focus forward or backward in small increments for individual lenses. You can test your system by photographing a focus chart or ruler at a 45-degree angle at various distances. If the sharpest point consistently falls in front of or behind your focus point, adjustment is warranted.
However, proceed with caution. Incorrect microadjustment can make matters worse, and different shooting distances may require different adjustments. If you’re uncomfortable performing this yourself or notice severe focus issues across multiple lenses, professional calibration is your best option. Camera repair centers have specialized equipment to precisely align your camera body and lenses.
Remember that microadjustment addresses consistent directional errors, not random focusing problems. If your focus accuracy varies unpredictably, the issue likely lies elsewhere in your technique or equipment condition.
Understanding focus is one of the fundamental photography skills that will serve you throughout your entire photographic journey, regardless of whether you’re shooting with an entry-level DSLR or the latest mirrorless flagship. While camera technology continues to evolve at a remarkable pace, the principles of achieving sharp focus remain constant. Mastering these fundamentals gives you the creative freedom to capture exactly what you envision, whether that’s a perfectly crisp portrait with dreamy background blur or a landscape where every element from foreground to horizon is tack-sharp.
The beauty of focus mastery is that it’s entirely achievable through deliberate practice. Start with simple exercises: photograph a stationary subject using each AF mode to understand their characteristics, then progress to tracking moving subjects at different speeds. Practice switching between AF area modes without looking at your camera until it becomes second nature. Challenge yourself to nail focus in difficult conditions like low light or low contrast scenes.
Remember, even the most advanced autofocus system is simply a tool. Your understanding of when and how to use each focusing mode transforms that tool into a creative asset. As you continue developing your skills, you’ll find that confident focus control opens doors to photographic opportunities you might have previously avoided. Start today by choosing one focusing technique from this article and dedicating your next shooting session to practicing it until it feels intuitive.